Quick Summary
This article explains how to integrate Shopify with Zapier to automate routine eCommerce processes. Connect apps to create workflow automations (Zaps), and explore real-world examples of useful Shopify-Zapier configurations. Check out pricing tiers, common issues, and FAQs to boost store operations and reduce manual labor in no time.
Table of Contents
Running an online store means keeping an eye on every detail, from taking orders and managing inventory to talking with customers and running marketing. Doing all of these tasks manually loses time, leads to mistakes, and is simply inefficient. By using the Zapier Shopify integration, you can automate all these tasks easily for any business.
This article shows you how to connect Zapier to Shopify. It also covers the basics like setting up the app and advanced automation techniques. This will completely change how your online store works! Save hours each week and make your business and customers happier with the Shopify Zapier integration. So, let’s get started…
What is Zapier?
Zapier is a leading automation tool that connects over 8,000 apps without any coding. It automates tasks called “Zaps,” making it easy to link different apps. The platform supports various app types, including contact management, marketing, CRM, productivity, and more. This no-code approach simplifies automation for e-commerce companies.
Example: When you connect Zapier to Shopify, new sale trigger alerts can be sent to Slack directly. It even adds all the customer information to Google Sheets. So much more can be automated that it’s basically software programs talking to each other and sending data instantly.
Why Integrate Zapier with Shopify?
Online store owners have a lot on their plates. However, tasks like order processing and fulfillment can be fully automated through the Shopify + Zapier integration. By taking care of rule-based jobs, eCommerce automation saves you both time and sanity. People should be freed up to do the important work, not replaced.
Benefits of Integrating Zapier with Shopify
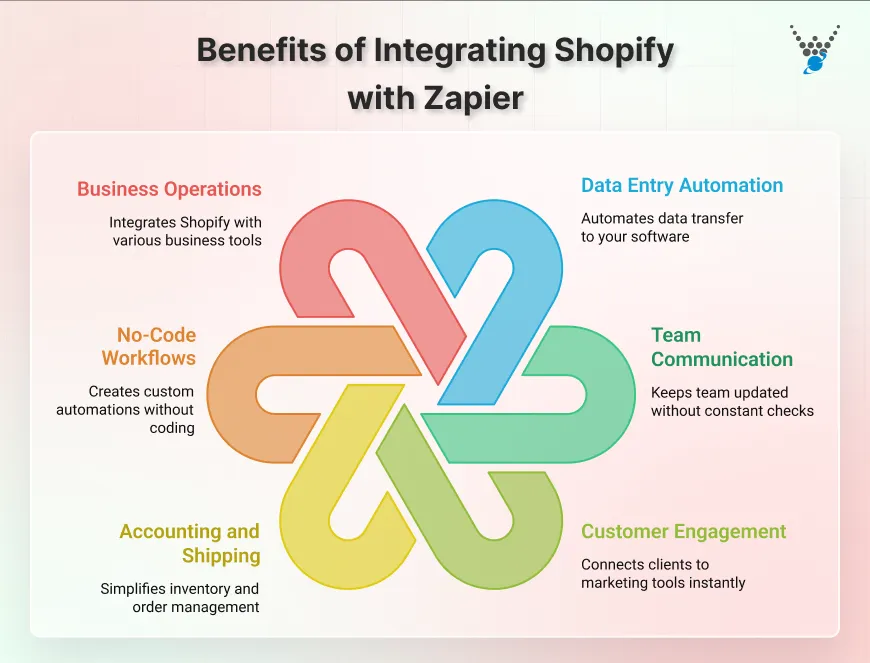
- Automate data entry and management: You can set up automation and delegate sending orders from Shopify to a Google Sheet.
- Improve team communication: Keep your team updated without needing to check Slack or Gmail every time a new sale or client account is created.
- Dealing with customers: Mailchimp or Google Ads can instantly connect Shopify clients to them.
- Make accounting and shipping easier: Changes to inventory and orders from customers can be made easily, like checking stock and sending data.
- Create custom workflows without coding: Zapier’s no-code interface makes Zaps, which are automated processes. These connect Shopify to other apps without having to write code or hire engineers.
- Simplify business operations: To reduce other workloads even more, you can easily connect Shopify to marketing, banking, or any CRM software.
When you connect Shopify to Zapier, it’s like having an efficient assistant do the boring, time-consuming jobs for you.
How to Connect Shopify and Zapier?
Connecting Zapier to Shopify is simple and takes only 15 minutes to set up your first integration. Make sure you have access to both your Shopify (paid) and Zapier accounts before you start.
Step 1 – Sign Up on Zapier with Shopify Log In
Sign up for an account at zapier.com.
Or
Install Zapier from the Shopify App Store. This links Zapier to your Shopify store for integration.
Note: You can try out automations before paying for Zapier. Its FREE plan allows up to 100 tasks per month.
Step 2 – Grant Permissions to Zapier
When asked, give Zapier permission to view your Shopify data and act on events in your store.
The Zapier app adds Quick Actions to your Shopify admin, but the dashboard is where you set up routines.
Step 3 – Connect Shopify and Zapier
Click Make a Zap on your Zapier page to set up your first automation.
Choose Shopify as the app that will set off the notification. Zapier requires the subdomain from your URL to access your Shopify shop.
You should use “yourstore” as your username if the URL of your store is https://admin.shopify.com/store/yourstore/.
Finish the OAuth authorization process to connect.
Step 4 – Choose a Setting Event
To set up an automated Shopify event, choose it.
Triggers include New Order, New Customer, New Paid Order, Abandoned Cart, Product Created, Order Fulfilled, and more.
Use New Paid Order as the event to start the automation. You can optionally filter by product type and order value.
Step 5 – Make Your Trigger Work
Zapier uses new data from your Shopify store to test the trigger setup.
Test with an order from your store to ensure Zapier can access your information.
Before doing anything, this test makes sure that your integration is strong.
Step 6 – Choose an App for Taking Action
Select the app that will receive information when the trigger fires.
Most people use Google Sheets to keep track of orders, Slack to talk to their teams, Mailchimp to send emails, QuickBooks to do their budgeting, and HubSpot to manage their customer relationships.
Choose the action, such as Send Channel Message in Slack or Create Spreadsheet Row in Google Sheets.
Step 7 – Map Out Your Data Fields
Set up how information from Shopify will flow into your action app.
When you use Zapier, you can connect trigger data like the customer’s name, email address, order total, and items purchased to action app fields.
This mapping puts the right information goes to the right place immediately.
Step 8 – Test and Turn On Your Zap!
Make sure the entire process works by testing it.
Check your action app to see what test data you can expect. Click Publish to turn on Zap if the test is successful. Now, when your Shopify store runs, your automation will work automatically!
See how easy it is to use app workflows to automate tasks that you do over and over again? If you still find it difficult to set up, partner with a good Shopify development agency and get automated rapidly.
Top 10 Shopify-Zapier Automation Examples (Use Cases)
You can find the best automations for your business by exploring real-life use cases. Here are some of the most popular examples of Zapier’s Shopify integration that you can apply to your business:
1. Add New Shopify Customers to Google Sheets
Automatically add new buyers to a spreadsheet for easy analysis and grouping. This simple routine backs up client data and allows you to create custom reports beyond Shopify’s analytics.
2. Send Slack Notifications for Every New Order
Notify your fulfillment team immediately when sales come in. Notifications in real time speed up the order process and make customers happier.
3. Create QuickBooks Entries for Shopify Transactions
Sync order data automatically with accounting tools to get rid of the need to do the books. This integration is easy and keeps the correct financial records.
4. Email Customers Automatically When Orders Are Fulfilled
When an order is marked “fulfilled,” your email marketing tool should send personalized emails confirming delivery, payments, and more.
5. Add Refund Requests to Trello
Set up automatic Trello cards for returns to help your customer service team keep track of issues. This workflow keeps track of refund patterns and offers ways to make the product or service better.
6. Add Customers to a Mailchimp List
Add new customers immediately to email marketing lists so they can stay updated. Automation builds your marketing audience, which speeds up campaign targeting.
7. Sync Order Details with HubSpot or Salesforce
You can keep track of all of your contacts by adding customer and sales information to your CRM. Integrated data lets you do follow-ups and give better customer service.
8. Post New Shopify Products to Social Media
Post new product listings on social media automatically. With this method, advertising for a product stays the same across multiple sites without having to be posted to each one manually.
9. Send SMS Alerts for Abandoned Carts
Send shopping cart abandoners text messages to get them to buy again. Because more people open SMS messages than emails, they are better at recovering carts.
10. Store Order Data in Google Drive Automatically
Keep customer details, orders, and bill information in the cloud for easy access. This makes a backup of the data so that it can be seen offline and lost data is avoided.
Common Issues and Troubleshooting Tips
Automations can go wrong even if they are set up correctly. Here are common problems and how to fix them:
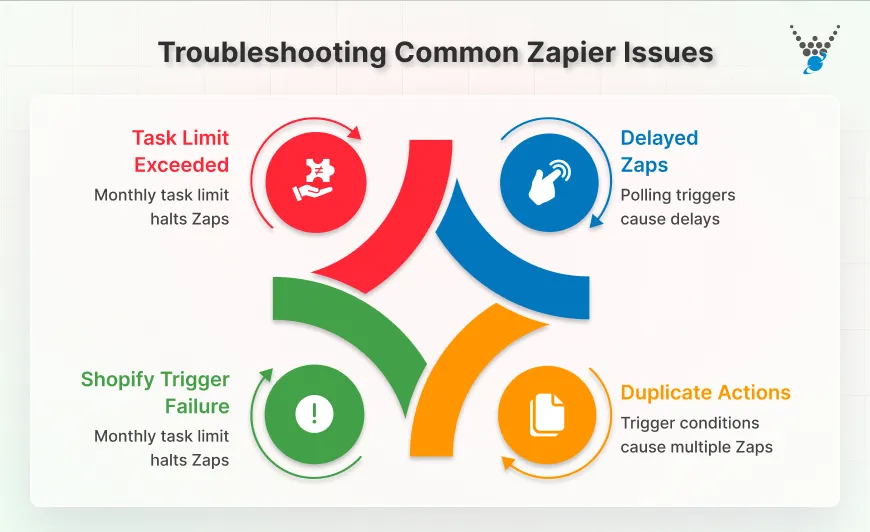
1. Shopify Trigger Not Working: Check your link if Zapier doesn’t find any new Shopify events. Your Shopify link is shown on Zapier’s My Apps page. Press the Reconnect button. Authenticate and set up the Shopify store correctly. Also, check if your Shopify plan has API access and that rights haven’t been taken away.
2. Zaps Duplicating Actions: Most of the time, some trigger conditions or multiple Zaps connected to the same event can cause duplicate Zaps. Filters can cut down the conditions that set off an alert or combine Zaps. Check the settings for deduplication and identifiers to avoid handling the same data more than once.
3. Zapier Task Limit Exceeded: Each plan comes with a monthly task limit, and exceeding this halts your Zaps. You can keep track of how tasks are used with billing and usage. If you hit your limits every time, you can choose a higher plan.
4. Delayed Zaps: Polling triggers (which check for new data at intervals) experience delays based on your plan’s polling frequency. Free plans check every 15 minutes, and for paid plans, it’s every minute. For time-consuming automations, use instant triggers (webhooks) or a plan that polls more frequently if available.
We have fixed these issues for many clients. Stores often experience authentication difficulties after altering Shopify permissions or themes. Hire Shopify developers today to get instant resolutions for your errors. The solution is mostly disconnecting and rejoining Shopify in Zapier, and then checking the trigger execution with the new shop data.
Zapier Pricing for Shopify Users
Choose the right automation plan for your store with Zapier’s fair pricing. Each completed action counts as one task under Zapier’s usage-based pricing, which is charged monthly.
Free Plan
The Free tier has 100 monthly tasks, two-step Zaps, and 15-minute polls. The Free plan can test basic automations; however, Shopify is a premium platform that requires paid plans.
Professional Plan
Professional offers 750 tasks each month. Unlimited multi-step Zaps, premium apps like Shopify, and 2-minute polling intervals for $29.99 per month (paid annually at $19.99/month). Shopify Zapier automation starts at $0.04 per task.
Team Plan
Team pricing for 2,000 tasks comes with unlimited users, 1-minute polling, shared workspaces, and enhanced support at $103.50 per month. Growing enterprises with several team members managing automations cooperatively suit this tier.
Company Plan
Get custom quotations, the highest work limits, dedicated support, and much more. Advanced security and SLA guarantees are available with enterprise pricing.
The cost-benefit analysis shows that automating order processing can save your team 75 hours per year (at $100/hour), resulting in a $7,500 time value gain for a simple $240 investment in the Professional plan. That 30x ROI doesn’t even count the freed-up hours or manual process failures that cost money!
Final Words on Connecting Zapier with Shopify
Zapier Shopify integration has really eased out the eCommerce operations. Automating processes was always a dream of big businesses, and now you can do that. Save time, eliminate errors, and improve customer experiences with this Shopify + Zapier combo.
Initial setup requires understanding and might take a few minutes. But it becomes simple to operate, learn, and provides immediate value. Additionally, Zapier with Shopify expands your toolkit for customers, inventory tracking, and marketing as well. Maximize their use for your store’s operations and use the guide’s examples before moving to larger automations.
Frequently Asked Questions
Is Zapier free for Shopify users?
Zapier’s free plan lets you do 100 tasks a month and has simple tools. Most businesses pay to have everything automated.
How to connect Zapier to Shopify?
You can connect Zapier to Shopify by logging into your Zapier account, creating a new Zap, and selecting Shopify as the trigger. Then sign in to your Shopify store, allow the required permissions, and choose the action you want to automate in another app. Finally, test the Zap to make sure everything works and switch it ON.
Can Zapier automate Shopify order management?
Yes, Zapier can handle order management tasks like sending notifications, updating inventory, talking to customers, and syncing data between business apps.
What are the best Zaps for Shopify?
Based on what a customer does, the best automations add orders to spreadsheets, send team notifications, update CRM systems, and start marketing processes.
Does Zapier work with Shopify Plus?
Yes, Zapier works perfectly with all Shopify plans, even Shopify Plus, and offers the same automatic tools.
Is Zapier safe for handling Shopify data?
With SOC 2 compliance and enterprise-level security, Zapier keeps business data safe while it’s being sent and processed.

Automate Your Shopify Store Today!
Save time by integrating Zapier with Shopify. Let our experts help you build powerful automations.