
Quick Summary
Laravel caching boosts web app performance by temporarily storing frequently used data to reduce database queries and speed up responses. This improves user experience, lowers server load, and supports scalability. The blog explains caching types (file, database, Redis, Memcached), methods (Cache::put, get, remember, forget), strategies (expiration, tag, event-driven), implementation tips, common challenges, and best practices for efficient, optimized Laravel caching.
Table of Contents
Every second counts when it comes to web apps. Users hate slow-loading pages. That’s where caching in Laravel comes in. It’s a simple and powerful way to make your app faster, handle more visitors, and reduce the load on your servers.
Along with speeding things up, Laravel caching improves the overall experience for your users. By storing data temporarily, your app avoids repeated database queries and heavy computations. The result is quicker responses, smoother navigation, and happier users.
In this blog, we’ll explain Laravel caching in detail. We’ll tell you what it is, how it works, and practical tips to implement it effectively. So, let’s start!
What is Caching?
Caching refers to temporarily storing frequently accessed data in a faster and more easily accessible location. This “faster location” is called a cache. It acts like a memory buffer that speeds up retrieval compared to fetching data from its original source, typically the database or an external API.
But what does it store? Often, caching involves storing database queries, compiled views, API responses, or user-specific data. This data is typically static or changes infrequently.
Caching is a fundamental concept in Laravel as well as other web development platforms. It can help improve system performance and reduce latency.
How Does Caching Work?
Caching is, basically, storing data (or content) for faster and easier accessibility in the future. Here’s how this technique works in Laravel.
- Request Arrives: A user makes a request to your Laravel application. The application needs to retrieve data to fulfill the request.
- Cache Check: Laravel checks if the data is already stored in the cache. It uses a cache key, a unique identifier for the data, to search for it.
- Cache Hit or Miss: Upon checking for the data, Laravel decides if it’s a cache hit or miss.
- Cache Miss: If the data is not found in the cache, the application retrieves it from the original source (e.g., database, API). This can be slower, especially for complex queries or external calls.
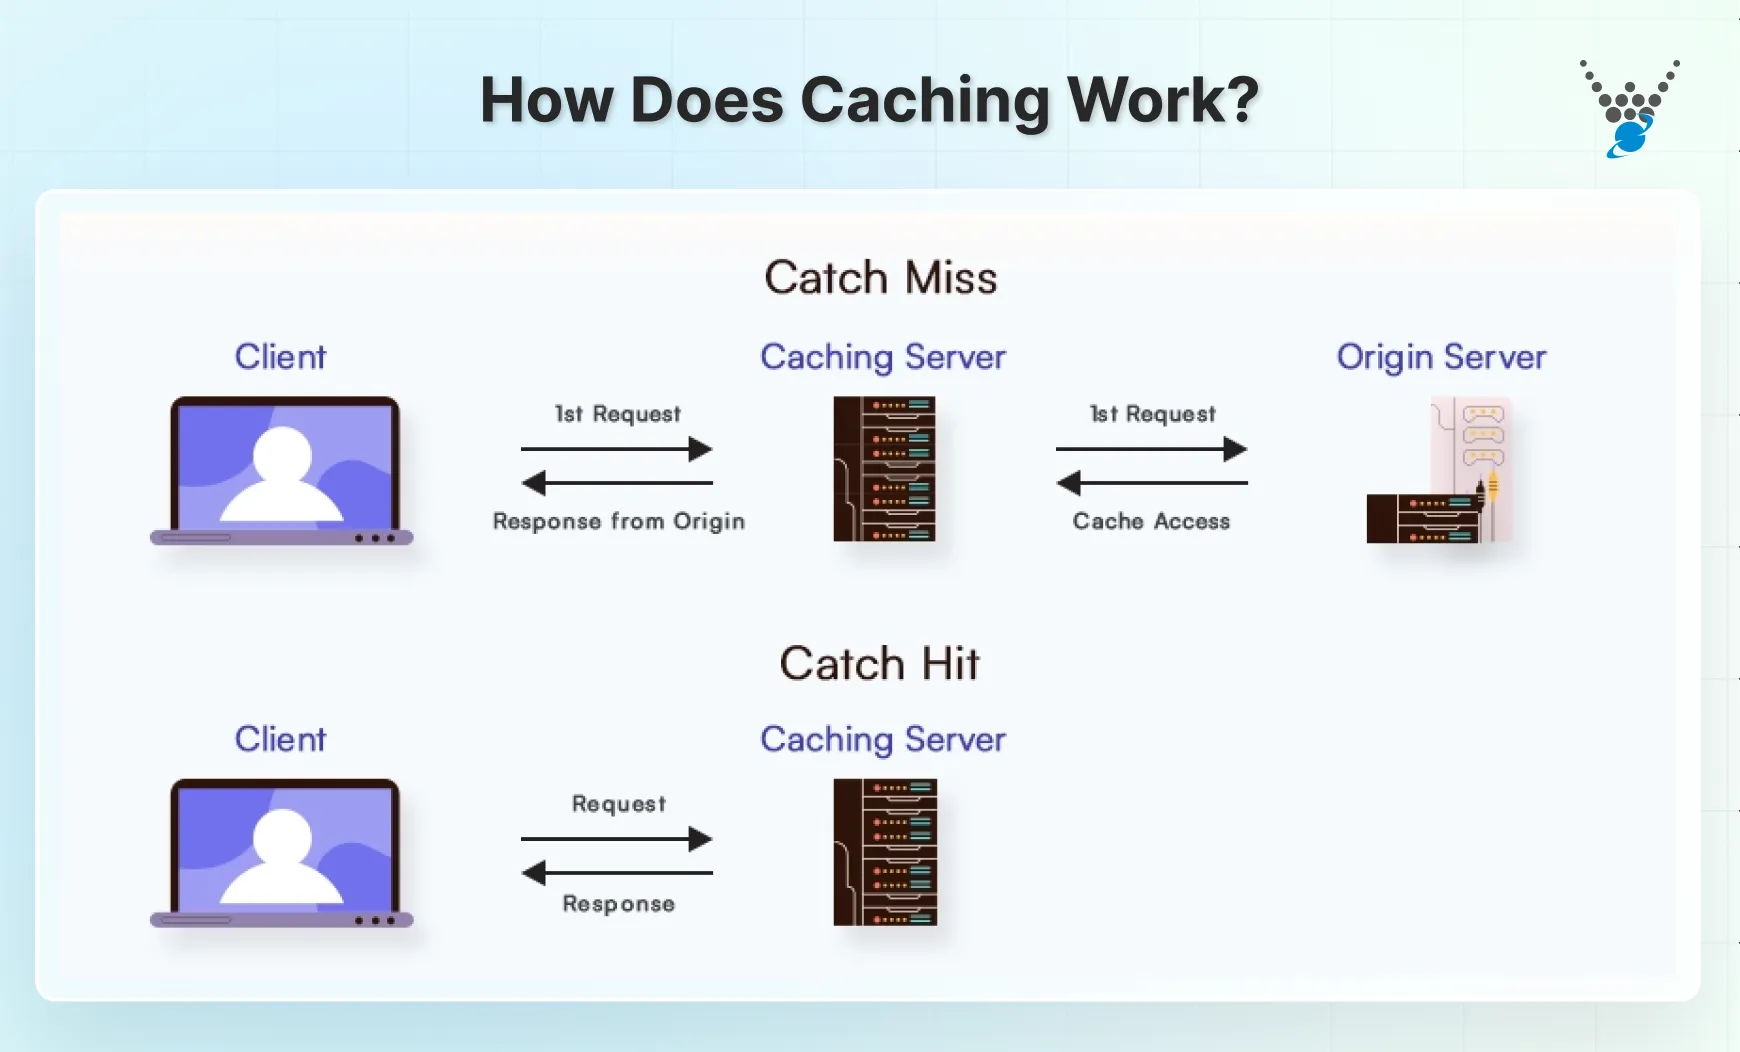
- Cache Hit: If the data is found in the cache, it is retrieved and used to respond to the request immediately. This is the fastest scenario, significantly reducing response time.
- Cache Update (Optional): Depending on your configuration, the retrieved data might be stored in the cache with the corresponding key. This ensures future requests for the same data can benefit from the cached version.
- Response and Expiration: The application uses the retrieved data (either from the cache or original source) to respond to the user’s request. The cached data also has an expiration time. After this time, it is considered stale and automatically removed from the cache. It prevents outdated info from being served.
You can configure different cache drivers (e.g., Memcached, Redis) with varying performance characteristics. And there’s an option to use tags to invalidate specific groups of cached data when changes occur in the original source.
Overall, caching acts as a middle layer between your application and its data sources. So the information retrieval is faster and more efficient.
Why is Laravel Caching Important?
Caching can be an excellent way to improve the performance of a website. That’s why it is one of the primary implementations when it comes to site speed optimization. But there are several other reasons why Laravel caching is important.
- Reduced response times: Caching eliminates repeated database/API calls, making page loads much faster. That results in significantly faster page loads and user interactions.
- Lower server load: Caching reduces pressure on the database and other resources. So your application can handle more traffic and scale efficiently.
- Efficient resource usage: Cached data bypasses the database and APIs. It frees up resources for other critical tasks and improves overall application responsiveness under high traffic.
- Horizontal scaling: By distributing cached data across multiple servers, you can increase your application’s handling capacity for concurrent users.
- Improved perceived performance: Faster response times and smooth interactions lead to a more enjoyable and engaging user experience.
- Personalized content: Caching user preferences and frequently accessed data enables dynamic and personalized experiences without additional database calls.
- Reduce database calls: Minimizes code complexity and ensures database interactions are truly necessary, leading to cleaner and more maintainable code.
- Simplifies testing: Cache specific data during testing to isolate components and streamline the testing process.
- Variety of cache drivers: Choose the best backend based on your specific needs (e.g., Memcached for speed, Redis for persistence).
- Fine-grained control: Configure cache expiration times, tag-based invalidation, and custom drivers for advanced use cases.
Overall, caching serves as an effective strategy to enhance a site’s performance, scalability, user experience, and development efficiency. Implementing Laravel performance optimization techniques further boosts application speed and ensures smoother, more efficient operations across all environments.
Different Types of Caching in Laravel
Laravel provides support for various types of caching mechanisms out of the box. Some of the commonly used caching mechanisms in Laravel include:
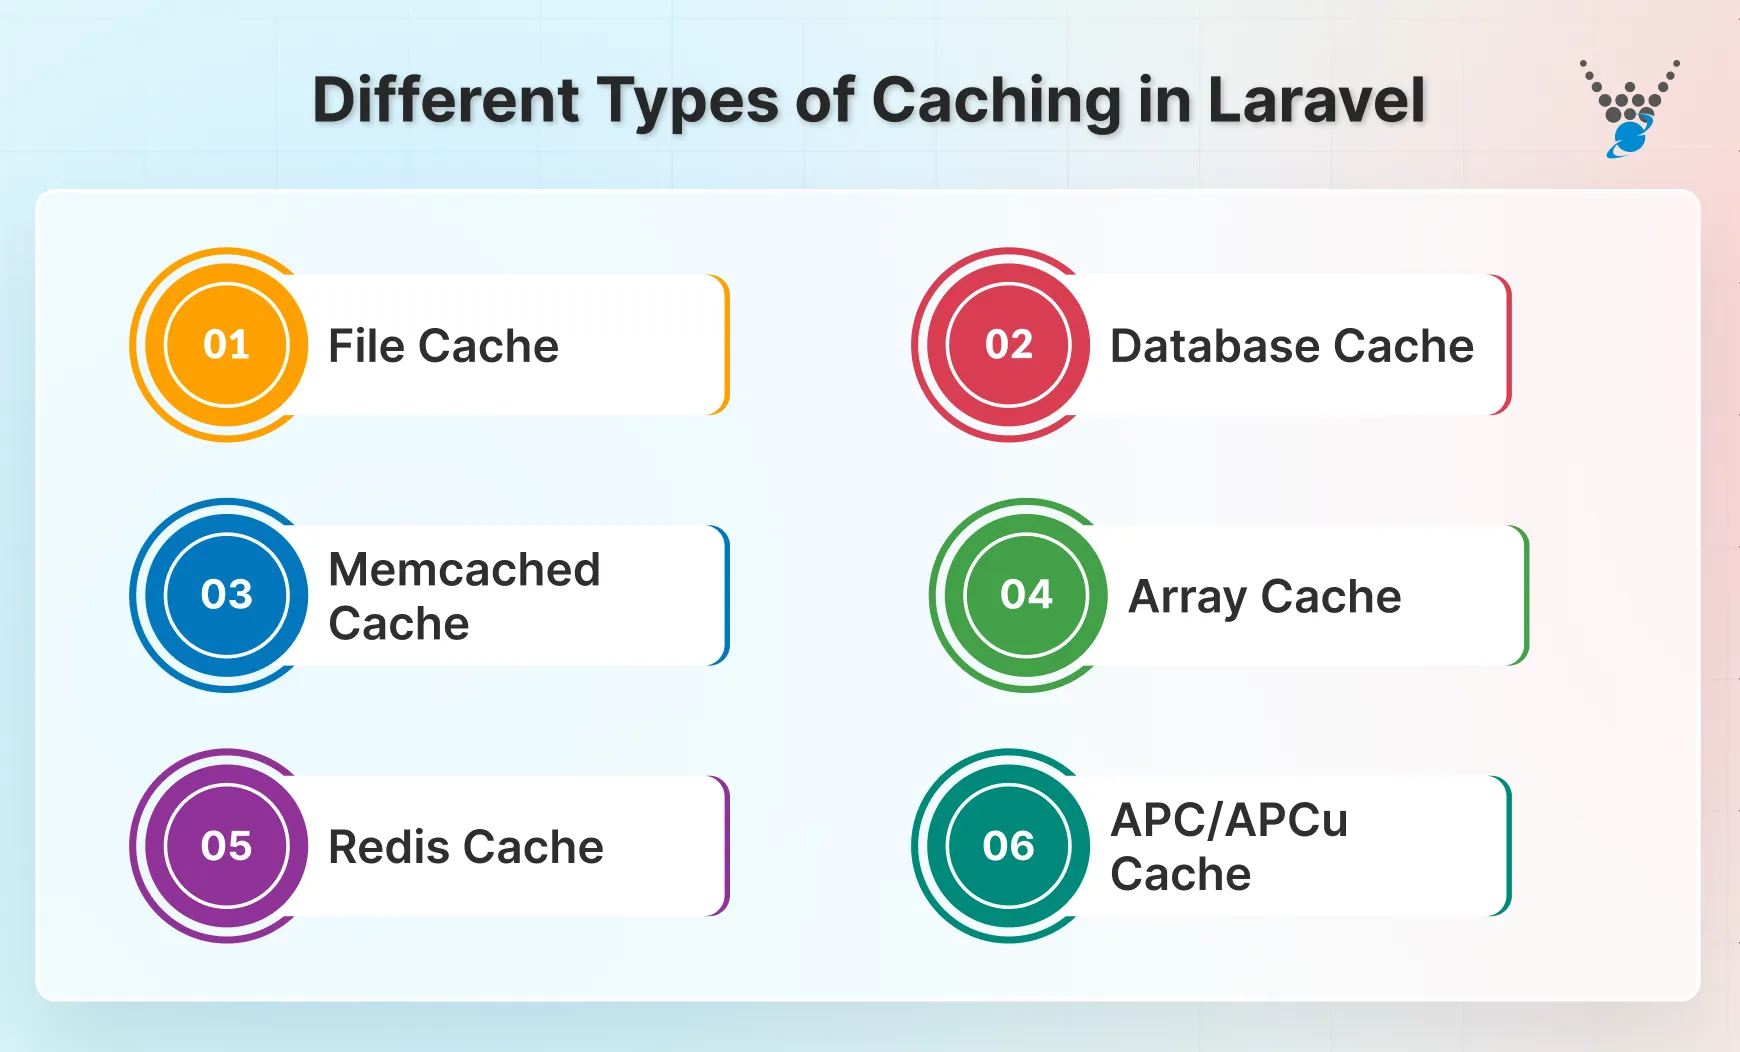
- File Cache: Laravel allows you to cache data to the file system using simple file-based caching. This type of caching is useful for storing relatively small amounts of data that do not need to be shared across multiple servers.
- Database Cache: Laravel supports caching data to a database table. Database caching is useful for storing larger amounts of data. You can also use it for sharing cached data across multiple instances of your application.
- Memcached Cache: Memcached is an in-memory caching system that is commonly used to improve the performance of web applications. Laravel provides built-in support for caching data to Memcached servers. So you can store and retrieve cached data quickly.
- Redis Cache: Redis is an in-memory data store that can be used as a caching mechanism in Laravel. Laravel provides support for caching data to Redis servers. Redis cache can be particularly useful for applications that require high-performance caching and data persistence.
- APC/APCu Cache: Laravel supports using APC (Alternative PHP Cache) or APCu (APC User Cache) as caching mechanisms. These are opcode caches that store compiled PHP code in memory. They can help improve the performance of PHP applications.
- Array Cache: Laravel provides an array-based cache driver that stores cached data in memory. This cache driver is primarily used for testing and development purposes. But you can also use it in certain production scenarios where a simple in-memory cache is sufficient.
These caching mechanisms can be configured in Laravel’s configuration files (config/cache.php) and work seamlessly with Laravel’s caching API. To achieve higher performance and handle concurrent requests efficiently, implement Laravel Octane to scale your application and significantly enhance its speed and responsiveness.
So, want the best performance for your Laravel application with caching and other strategies? Then consult with a Laravel web development company.
Laravel Cache Methods (with Examples)
Laravel provides a variety of cache helper methods. Below is a list of the most commonly used ones with one-line explanations and examples.
- Cache::put(): Store data in the cache for a given number of seconds.
Cache::put('key', 'value', 600); // store for 10 minutes
- Cache::get(): Retrieve an item from the cache by key.
$value = Cache::get('key');
- Cache::remember(): Retrieve an item, or execute a callback and cache the result if it doesn’t exist.
$users = Cache::remember('users', 3600, function () {
    return User::all();
});
- Cache::rememberForever(): Like remember(), but stores the item indefinitely.
$settings = Cache::rememberForever('settings', function () {
    return DB::table('settings')->get();
});
- Cache::forever(): Store an item indefinitely without needing a callback.
Cache::forever('site_name', 'My Laravel App');
- Cache::has(): Check if a given key exists in the cache.
if (Cache::has('users')) {
    // Do something
}
- Cache::forget(): Remove an item from the cache.
Cache::forget('users');
- Cache::flush(): Clear all items from the cache.
Cache::flush();
- Cache::many(): Retrieve multiple items from the cache at once.
$values = Cache::many(['posts', 'comments', 'tags']);
- Cache::increment() / Cache::decrement(): Increment or decrement the value of a cached integer.
Cache::increment('page_views');
Cache::decrement('stock_count');
In short, Laravel provides a range of cache helper methods for storing, retrieving, and managing cached data, including Cache::put, Cache::get, Cache::remember, Cache::forever, and Cache::forget. Additional methods like Cache::has, Cache::flush, Cache::many, and Cache::increment/decrement give developers fine-grained control over caching operations.
How to Implement Caching in Laravel?
Caching is a crucial aspect of optimizing any web application. Laravel offers a powerful caching system that can greatly improve performance. From configuring the caching driver to utilizing cache facades, here’s how the process goes.
Choose a Caching Driver
Choosing the right caching driver is crucial for optimizing your Laravel application’s performance and resource usage. Here’s how you choose the most suitable driver for caching in your Laravel website.
- Small projects: File-based caching offers a simple and lightweight solution.
- Performance-critical applications: Memcached or Redis provide much faster data retrieval.
- Complex caching needs: Redis’s flexibility and data structures excel for advanced use cases.
- Resource limitations: Consider available server resources and the potential overhead of Redis.
- Existing infrastructure: Evaluate compatibility with your current setup. For example, use database-based caching if you are already using a database server.
Remember, the best choice depends on your specific application requirements, performance needs, and resource constraints. Experiment and assess performance improvements to find the optimal caching solution for your Laravel project.
Configure Cache Driver
Once you’ve chosen your caching driver (e.g., Memcached, Redis), it’s time to configure it. In Laravel, you will need to set up the driver itself and potentially adjust specific settings for optimal performance.
Step 1: Edit config/cache.php
This file contains the configuration for all caching drivers in your application. Locate the default driver setting. This determines the driver used for most caching operations unless explicitly specified otherwise. Change the default value to your chosen driver (e.g., memcached, redis).
Step 2: Configure specific driver settings
Each driver has its own configuration options within the cache.php file. Refer to the Laravel documentation for specific details on each driver’s configuration options. Here are some common examples:
Memcached
- host: The hostname or IP address of your Memcached server.
- port: The port on which your Memcached server is listening.
- weight: Optional weight for weighted round-robin load balancing across multiple servers.
Redis
- host: The hostname or IP address of your Redis server.
- port: The port on which your Redis server is listening.
- database: The Redis database number to use (default is 0).
- password: Optional password for authentication if your Redis server requires it.
By understanding and configuring your cache driver effectively, you can leverage the power of caching. It significantly improves your Laravel application’s performance, scalability, and user experience.
Implement Caching in Your Code
While the previous guide provides a solid foundation, let’s delve deeper into code examples and explore advanced caching techniques:
- Database Caching: Use Cache::remember or Cache::rememberUnless to cache database query results for frequent queries. Define expiration times based on data update frequency. Consider tag-based invalidation for related data updates.
// Basic query caching
$posts = Cache::remember('all_posts', 60, function () {
    return DB::table('posts')->get();
});

// More granular caching: specific post by ID
$post = Cache::remember('post_' . $id, 120, function () use ($id) {
    return DB::table('posts')->find($id);
});
- Object Caching: Cache frequently accessed objects (e.g., user models, API responses) with Cache::remember or Cache::rememberForever. Ensure object serialization is supported by your chosen driver.
// Cache a user object for repeated use within a request
$user = Cache::remember('user_' . auth()->id(), 300, function () {
    return User::find(auth()->id());
});

// Access cached user data throughout the request
$userEmail = $user->email;
- Page Caching: Use Blade directives like @cache or @unless to cache entire rendered HTML pages. Set appropriate expiration times and invalidation strategies for dynamic content. Consider using dedicated page caching packages for advanced features.
@if (Cache::has('homepage'))
    {!! Cache::get('homepage') !!} // Use cached HTML
@else
    @php
        $content = view('homepage')->render(); // Generate fresh content
        Cache::put('homepage', $content, 3600); // Cache for 1 hour
    @endphp
    {!! $content !!} // Display fresh content
@endif
This stores the query results for 60 seconds with the key my-key. If data exists, it’s retrieved from the cache; otherwise, the callback executes and stores the result.
Consider Invalidation Strategies
Invalidation strategies are crucial for maintaining data freshness in your Laravel application when using caching. Here are the different approaches:
- Expiration-Based Invalidation
- Set expiration times: Use Cache::remember with a duration (in seconds) to automatically remove cached data after a specific period.
- Advantages: Simple to set up, suitable for data with well-defined expiration times.
- Disadvantages: Can lead to stale data if expiration times are not carefully chosen.
- Example: Cache frequently accessed blog posts for 10 minutes with Cache::remember(‘latest_posts’, 600, …);
- Tag-Based Invalidation
- Associate cached data with tags: Group related data under tags (e.g., ‘posts’, ‘news’).
- Invalidate specific tags: Use Cache::tags(‘posts’)->flush(); to remove all cached data with the ‘posts’ tag when relevant changes occur.
- Advantages: Efficiently invalidates multiple related items at once.
- Disadvantages: Requires careful tag management to avoid unintended invalidation.
- Example: Cache post details and comments with the ‘post_id’ tag. Invalidate the tag when the post is updated.
- Event-Driven Invalidation
- Listen to specific events: Use Laravel’s event system to react to events like model updates or database changes.
- Invalidate relevant cache: Within your event listener, clear or tag-invalidate cached data based on the event.
- Advantages: Highly granular invalidation, ensures data consistency with updates.
- Disadvantages: Requires more code and event listener management.
- Example: Listen to the PostUpdated event and invalidate the post’s details and comments cache entries.
Other than these three, there are some hybrid strategies that might be helpful:
- Combine different approaches based on your data characteristics.
- Use expiration for short-lived data and tags for related data sets.
- Leverage events for specific updates that require immediate invalidation.
These strategies help ensure your cached data remains consistently updated. For situations requiring precise control over concurrency and task synchronization, implement atomic locks in Laravel to manage processes efficiently and prevent race conditions.
Monitor and Optimize
After implementing the caching on your Laravel website or web app, you need to monitor the results for continuous optimization. It maximizes the benefits and avoids any potential drawbacks. Here’s a deeper dive into these aspects:
Monitoring
- Laravel Telescope: This built-in debugging tool offers detailed insights into your application’s cache usage. You can view cached data, hit rates, expiration times, and tag associations, providing valuable information for optimization.
- Server Monitoring Tools: Utilize tools provided by your server environment to track metrics like cache size, memory usage, and hit/miss ratios. This helps identify potential bottlenecks or inefficient caching strategies.
- Custom Logging: Implement custom logging for specific events related to caching, such as cache misses or invalidation actions. This can aid in troubleshooting and understanding specific caching behavior.
Optimization
- Analyze Cache Usage: Identify frequently accessed data and ensure it’s effectively cached. Look for data with high miss rates and consider caching it with appropriate strategies.
- Adjust Expiration Times: Fine-tune expiration times based on data update frequency. Avoid unnecessary cache invalidation by setting optimal durations for different data types.
- Optimize Invalidation Strategies: Review your tag usage and event listeners for invalidation. Ensure they are granular enough to avoid invalidating unnecessary data.
- Consider Cache Drivers: If using a file-based driver, evaluate if a more performant driver like Memcached or Redis is suitable for your needs.
- Clear Cache Strategically: Avoid clearing the entire cache frequently, as rebuilding it can be resource-intensive. Use targeted invalidation or specific cache driver methods for clearing relevant data.
You can also pre-populate (or warm) the cache with frequently accessed data during application startup to avoid initial cold misses. Also, don’t forget to conduct performance tests with and without caching. It will help you quantify the impact and identify areas for further optimization.
Monitoring and optimization are continuous processes essential for maintaining performance. Implementing the Laravel N+1 query detector helps identify and eliminate redundant database queries, ensuring your application runs efficiently and scales effectively.
Laravel Cache Commands (Artisan)
In addition to cache methods, Laravel provides Artisan commands to manage cache directly from the terminal. These commands are handy during development and deployment.
- Clear Application Cache
php artisan cache:clear
Removes all items from the application cache.
- Cache Configuration
php artisan config:cache
Creates a cache file for faster configuration loading. Run this after updating the config files.
- Cache Routes
php artisan route:cache
Caches the application’s routes for faster route registration. Run this after adding or modifying routes.
- Clear Compiled Views
php artisan view:clear
Removes all cached Blade templates. Run this if you update Blade files but don’t see changes reflected.
Simply put, to implement caching in Laravel, choose the right driver, configure it, and use methods like Cache::remember for queries, objects, or pages. Combine this with expiration, tag, or event-driven invalidation, and monitor performance regularly using tools like Laravel Telescope or Artisan cache commands to optimize speed and resource usage.
Caching Strategies in Laravel (Patterns)
Beyond basic caching methods, developers often apply well-known caching patterns to structure how data flows between the cache and the database. Some common approaches include:
Cache Aside (Lazy Loading)
The application checks the cache first. If the data isn’t there (cache miss), it loads from the database, stores it in the cache, and returns it.
- Pros: Easy to implement, avoids stale data when combined with invalidation.
- Cons: First request is slow (cold cache).
Read Through
The cache itself is responsible for loading data from the database when it’s missing.
- Pros: Transparent to the application, ensures consistent access.
- Cons: Requires a more advanced cache layer or library.
Write Through
Every time the application writes to the database, it also writes to the cache.
- Pros: Cache is always up to date.
- Cons: Writes can be slower since they go to both DB and cache.
Write Behind (Write Back)
The application writes data to the cache first, and the cache asynchronously writes to the database later.
- Pros: Fast writes, good for high-write scenarios.
- Cons: Risk of data loss if the cache fails before syncing with the DB.
Write Around
The application writes only to the database and lets the cache update later when that data is read.
- Pros: Reduces unnecessary cache writes for rarely accessed data.
- Cons: First reads may be slow since data isn’t cached yet.
In short, Laravel supports common caching strategies like Cache Aside, Read/Write Through, Write Behind, and Write Around, which define how data flows between the cache and database. Each balances trade-offs between speed, freshness, and complexity depending on the use case.
Common Challenges of Caching in Laravel
Caching can significantly improve performance, but it also comes with challenges that developers should keep in mind:
- Cache invalidation is hard: Keeping cached data in sync with the database is notoriously difficult. If invalidation rules aren’t carefully designed, you may end up serving outdated or incorrect information to users.
- Risk of stale or incorrect data: Cached values can remain long after the underlying data has changed. This can confuse users, cause functional errors, and even create security issues if sensitive data is cached improperly.
- Infrastructure overhead: Advanced cache drivers like Redis and Memcached require additional infrastructure. They bring more power but also demand extra resources, server configuration, and monitoring to ensure reliability.
- Debugging complexity: When issues arise, it can be difficult to tell whether the bug lies in your code, the database, or the cache layer. Cached responses often “hide” real-time changes, which can make troubleshooting tricky.
- Overuse of caching: While tempting to apply caching everywhere, doing so can add unnecessary complexity and make the system harder to maintain. It’s best used strategically for high-impact operations where performance truly matters.
Simply put, caching in Laravel boosts performance but comes with challenges like keeping data fresh, avoiding stale or incorrect information, and managing additional infrastructure and complexity. Developers should use caching strategically and plan invalidation carefully to maintain reliability and simplify debugging.
Advanced Caching Options in Laravel
For production-ready applications that require high performance and scalability, Laravel allows you to implement more advanced caching techniques beyond basic query and object caching:
- Full-page caching (Varnish): Instead of caching individual queries or views, you can cache entire HTML pages using reverse proxies like Varnish. This drastically reduces server processing for frequently accessed pages and can serve thousands of requests per second.
- Combining multiple caching layers: You can use a multi-layered caching strategy, such as storing frequently accessed data in Redis or Memcached while also leveraging a browser or CDN cache. This approach reduces database load, speeds up response times, and improves scalability for high-traffic applications.
These advanced strategies help ensure your Laravel application can handle large-scale traffic while maintaining fast, reliable performance. They are particularly useful for eCommerce, media-heavy, or API-intensive applications where every millisecond counts.
Best Practices for Laravel Caching
To get the most out of caching while avoiding common pitfalls, follow these recommended best practices:
- Cache application logic, not configuration files: Focus on caching frequently accessed data like queries, views, or API responses, rather than configuration settings that rarely change.
- Avoid overusing global cache flushes: Clearing the entire cache can be expensive and disrupt performance. Use targeted invalidation or tags to remove only the necessary items.
- Use tags and events wisely: Use tag-based or event-driven cache invalidation to keep data fresh without excessive overhead. Plan tags and event listeners carefully to prevent unintended cache clearing.
- Measure performance before and after caching: Always benchmark your application to ensure caching is providing real improvements. Track metrics like response times, database query counts, and hit/miss ratios.
- Be selective with caching layers: The entire data does not need caching. Focus on high-impact areas to balance speed, memory usage, and maintainability.
Follow Laravel caching best practices by caching frequently accessed data, using targeted invalidation with tags/events, and avoiding unnecessary full cache flushes. Always benchmark performance and focus caching on high-impact areas to balance speed, memory use, and maintainability.
Let’s Conclude Laravel Caching
Laravel caching helps store frequently accessed data in a temporary storage. It reduces the number of times the data needs to be retrieved from the database and improves performance. There are several types of caching in Laravel, including file caching, database caching, and in-memory caching. Each type of caching can be configured based on the specific needs of an application.
Remember, caching isn’t magic; it’s a strategic dance between speed and data freshness. Carefully choose the right strategies, monitor the usage, and continuously optimize the caching. That way, you can unlock significant performance gains while maintaining data integrity.
So, do you want to implement Laravel caching? Or some other site performance optimization strategy? Then hire dedicated Laravel developers today!
FAQs on Laravel Caching
Why is caching important in Laravel?
Caching is important in Laravel because it helps to reduce database queries and increase application performance. It also helps to optimize server resources and reduce load times for users.
How do I enable caching in Laravel?
Caching can be enabled in Laravel by configuring the cache driver in the config/cache.php file. Popular cache drivers include file, database, and Redis. You can also use third-party packages for more advanced caching options.
What are some common use cases for caching in Laravel?
Caching is commonly used in Laravel for:
– Speeding up database operations
– Caching API responses
– Improving the performance of frequently accessed views or pages.
It can also be used for storing user authentication tokens and other sensitive data.
How do I reset Laravel cache?
You can reset your Laravel cache using Artisan commands. For example, run php artisan cache:clear to remove all cached items. If you also want to refresh configuration, routes, and views, use php artisan config:cache, php artisan route:cache, and php artisan view:clear. Regularly clearing cache is useful during development or after major updates.
Does Laravel cache queries automatically?
No, Laravel does not automatically cache database queries. You need to implement caching using methods like Cache::remember() or Cache::rememberForever(). By explicitly caching queries, you reduce database load and speed up repeated requests. Always choose expiration times wisely to avoid stale data.
Where is Laravel cache stored?
The cache location depends on the driver you’re using. File cache stores data in storage/framework/cache/data, while Redis or Memcached store it in memory. Laravel’s flexible caching system allows you to switch drivers in config/cache.php without changing your code.
How to disable cache in Laravel?
To disable caching temporarily, you can set the cache driver to array in config/cache.php. This stores data in memory for the current request and clears it afterward. It’s helpful for debugging or development when you want to bypass cached data.
Can caching improve user-specific content?
Yes! You can cache user-specific data like preferences, dashboard stats, or session info. Using keys like user_{{id}} ensures each user gets personalized cached content while reducing repeated database queries.
How often should I invalidate the cache?
It depends on your data. Use short expiration times for rapidly changing info, or implement tag/event-based invalidation for dynamic content. The key is to balance freshness with performance, avoiding unnecessary database hits while keeping data accurate.


