
Quick Summary
In Laravel, atomic locks prevent race conditions by ensuring exclusive access to critical code sections. Using the Cache facade with a modern, block-based syntax, they allow only one process to execute a task at a time, such as updating inventory. This mechanism is vital for maintaining data integrity and building robust, concurrent applications, safeguarding against conflicts in multi-user environments.
Table of Contents
Are multiple users trying to access the same resource in your Laravel application simultaneously? Then there might be a worry of data inconsistencies and unexpected errors, which is understandable. But don’t worry–atomic locks in Laravel might be the perfect solution.
Atomic locks provide a simple, powerful mechanism to manage concurrency. They ensure that a sequence of operations completes without interference from other processes.
This blog will dive deep into Laravel atomic locks, how they work, how to use them, and the kind of benefits they offer. Let’s get straight into it.
What is an Atomic Lock?
At its core, an atomic lock is a concurrency control mechanism. Within web applications, it acts like a gatekeeper for any specific section of code or a resource. When one process acquires a lock, it gains exclusive access. It forces all other processes attempting to acquire the same lock to wait.
It’s like a single-occupancy washroom with a lock on the door. The first person who goes in locks the door and uses the facility uninterrupted. Anyone else who arrives must wait in line until the door is unlocked and the occupant leaves.
The lock prevents multiple people from entering simultaneously and creating chaos. In technical terms, the “atomic lock” guarantees that the locked code block executes as a single, uninterruptible unit.
How Do Atomic Locks in Laravel Work?
Laravel simplifies the implementation of atomic locks through its Illuminate\Support\Facades\Cache facade. Under the hood, Laravel leverages its cache system (like Redis or Memcached) to manage these locks. It provides a centralized and scalable way to control access across multiple servers.
The primary method is Cache::lock(‘lock_name’, 10). Here’s the typical workflow:
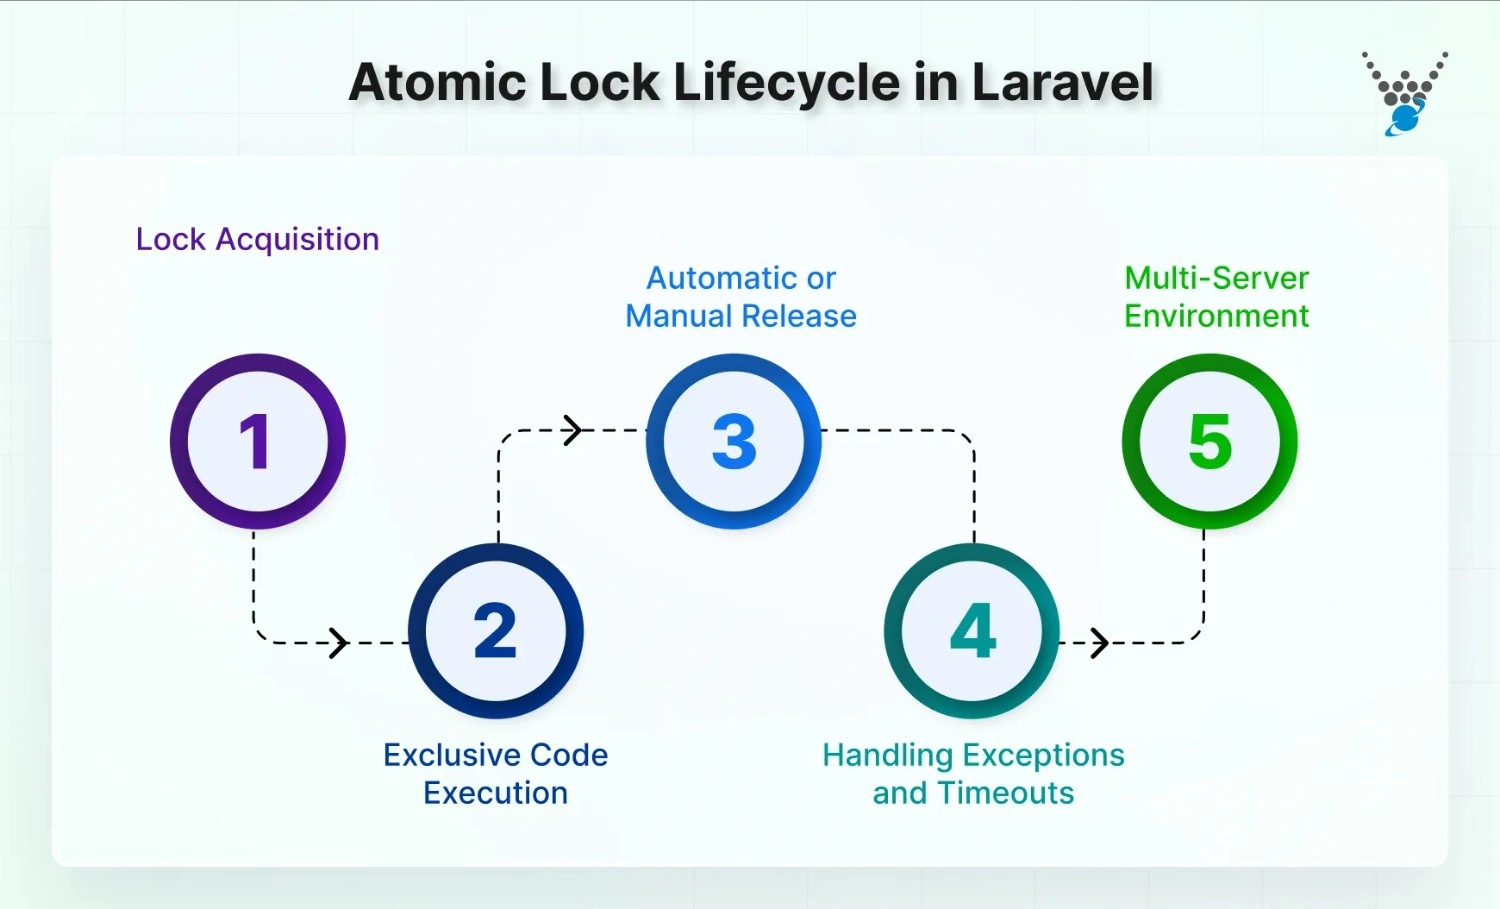
Acquiring the Lock
Your application attempts to acquire a lock with a unique name and an optional timeout (e.g., 10 seconds). If no other process holds this lock, acquisition is successful, and the code proceeds. If the lock is already taken, the process can wait for a specified duration for it to be released.
Executing Critical Code
Once the lock is obtained, the code within the closure executes exclusively. Other processes requesting the same lock are blocked, preventing race conditions.
Automatic or Manual Release
After the code in the closure finishes execution, Laravel automatically releases the lock. This is the safest approach. You can also manually release locks if needed.
The following code illustrates this acquire-execute-release cycle:
use Illuminate\Support\Facades\Cache;
$lock = Cache::lock('process_order', 10);
if ($lock->get()) {
    // Critical code section: Update inventory, charge payment, etc.
    $lock->release(); // Can be manual...
}
// ...or automatic using a closure.
Cache::lock('process_order', 10)->block(5, function () {
    // This code is executed only after the lock is acquired.
    // The lock automatically releases after execution.
});
This mechanism ensures that only one process executes critical business logic at a time, preserving data integrity. To boost speed and maintain stability in your applications, apply proven techniques for Laravel performance optimization that streamline processing and resource usage.
Automatic or Manual Release
After the code in the closure finishes execution, Laravel automatically releases the lock. This is the safest approach. You can also manually release locks if needed.
The following code illustrates this acquire-execute-release cycle:
use Illuminate\Support\Facades\Cache;
$lock = Cache::lock('process_order', 10);
if ($lock->get()) {
    // Critical code section: Update inventory, charge payment, etc.
    $lock->release(); // Can be manual...
}
// ...or automatic using a closure.
Cache::lock('process_order', 10)->block(5, function () {
    // This code is executed only after the lock is acquired.
    // The lock automatically releases after execution.
});
Handling Exceptions and Timeouts
If an exception occurs while the lock is held, Laravel ensures the lock is released to avoid deadlocks. You can also define timeouts, so if a process can’t acquire the lock within the specified duration, it moves on gracefully instead of waiting indefinitely.
Multi-Server Environment
When using a distributed cache driver like Redis or Memcached, Laravel’s atomic locks work seamlessly across multiple servers. This ensures consistent lock behavior and safe concurrency control, even in large, load-balanced environments.
This mechanism ensures that only one process can execute the sensitive business logic at a time, thereby maintaining data integrity.
How Atomic Locks Prevent Race Conditions
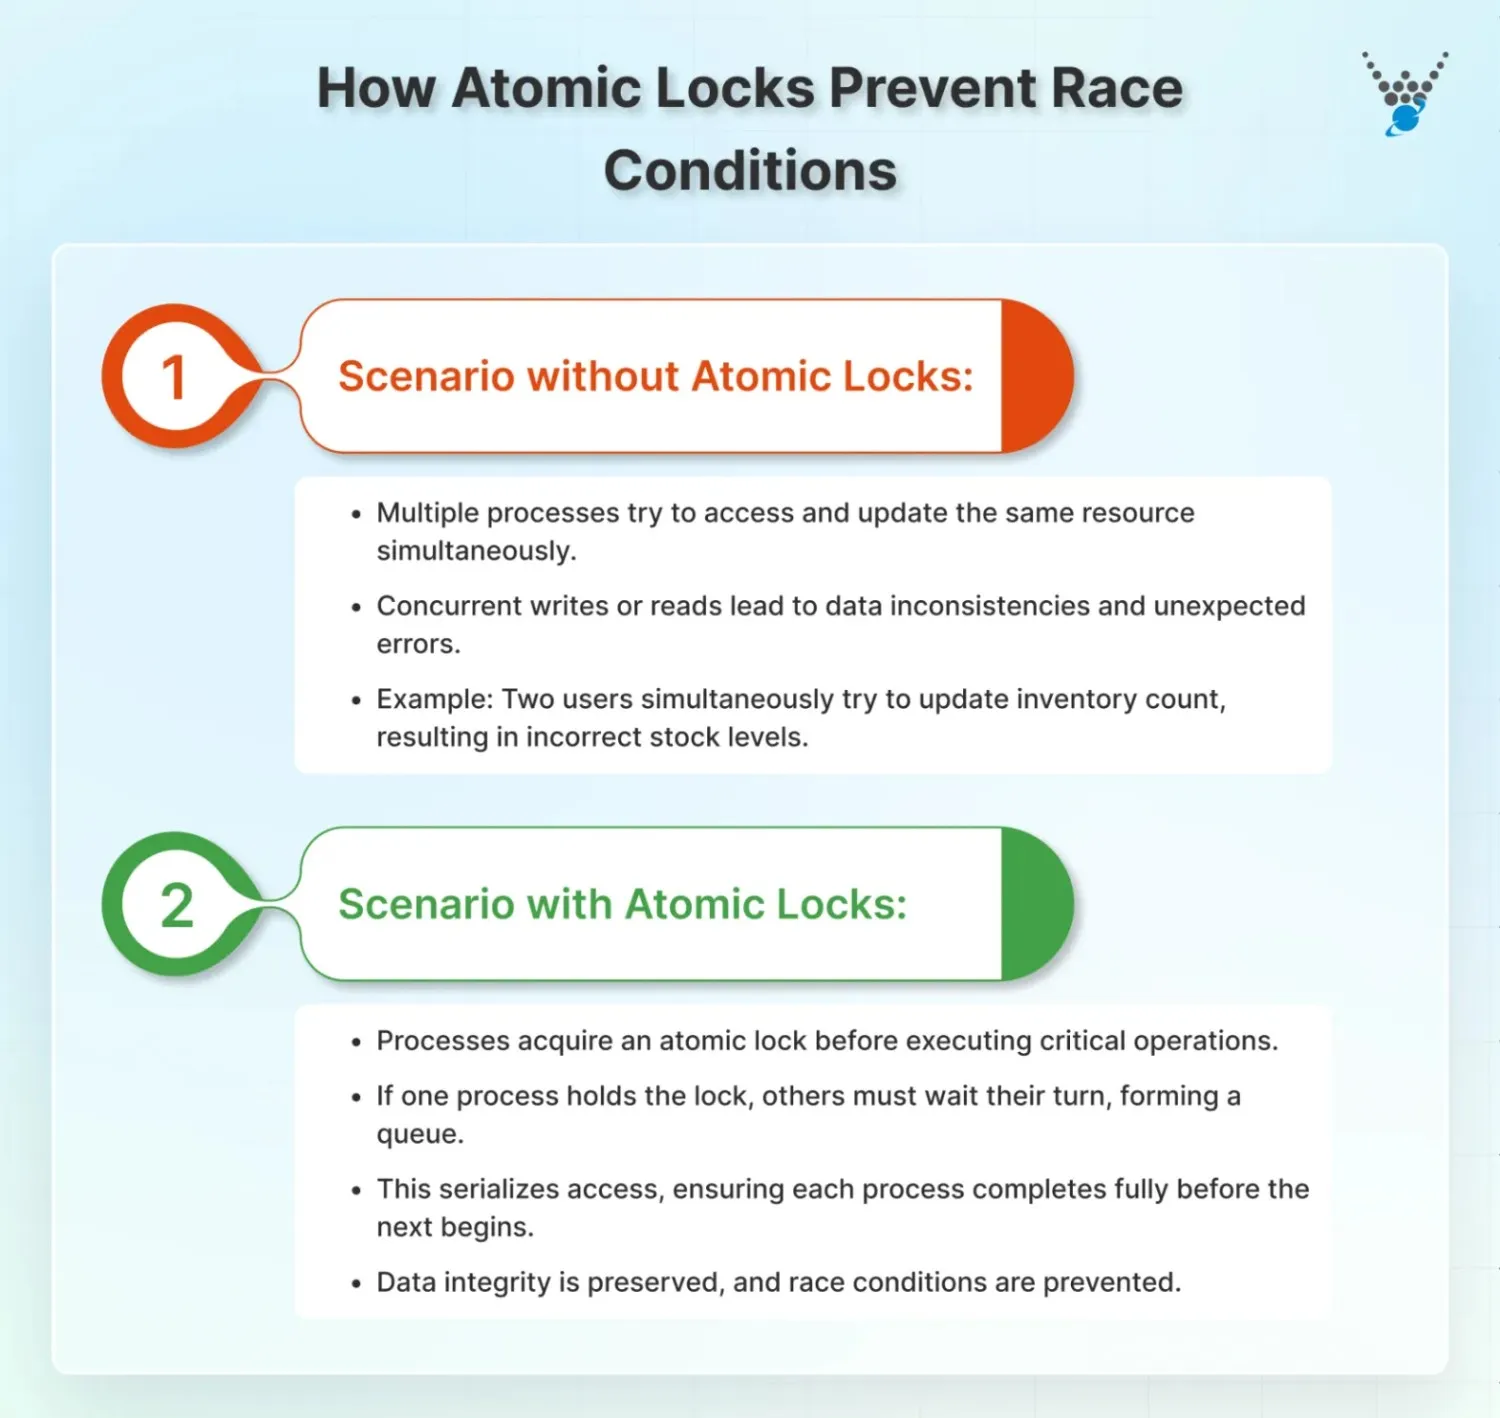
Scenario without Atomic Locks:
- Multiple processes try to access and update the same resource simultaneously.
- Concurrent writes or reads lead to data inconsistencies and unexpected errors.
- Example: Two users simultaneously try to update inventory count, resulting in incorrect stock levels.
Scenario with Atomic Locks:
- Processes acquire an atomic lock before executing critical operations.
- If one process holds the lock, others must wait their turn, forming a queue.
- This serializes access, ensuring each process completes fully before the next begins.
- Data integrity is preserved, and race conditions are prevented.
How to Use Atomic Locks in Laravel?
Atomic locks in Laravel primarily use the Cache facade. Let’s look at the most common patterns for managing locks, from basic acquisition to more advanced handling.
The Basic Get and Release
The fundamental pattern involves manually acquiring a lock and then releasing it.
use Illuminate\Support\Facades\Cache;
// Create a lock instance with a name and a 10-second timeout
$lock = Cache::lock('order_processing', 10);
// Attempt to acquire the lock
if ($lock->get()) {
    // Perform your critical, non-concurrent task here
    // Example: Deducting inventory, processing a payment
    // Manually release the lock so other processes can use it
    $lock->release();
}
Automatic Release with a Closure
This is the recommended and safest approach. The lock is automatically released when the closure ends, even if an exception is thrown.
use Illuminate\Support\Facades\Cache;
Cache::lock('order_processing', 10)->get(function () {
    // This code is executed only if the lock was acquired.
    // Update product stock, generate a unique invoice number, etc.
    // The lock will be released automatically after this function.
});
Blocking Until the Lock is Available
You can make a process wait for a specified period if the lock is currently held by another process.
// Wait for a maximum of 5 seconds to acquire the 'order_processing' lock
$lock = Cache::lock('order_processing', 10);
if ($lock->block(5)) {
    // The lock was acquired after waiting up to 5 seconds
    // ... critical code ...
    $lock->release();
}
// Or, more elegantly with a closure:
Cache::lock('order_processing', 10)->block(5, function () {
    // This code will run once the lock is available and acquired.
});
By applying these patterns, you ensure serialized access to critical sections of your code, maintaining data consistency and preventing race conditions. To handle higher concurrency and achieve faster request processing, leverage Laravel Octane to scale your application and enhance overall performance.
If you want help with implementing atomic locks or other ways to manage concurrency, consult with a pro Laravel development company.
What are the Other Use Cases of Atomic Locks in Laravel?
Atomic locks extend beyond basic data modification scenarios and offer valuable functionalities for managing coexistence in various situations within your Laravel application. Here are some additional use cases:
1. Cron Job Synchronization
These jobs might perform tasks like data cleanup or sending automated emails. Using atomic locks, you can ensure only one cron job executes at a time, preventing conflicts and race conditions. This is beneficial in load-balanced environments where multiple servers might attempt to run the same job simultaneously.
2. Process Queue Jobs
When processing jobs asynchronously using Laravel queues, atomic locks can be employed to prevent duplicate processing. For example, if a job involves sending a welcome email to a new user, an atomic lock can guarantee only one job is processed for that specific user. Regardless of how many attempts have occurred due to retries or queue failures.
3. Resource-intensive Operations
Certain operations might be resource-intensive, consuming significant CPU or memory. By using atomic locks, you can serialize these operations, ensuring only one process executes them at a time. This helps prevent overloading the server and maintains application responsiveness.
4. Limit API Requests
Atomic locks can be used to implement rate limiting for specific API endpoints. This helps prevent denial-of-service attacks and ensures fair access to your API resources. By developing a lock before processing a request, you can set the number of requests allowed within a defined timeframe.
5. Cache Invalidation Coordination
In scenarios where you use Laravel’s cache for performance optimization, atomic locks can be instrumental in coordinating cache invalidation. When data is modified, you can acquire a lock to ensure only one process invalidates the corresponding cached data.
This approach helps maintain cache coherence and prevents data inconsistencies. By leveraging Laravel Caching, you can significantly boost your application’s performance and ensure faster data retrieval across frequently accessed resources.
Troubleshooting Common Atomic Locks Errors in Laravel
While atomic locks offer a robust solution for concurrency control, occasional errors can arise during development or operation. Here’s how to identify and address some common atomic lock errors in Laravel:
1. Lock Timeout Reached:
If your code encounters a LockTimeoutException error, it signifies that the Cache::lock method. This denotes it waited for the specified timeout duration but couldn’t acquire the lock. This could happen if another process holds the lock for an extended period.
Solutions:
- Increase the timeout value (if acceptable) to allow more waiting time for lock acquisition.
- Refactor your critical section to minimize its execution time, reducing lock holding duration.
- Implement a queuing or retry mechanism to handle situations where the lock is frequently unavailable.
2. Deadlock:
A deadlock occurs when two or more processes are waiting for locks on resources held by each other, creating a dependency loop. This can lead to your application hanging indefinitely.
Solutions:
- Design your locking strategy to avoid circular dependencies between locks.
- Employ lock timeouts to prevent processes from waiting indefinitely for unavailable locks.
- Consider using lock orders or lock ordering techniques to establish clear precedence when acquiring multiple locks.
3. Cache Driver Issues:
The functionality of atomic locks relies on the underlying cache driver. If you encounter errors related to lock acquisition or release, there might be issues with your cache configuration or the chosen cache driver itself.
Solutions:
- Ensure your cache driver is functioning correctly and configured according to Laravel’s documentation.
- If using a custom cache driver, verify its implementation adheres to Laravel’s caching contracts for atomic lock operations.
- Consider switching to a different cache driver known to be reliable for atomic locks in Laravel, if applicable.
4. Forgotten Lock Release:
Accidentally forgetting to release the lock after your critical section can lead to subsequent processes waiting indefinitely.
Solutions:
- Use try…finally blocks as mentioned earlier to guarantee lock release even in case of exceptions.
- Thoroughly test your code to ensure locks are always released promptly after use.
- Consider using debugging tools or logging mechanisms to track lock acquisition and release within your application.
5. Cache Invalidation Errors:
If you’re using atomic locks with cache invalidation, inconsistencies might arise. It is due to the invalidation mechanism not properly coordinated with the locking process.
Solutions:
- Invalidate cache entries only after successfully acquiring the lock and completing the critical section.
- Implement a centralized cache invalidation strategy to ensure consistency across multiple servers.
- Utilize Laravel’s tagging features for cache entries to invalidate them efficiently based on relevant tags or dependencies.
By understanding these common error scenarios, you can troubleshoot issues that may arise when using atomic locks in your Laravel application. Additionally, to prevent database performance bottlenecks, it’s worth learning about the laravel n+1 query detector which helps identify and fix inefficient queries.
Let’s Conclude
Atomic locks are an indispensable tool for managing concurrency and preserving data integrity in modern Laravel apps. Their fundamental purpose is to act as a gatekeeper, so critical sections of your code execute without interference from simultaneous requests.
While the concept is powerful, its implementation is elegantly simple. With Laravel’s block-based syntax, you can encapsulate your sensitive logic in a way that is both clean and safe. This modern approach guarantees that locks are acquired and released automatically. It eliminates common pitfalls and boilerplate code.
So, want help with robust development workflow aided by atomic locks and other advanced tactics? Then connect with our Laravel developers for hire today!
FAQs About Atomic Locks in Laravel
How do Atomic Locks differ from database transactions?
Database transactions ensure data integrity by grouping database operations so they all succeed or fail together. Atomic locks control access to a block of code itself, preventing any other process from entering that section simultaneously, regardless of whether it involves database operations.
Can Atomic Locks be used across multiple servers?
Yes, but only if you use a shared, centralized cache driver like Redis or Memcached. These drivers allow all your application servers to check the same lock state. The default ‘file’ cache driver will not work in a multi-server environment.
What happens if my code inside the lock throws an exception?
If you use the recommended closure-based approach (->get(function () { … })), the lock will be released automatically. If you acquire the lock manually, you must release it yourself, ideally within a finally block to ensure it happens even during an error.
What is the performance impact of using Atomic Locks?
When used correctly for short-lived operations, the impact is minimal. The primary performance risk is contention; if many processes are waiting for the same lock, it can create a bottleneck. Keeping lock durations as short as possible mitigates this.
How should I choose a good lock key?
Your lock key should be specific and descriptive of the resource or action you are protecting. For example, to lock a specific product’s inventory, use a key like update_stock_for_product_{id}, incorporating a unique identifier to avoid unnecessary global locks.
How do I decide on the lock timeout duration?
Set the timeout to a value slightly longer than the maximum expected execution time of your critical code. This provides a safety net. If a process crashes, the lock will automatically release after the timeout, preventing a permanent deadlock.
How is this different from ->withoutOverlapping() for a scheduled task?
The withoutOverlapping() method for scheduled tasks uses atomic locks under the hood. It is a pre-built, convenient abstraction for a very specific use case. Using atomic locks directly gives you fine-grained control over any custom code block in your application, not just scheduled commands.


