
Quick Summary
This blog explains how to build a multi-role Laravel application with Vue.js integration. It covers installing Laravel, setting up authentication, managing roles with Spatie permissions, creating models, routes, and controllers for Admin, Seller, and Buyer roles, and connecting Vue components for dynamic product management in a secure, scalable Laravel environment.
Table of Contents
Building a modern online marketplace no longer requires months of coding from scratch. With Laravel 11 powering the backend and Vue 3 delivering a reactive front-end experience, developers can create scalable, high-performance marketplaces faster than ever.
In this guide, we’ll walk you through each step, from installing Laravel to integrating Vue components for product management – so you can build a feature-rich marketplace that’s ready for real-world use.
Steps to Build a Marketplace with Vue.js and Laravel
Developing a marketplace with Vue.js and Laravel involves several steps. This process can be complex, so breaking it down into manageable steps is crucial.
Let’s first start with the prerequisites.
Prerequisites:
Here are the prerequisites and must-haves to get started with building the marketplace:
- PHP 8.1 or Higher: Required for Laravel 11.
- Composer: For managing PHP dependencies and installing Laravel.
- Node.js and npm: Needed to install and run Vue and front-end dependencies.
- Database: A MySQL or PostgreSQL database with credentials set up.
- Basic Knowledge of Laravel and Vue.js: Familiarity with both frameworks to follow the process smoothly.
- Code Editor: A reliable editor like VS Code or PhpStorm for working with PHP, JavaScript, and Vue.
Step 1: Install Laravel and Set Up Bootstrap UI Authentication
Begin by installing Laravel and setting up the necessary authentication UI using Bootstrap.
Create Laravel Project:
composer create-project laravel/laravel laravel-vendor
cd laravel-vendor
This command sets up a new Laravel project in a directory called “laravelvendor.”
Install Laravel UI and Bootstrap Auth:
composer require laravel/breeze --dev
php artisan breeze:install vue
npm install && npm run dev
php artisan migrate
Here, Laravel UI is installed with Bootstrap and basic authentication, providing a quick way to set up a login and registration system with styling.
Install Vue 3 and Dependencies:
npm install vue@3 @vitejs/plugin-vue
Installing Vue 3 introduces reactive, component-based features that enable the creation of dynamic front-end components for your marketplace. To establish seamless interaction between the backend and frontend, developers often integrate VueJS with Laravel, combining the power of both frameworks for efficient and scalable application development.
Install Spatie Laravel Permission:
composer require spatie/laravel-permission
php artisan vendor:publish --provider="Spatie\Permission\PermissionServiceProvider"
The Spatie package enables role and permission management, which is essential for differentiating access for Admins, Sellers, and Buyers.
Configure Service Providers and Middleware: In config/app.php, add Spatie’s Permission ServiceProvider:
'providers' => [
// ...
    Spatie\Permission\PermissionServiceProvider::class,
],
In app/Http/Kernel.php, add middleware aliases for roles and permissions:
protected $middlewareAliases = [
    'role' => \Spatie\Permission\Middleware\RoleMiddleware::class,
    'permission' => \Spatie\Permission\Middleware\PermissionMiddleware::class,
    'role_or_permission' => \Spatie\Permission\Middleware\RoleOrPermissionMiddleware::class,
];
Adding these middleware aliases enables you to control access based on roles and permissions.
Add HasRoles to the User Model: In app/Models/User.php, include the HasRoles trait:
use Spatie\Permission\Traits\HasRoles;
The HasRoles trait allows role-based access management directly on the User model, simplifying role checks throughout the application.
Step 2: Create Controllers, Model, Seeders, and Migration
Create controllers, models, and seeders to organize data and define the structure of your application.
Create Controllers for Admin, Seller, and Buyer:
php artisan make:controller Admin/AdminController
php artisan make:controller Seller/SellerController
php artisan make:controller Buyer/BuyerController
Each controller here is role-specific, providing a foundation similar to the one needed to build a music streaming website with dedicated functions for user actions.
Create the Product Model:
php artisan make:model Product -m
The Product model represents the items being listed and sold, linking to the database to store product details.
Create Seeders for Roles, Users, and Products:
RoleSeeder:
use Spatie\Permission\Models\Role;
UserSeeder:
use App\Models\User;
ProductSeeder:
use App\Models\Product;
use App\Models\User;
Seeders populate the database with initial data for roles, test users, and example products, which helps you test different scenarios.
Update DatabaseSeeder to Call These Seeders: In the DatabaseSeeder, include the role, user, and product seeders to load them all at once:
$this->call([
    RoleSeeder::class,
    UserSeeder::class,
    ProductSeeder::class,
]);
Create a Factory for Products:
php artisan make:factory ProductFactory
In database/factories/ProductFactory.php, define product data:
namespace Database\Factories;
use App\Models\Product;
use Illuminate\Database\Eloquent\Factories\Factory;

class ProductFactory extends Factory
{
    protected $model = Product::class;

    public function definition()
    {
       return [
    'title' => fake()->sentence(3),
    'description' => fake()->paragraph(),
    'price' => fake()->randomFloat(2, 50, 500),
    'user_id' => User::factory(),
];
    }
}
Factories like this allow you to generate test data quickly, which is helpful for testing the marketplace.
Create the Product Migration:
Schema::create('products', function (Blueprint $table) {
    $table->id();
    $table->foreignId('user_id')->constrained()->onDelete('cascade');
    $table->string('title');
    $table->text('description')->nullable();
    $table->decimal('price', 10, 2);
    $table->timestamps();
});
Migrations handle the structure of the database tables. The Product migration will define the fields for storing product details.
Step 3: Setup View Files in the resources Folder
Set up the views for different users (Admin, Seller, Buyer) to define how each role interacts with the application.
Super Admin Views:
resources/views/admin/dashboard.blade.phpresources/views/admin/products/index.blade.phpresources/views/admin/products/create.blade.php
These views will allow the Super Admin to manage products, view listings, and add or edit product details.
Seller Views:
resources/views/seller/products/index.blade.phpresources/views/seller/products/create.blade.php
Sellers can list and manage their own products through these views.
Buyer Views:
resources/views/buyer/products/index.blade.php
Buyers will be able to browse products, but only have view access.
Update Welcome Blade:
Modify the resources/views/welcome.blade.php as needed. This is your landing page, so you can update it to suit your marketplace’s branding and main content.
Step 4: Setup Routes in web.php
Define role-specific routes to control access based on user type.
Admin Routes:
use App\Http\Controllers\Admin\AdminController;
use App\Http\Controllers\Seller\SellerController;
use App\Http\Controllers\Buyer\BuyerController;

Route::middleware(['auth'])->group(function () {

    Route::middleware('role:admin')->prefix('admin')->group(function () {
        Route::resource('products', AdminController::class);
    });

    Route::middleware('role:seller')->prefix('seller')->group(function () {
        Route::resource('products', SellerController::class);
    });

    Route::get('/products', [BuyerController::class, 'index'])->name('buyer.products');
});
Admins have access to the full suite of product management routes.
Seller Routes:
Route::middleware(['auth', 'role:seller'])->prefix('seller')->name('seller.')->group(function () {
    Route::get('dashboard', [SellerController::class, 'dashboard'])->name('dashboard');
    Route::get('products', [SellerController::class, 'showProducts'])->name('products.index');
    Route::get('products/create', [SellerController::class, 'createProductForm'])->name('products.create');
    Route::post('products', [SellerController::class, 'storeProduct'])->name('products.store');
    Route::get('products/{id}/edit', [SellerController::class, 'editProductForm'])->name('products.edit');
    Route::put('products/{id}', [SellerController::class, 'updateProduct'])->name('products.update');
    Route::delete('products/{id}', [SellerController::class, 'deleteProduct'])->name('products.delete');
});
Sellers have access to manage only their own products through these routes.
Buyer Routes:
Route::get('/products', [BuyerController::class, 'index'])->name('buyer.products');
Buyers only need a route to view available products.
Step 5: Run Migrations and Seeders
Prepare the database by setting up tables and filling them with test data.
Set Up the Database in .env: Update your database credentials here.
DB_CONNECTION=mysql
DB_HOST=127.0.0.1
DB_PORT=3306
DB_DATABASE=laravelvendor
DB_USERNAME=root
DB_PASSWORD=
Run Migrations:
php artisan migrate
This command will create tables based on your migrations, setting up the database structure.
Run Seeders:
php artisan db:seed
This command will populate the database with initial data from your seeders.
For Specific Seeders:
php artisan db:seed --class=RoleSeeder
php artisan db:seed --class=UserSeeder
php artisan db:seed --class=ProductSeeder
Running specific seeders is useful when you need to seed only a particular type of data at a time. After setting up your environment, knowing use of Laravel with React.js helps you build dynamic and interactive web applications with seamless backend and frontend integration.
Step 6: Create the Product Management Vue Component
This component will handle the product management front-end functionality, much like learning how to use Agora Web SDK to add Real-Time Video for dynamic interactions.
Update app.js: In resources/js/app.js, import and register the AddProduct component:
import './bootstrap';
import { createApp } from 'vue';
import AddProduct from './components/AddProduct.vue';

createApp(AddProduct).mount('#app-product');
Create AddProduct.vue Component: Create resources/js/components/AddProduct.vue for handling product input.
Update create.blade.php: Modify resources/views/admin/products/create.blade.php to include the Vue component:
@extends('layouts.app')

@section('content')
<div id="app-product">
    <add-product></add-product><!-- Your Vue component -->
</div>
@endsection
Add API Route: In routes/api.php, add an API route for storing products:
Route::middleware('auth:sanctum')->post('admin/products', [SuperAdminController::class, 'store']);
Update vite.config.js: Ensure that Vue.js is properly configured:
import { defineConfig } from 'vite';
import laravel from 'laravel-vite-plugin';
import vue from '@vitejs/plugin-vue';

export default defineConfig({
    resolve: {
        alias: {
            '@': '/resources/js',
            vue: 'vue/dist/vue.esm-bundler.js',
        },
    },
    plugins: [
        laravel({
            input: ['resources/css/app.css', 'resources/js/app.js'],
            refresh: true,
        }),
        vue(),
    ],
});
With these steps completed, your Laravel application should now support a fully functioning product management system using Vue.js on the admin side, complete with role-based access for Admin, Seller, and Buyer users.
Now that you’ve completed the setup process, you can explore the entire project on GitHub. The repository includes the full codebase with configurations, controllers, models, and Vue components used in this guide. For building scalable and efficient web applications, consider leveraging Laravel development services to streamline your development process.
Measures to Consider When Building a Marketplace with Vue.js and Laravel
Undoubtedly, as the procedure involves both front-end and back-end development – building a marketplace with Vue.js and Laravel is a bit complex. To ensure your Laravel Vue js application develops and deploys well, we brought some tips to consider:
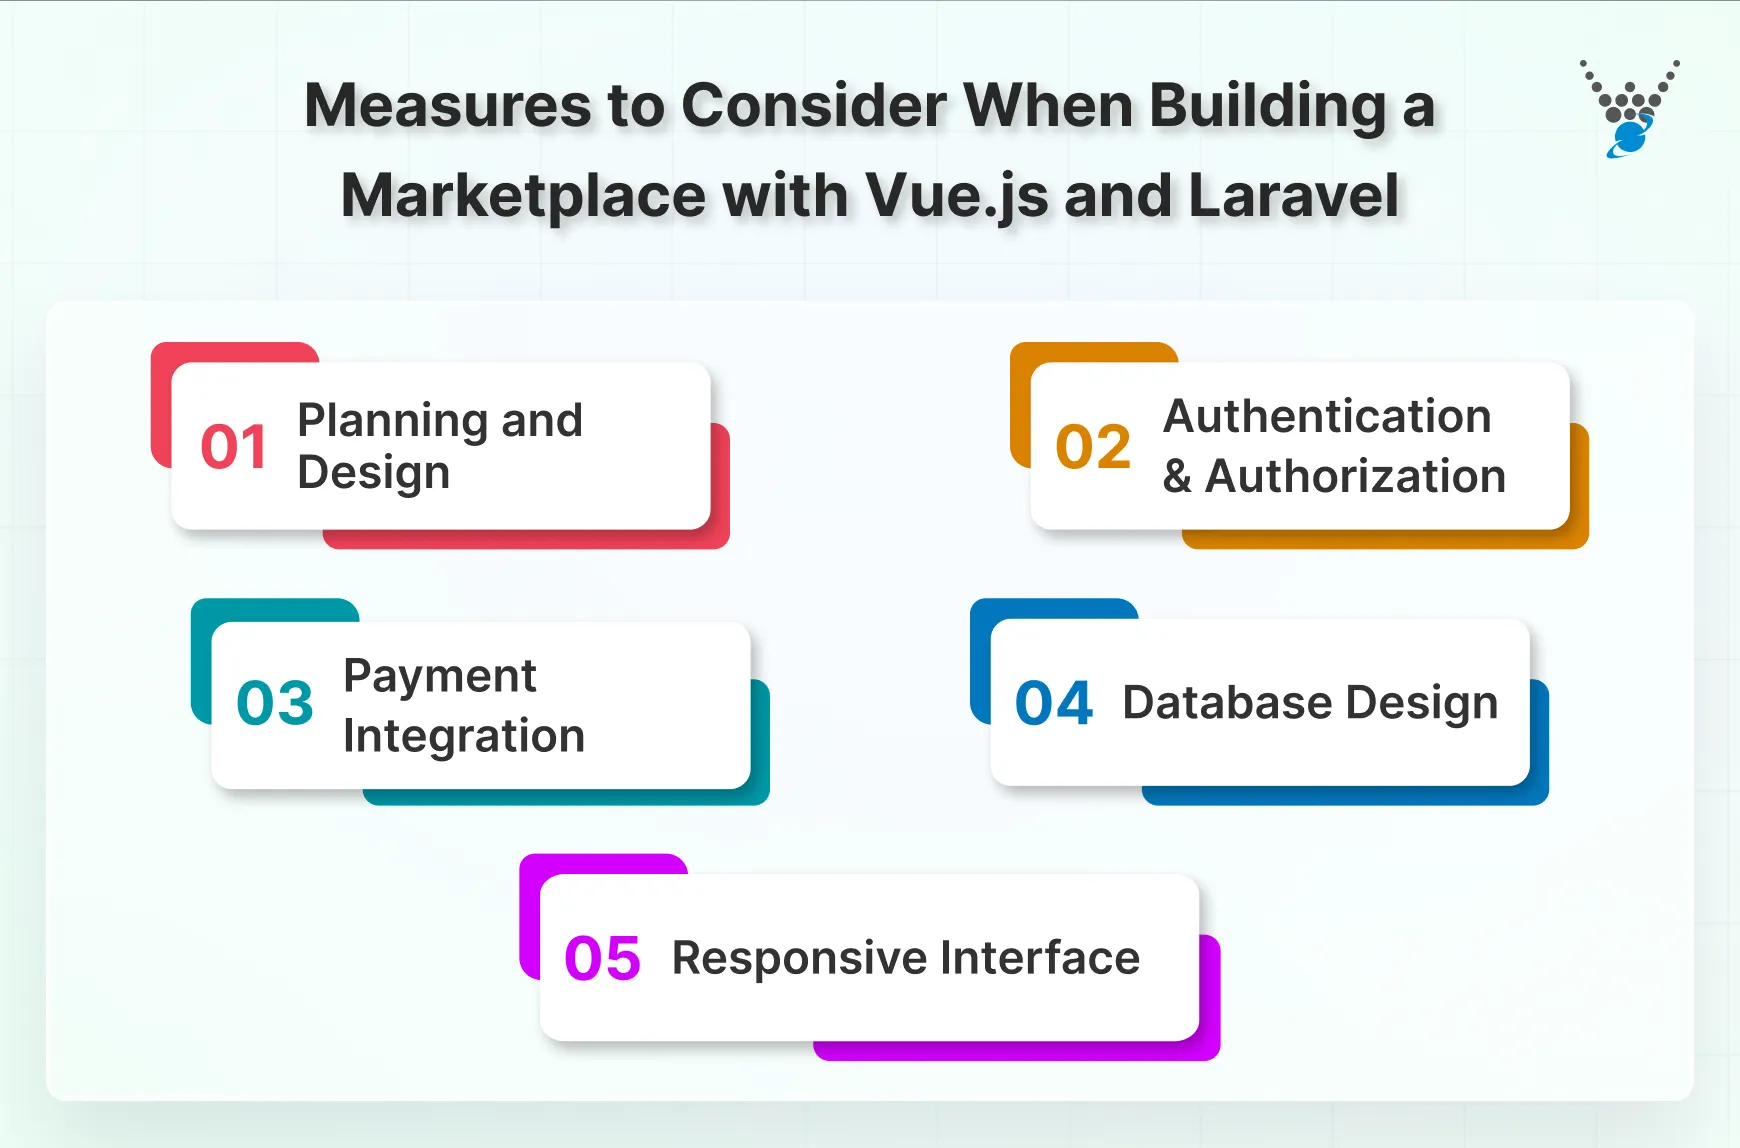
1. Planning and Design
- Start with a clear plan and design for your marketplace.
- Understand your target audience and business niche.
- Create wireframes and prototypes to visualize real-time user interactions.
2. Authentication and Authorization
- Implement robust user authentication and authorization.
- Utilize Laravel’s built-in authentication features.
- Ensure secure access to your marketplace.
3. Payment Integration
- Integrate a reliable payment gateway for secure transactions. (e.g., Stripe or PayPal)
- Facilitate secure and quick transactions between both buyers and sellers.
- Also, do remember to implement features for handling refunds and disputes efficiently.
4. Database Design
- Design a well structured database schema.
- Store user data, product information, and relevant data.
- Optimize database queries for performance.
5. Responsive Interface
- Ensure marketplace accessibility on various devices and screen sizes.
- Utilize CSS frameworks like Bootstrap or Tailwind CSS.
- Simplify responsive design for improved user experience.
Remember that building a marketplace is an ongoing process. Be prepared to adapt to the evolving user needs and market trends as your platform grows.
Remember that building a marketplace is an ongoing process, requiring you to adapt to evolving user needs and market trends as your platform grows. And if you’re exploring other frontend alternatives, our guide on how to use Laravel with React.js shows how Laravel works seamlessly with React for modern UI development.
Conclusion
By following these steps, you’ve built a marketplace with Laravel for backend operations and Vue for a responsive frontend.
With role-based access, product management, and a Vue-powered interface, your platform is ready for users to browse, buy, and sell, offering a solid foundation to expand features as your marketplace grows.
If you want to implement advanced features without errors and ensure a smooth process, work with a custom web development company or hire Laravel developers who can deliver scalable, secure, and high-performing solutions.


