Table of Contents
Handling form validation in Laravel is usually straightforward. But what happens when your input data isn’t flat, like arrays inside arrays or objects with nested fields? That’s where things get tricky. If you’ve ever struggled to validate a list of items, multi-step forms, or dynamic fields, nested validation is exactly what you need.
Laravel makes it easy to handle complex inputs — if you know the right tools and patterns. From dot notation to form request classes, there’s more than one way to keep your code neat and your data accurate.
In this blog, we’ll break down everything you need to know about Laravel Nested Validation, walk through examples. So, let’s start!
What is Nested Validation?
When you’re accepting structured input data like objects, arrays, or lists inside lists, you need a way to validate that entire structure, not just top-level fields. That’s where nested validation in Laravel comes in.
Laravel allows you to validate deeply nested data using dot notation and wildcards (*). This means you can target specific keys inside arrays or even loop over multiple items with minimal effort.
A Simple Example:
Let’s say your form submits a user profile that includes multiple contact methods. The incoming JSON data might look like this:
{
  "user": {
    "name": "Alice",
    "contacts": [
      { "type": "email", "value": "alice@example.com" },
      { "type": "phone", "value": "1234567890" }
    ]
  }
}
To validate this structure, you can write:
$request->validate([
  'user.name' => 'required|string',
  'user.contacts.*.type' => 'required|in:email,phone',
  'user.contacts.*.value' => 'required|string'
]);
Here, Laravel handles the nested structure effortlessly, checking each contact for the correct format and presence of required fields.
Key Concepts:
- dot notation: This lets you access deeply nested fields like user.name or user.contacts.0.type. Laravel automatically walks through the structure to find the correct field.
- * wildcard: When validating arrays, * acts as a placeholder for each index. For example, user.contacts.*.type will apply the rule to every contact’s type field, no matter how many items are in the array.
This method is useful when working with:
- Dynamic form inputs (like adding/removing fields on the frontend)
- JSON payloads from JavaScript-based apps or APIs
- Nested components in reusable frontend frameworks (like Vue or React)
Instead of writing loops or custom validation logic, Laravel’s built-in tools help you keep things concise, readable, and consistent. Nested validation ensures the structure and quality of incoming data without extra effort.
Methods to Implement Nested Validation
There’s no one-size-fits-all way to validate nested data in Laravel. Small form, reusable API requests, and dynamic data import are some common methods. Depending on your use case, you can choose a suitable validation method.
Each approach has its strengths, and knowing when to use – it can make your code cleaner, more maintainable, and easier to scale.

Inline Validation in Controllers
Best For: Quick validations in simple controllers
If you’re working on a small feature or one-off form, validating directly in your controller using $request->validate() is fast and convenient.
public function store(Request $request)
{
    $validated = $request->validate([
        'customer.name' => 'required|string',
        'order.items.*.product_id' => 'required|exists:products,id',
        'order.items.*.quantity' => 'required|integer|min:1',
    ]);
}
Form Request Classes
Best For: Larger, reusable validations
Laravel’s Form Request classes are ideal when you want to organize your validation rules separately. They’re clean, testable, and reusable across multiple controllers.
php artisan make:request StoreUserRequest
// In StoreUserRequest.php
public function rules()
{
    return [
        'user.name' => 'required|string',
        'user.contacts.*.type' => 'required|in:email,phone',
        'user.contacts.*.value' => 'required|string',
    ];
}
Then inject it into your controller:
public function store(StoreUserRequest $request)
{
    $validated = $request->validated();
}
Validator Facade (Manual Validation)
Best For: JSON APIs, webhooks, and background jobs
If you’re validating raw arrays or JSON data often outside of a typical controller, you can use Laravel’s Validator facade for full control.
$data = json_decode($jsonPayload, true);
$validator = Validator::make($data, [
    'event.name' => 'required|string',
    'event.data.items.*.sku' => 'required|string',
    'event.data.items.*.price' => 'required|numeric|min:0',
]);
if ($validator->fails()) {
    return response()->json(['errors' => $validator->errors()], 422);
}
Dynamic Rule Generation
Best For: When the structure of your data changes dynamically
Sometimes, you don’t know the exact number of fields, such as when importing spreadsheets or submitting dynamic forms. In those cases, you can build your validation rules programmatically.
$rules = [];
foreach ($request->input('products', []) as $index => $product) {
    $rules[\"products.$index.name\"] = 'required|string';
    $rules[\"products.$index.variants.*.price\"] = 'required|numeric|min:0';
}
$request->validate($rules);
Each of these methods is designed to solve a different kind of problem, and the good news is – you can mix and match them as needed in your app. Once you’re familiar with these techniques, validating deeply nested and dynamic data becomes a smooth and predictable process.
Advanced Example: Blog Post Submission with Categories and Tags
Let’s say you’re building a blog application in Laravel where users can submit posts in multiple categories and with multiple tags. Each post can have a title, content, and multiple categories and tags associated with it. You’ll validate this nested data using Laravel’s request validation.
Here’s how to achieve this using Form Request Validation.
Scenario:
You have a form where users submit a blog post with a title, content, multiple categories, and tags. The categories are chosen from a list, and tags are entered manually.
Expected Input:
{
    "title": "New Blog Post",
    "content": "This is the blog content...",
    "categories": [1, 2],
    "tags": [
        {"name": "Laravel"},
        {"name": "PHP"}
    ]
}
Step-by-Step Process
To simplify this example, let’s walk through how you can validate and handle a blog post submission that includes nested data like categories and tags.
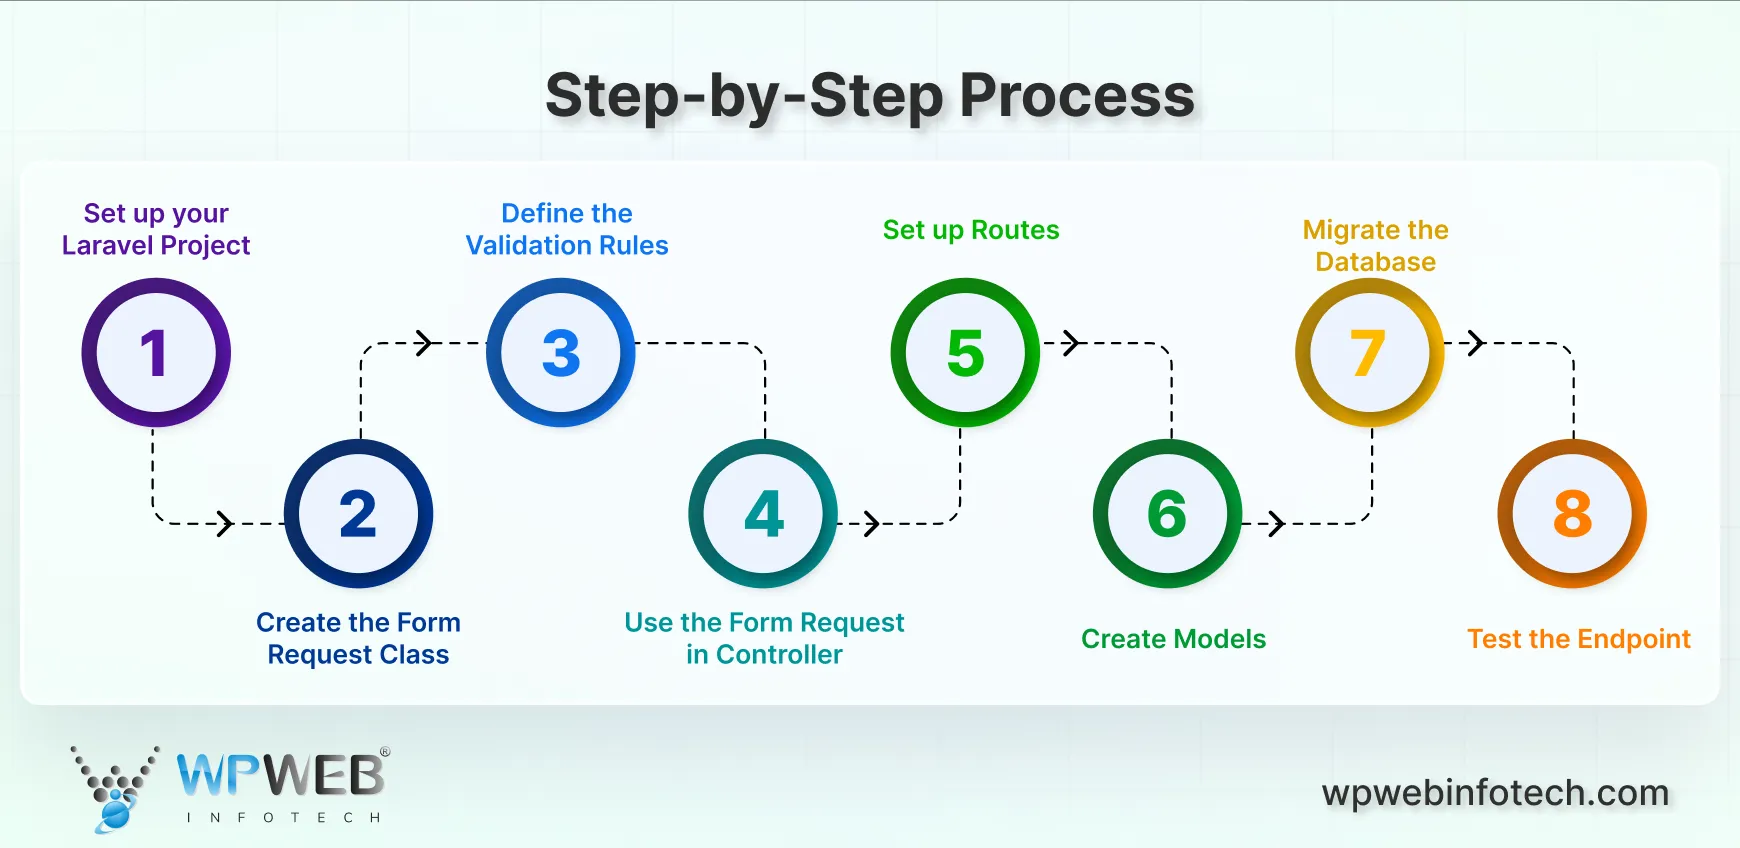
Step 1: Set up your Laravel Project
If you haven’t already set up Laravel, run these commands to install it:
composer create-project --prefer-dist laravel/laravel blog-validation-example
cd blog-validation-example
php artisan serve
Now, you have a fresh Laravel project running.
Step 2: Create the Form Request Class
Next, create a custom request class where we’ll define the validation rules.
php artisan make:request StoreBlogPostRequest
This will generate a new StoreBlogPostRequest.php file in the app/Http/Requests directory.
Step 3: Define the Validation Rules
Open the newly created StoreBlogPostRequest.php and add the following validation rules for title, content, categories, and tags:
// app/Http/Requests/StoreBlogPostRequest.php
public function rules()
{
    return [
        'title' => 'required|string|max:255', // title validation
        'content' => 'required|string|min:10', // content validation
        'categories' => 'required|array', // categories must be an array
        'categories.*' => 'exists:categories,id', // each category ID must exist in the 'categories' table
        'tags' => 'required|array', // tags must be an array
        'tags.*.name' => 'required|string|max:50', // each tag must have a name (string)
    ];
}
Here’s what we’ve validated:
- title: Must be a required string with a max length of 255 characters.
- content: Must be a string with a minimum length of 10 characters.
- categories: Must be an array of existing category IDs from the database.
- tags: Must be an array where each tag has a name that is a string with a max length of 50 characters.
Step 4: Use the Form Request in Controller
Now, inject the request into your controller method. Let’s say we have a BlogPostController to handle the submission of the form.
php artisan make:controller BlogPostController
Open the BlogPostController.php file and define the store method:
// app/Http/Controllers/BlogPostController.php
use App\Http\Requests\StoreBlogPostRequest;
public function store(StoreBlogPostRequest $request)
{
    // Retrieve the validated input data
    $validated = $request->validated();
    // Here you can save the blog post data to the database
    // Assuming you have BlogPost, Category, and Tag models properly set up
    $post = new BlogPost();
    $post->title = $validated['title'];
    $post->content = $validated['content'];
    $post->save();
    // Attach categories to the post
    $post->categories()->sync($validated['categories']);
    // Create tags or associate them with the post
    foreach ($validated['tags'] as $tag) {
        $post->tags()->create(['name' => $tag['name']]);
    }
    return response()->json(['message' => 'Blog post created successfully!'], 201);
}
Step 5: Set up Routes
Next, set up a route to handle the form submission in routes/web.php:
// routes/web.php
use App\Http\Controllers\BlogPostController;
Route::post('/blog-post', [BlogPostController::class, 'store']);
Step 6: Create Models
Make sure you have the appropriate models and database migrations for BlogPost, Category, and Tag. You can create models and migrations as follows:
php artisan make:model BlogPost -m
php artisan make:model Category -m
php artisan make:model Tag -m
Then, set up the relationships in the models, for example:
// app/Models/BlogPost.php
public function categories()
{
    return $this->belongsToMany(Category::class);
}
public function tags()
{
    return $this->hasMany(Tag::class);
}
Step 7: Migrate the Database
Run the migrations to create the necessary tables:
php artisan migrate
Step 8: Test the Endpoint
Now, you can test the blog post creation via Postman, Insomnia, or through a front-end form.
Make a POST request to:
http://localhost:8000/blog-post
With the following JSON payload:
{
    "title": "My First Blog Post",
    "content": "This is a sample content for the blog post.",
    "categories": [1, 2],
    "tags": [
        {"name": "Laravel"},
        {"name": "PHP"}
    ]
}
If the validation passes, you’ll get a response like:
{
    "message": "Blog post created successfully!"
}
If validation fails, Laravel will automatically return the appropriate error messages for any missing or invalid fields.
You’ve now implemented a robust nested validation system for your blog post submission, including categories and tags. This advanced method of validation ensures that your data is structured and validated correctly, helping you handle more complex use cases with ease.
With Laravel’s flexible validation system, adding new rules or expanding the structure is straightforward and easy to manage.
Best Practices for Laravel Nested Validation
When working with Laravel nested validation, following best practices ensures that your validation logic remains clean, efficient, and maintainable. Incorporating Data Validation in Laravel helps enforce consistent and accurate input handling, ensuring your validation rules scale effectively with your application.

Keep Validation Rules Simple and Focused
Avoid writing overly complex validation rules. Simplicity is key for maintaining readability and reducing errors. Break down validation into smaller, more manageable rules, and try to keep each rule focused on one thing.
For example, instead of validating everything in one rule:
// Avoid overly complex rules like this
$request->validate([
    'user.name' => 'required|string|max:255|unique:users',
    'user.email' => 'required|string|email|max:255|unique:users',
]);
Instead, break it up:
// More readable and maintainable approach
$request->validate([
    'user.name' => 'required|string|max:255',
    'user.email' => 'required|string|email|max:255',
]);
This keeps your validation clean and makes it easier to debug or extend in the future.
Leverage Form Request Classes for Reusability
Form Request classes are a powerful feature of Laravel. They allow you to move your validation logic out of your controllers and into a dedicated request class. This not only keeps controllers clean but also makes the validation reusable across different methods.
For example, if you’re validating a blog post submission, create a StoreBlogPostRequest class:
php artisan make:request StoreBlogPostRequest
Then, use it in your controller:
public function store(StoreBlogPostRequest $request)
{
    // Validation is handled automatically
    $validatedData = $request->validated();
}
This helps in keeping your code organized and easily testable.
Use Dot Notation for Nested Data
Laravel allows you to easily validate nested data using dot notation. This keeps your validation rules concise and avoids the need for custom loops.
For example, if you’re validating a user’s address within a user object:
$request->validate([
    'user.address.street' => 'required|string',
    'user.address.city' => 'required|string',
    'user.address.zipcode' => 'required|numeric',
]);
Using dot notation, you can quickly target nested fields without writing repetitive validation rules.
Avoid Redundant Validation
In large applications, it’s tempting to validate the same fields in multiple places, but this can quickly lead to redundancy. Try to centralize your validation logic, especially for common fields.
For example, if you’re validating the email field for both user registration and login, consider creating a custom rule that can be reused:
$request->validate([
    'email' => ['required', 'email', new UniqueEmailRule()],
]);
This approach reduces redundancy and keeps your validation logic DRY (Don’t Repeat Yourself).
Test Your Validation Thoroughly
No matter how simple or complex your validation rules are, always test them with a variety of inputs. Ensure that both valid and invalid data trigger the expected behavior.
Testing helps you catch edge cases and ensure that your application behaves as expected under different conditions. Laravel’s built-in validation features allow you to test rules with php artisan tinker or automated tests.
Use Custom Validation Rules for Complex Scenarios
Sometimes, Laravel’s built-in validation rules aren’t enough. In such cases, you can create custom validation rules to handle more complex scenarios.
For example, you can create a rule that checks if a user’s age is above a certain threshold:
php artisan make:rule AgeAboveThreshold
In your custom rule class, you can define the logic:
public function passes($attribute, $value)
{
    return $value >= 18;
}
Then use it in your validation:
$request->validate([
    'user.age' => [new AgeAboveThreshold()],
]);
Custom rules make your validation more flexible and specific to your app’s needs.
Document Your Validation Logic
As your validation rules grow, it’s important to document them—especially when dealing with nested structures. Clear documentation helps other developers understand why certain rules exist and how they work.
Commenting your validation logic or using doc blocks within your Form Request classes makes your code more accessible to others (or to your future self).
Use Conditional Validation Where Necessary
Sometimes, validation rules should only apply based on certain conditions (e.g., a field might only be required if another field has a specific value). Laravel allows you to add conditional validation logic based on these situations.
For example, making a profile_picture is required only if the user selects a specific option:
$request->validate([
    'profile_picture' => 'required_if:profile_visibility,public|image',
]);
This way, validation adapts to the user’s choices and keeps the process smooth.
By following these best practices for Laravel nested validation, you ensure that your validation rules remain clean, efficient, and easy to manage. Whether you’re building a simple form or a complex API, these guidelines will help you create maintainable and scalable validation logic for any type of nested data structure.
Conclusion
Nested validation in Laravel isn’t just nice to have; it’s essential when working with complex or dynamic data. Whether you’re building APIs, handling JSON payloads, or managing dynamic forms, using dot notation and wildcards keeps your validation clean and scalable.
By leveraging tools like form requests, custom rules, and conditional logic, you can avoid clutter and maintain full control over your data integrity.
If you need professional help with managing your data in Laravel, you can consider working with a Laravel development agency to simplify things and save time.
FAQs For Laravel Nested Validation
What is validation in Laravel?
Validation in Laravel is the process of checking incoming request data to ensure it meets certain rules before it’s used or saved. It helps keep your application secure and your data clean.
What are the requirements for array validation in Laravel?
To validate arrays in Laravel, you can use rules like ‘field’ => ‘array’ and apply rules to each item using wildcards like ‘field.*’ => ‘rule’. This works well for things like lists, multi-input fields, or nested data.
How to create a validation rule in Laravel?
You can create a custom rule using php artisan make:rule CustomRuleName to create a validation in Laravel. Then, define your logic in the passes method and return your error message from message().
How to validate form input in Laravel?
To validate form input in Laravel, use $request->validate([…]) inside a controller or use a Form Request class to define reusable validation logic. Laravel automatically returns validation errors if the input doesn’t meet the rules.
What is bail in Laravel validation?
The bail rule in Laravel stops running further validation rules on a field after the first failure. It’s useful to avoid unnecessary checks once a basic condition fails (like required).

Build Powerful Laravel Applications
Learn how to leverage Laravel's powerful features for efficient and scalable web development.