Quick Summary
Unlock the full potential of user engagement with Laravel’s Notification System. This guide covers database notifications, email alerts, Slack messages, and custom channels, showing how to create, format, and deliver messages efficiently. Learn to set up models, migrations, and traits, display notifications in views, mark them as read, and even test and debug. Build notifications that are timely, reliable, and elevate the user experience effortlessly.
Table of Contents
Keeping your users informed is key to building a strong online presence. The Laravel Notification System makes it easy to send messages, alerts, and updates directly to your users in real time. Whether it’s letting them know about account activity, special offers, or important updates, Laravel notifications keep your audience connected and engaged.
These notifications are quick, reliable, and feel personal. For businesses, this means better user engagement, smoother communication, and stronger relationships with your audience. With Laravel, you’re creating a better experience for every user.
In this blog, we’ll cover everything you need to know to get started with Laravel notifications. We’ll begin with the prerequisites and learn how the experts set up notification systems. Additionally, we’ll help you learn advanced tips and tricks for setting up Laravel notifications. With that said, let’s dive in!
How Laravel Notification System Works
Laravel makes sending notifications feel effortless. At its core, the system follows a clear and simple workflow. First, an event or action takes place, like a user signing up or placing an order. Such triggers are efficiently handled through Laravel Events and Listeners, which play a key role in automating notification workflows. Once it’s ready, the message is sent through one or more channels.
What makes it powerful is the flexibility. You can send notifications in the way that best suits your audience. Laravel supports several channels out of the box:
- Mail: Perfect for sending clean, structured emails with ease, similar to how you’d configure sending emails in Laravel for automated user messages.
- Database: Stores notifications securely so users can view them inside your app whenever they need.
- Slack: Ideal for team alerts, quick updates, and smooth internal communication.
- Custom Channels: If you need something beyond the basics, Laravel allows you to build your own channels too.
Every message follows a clear path from trigger to delivery. You decide how and where it reaches your users. This gives you complete control, without adding complexity. The process stays simple, but the impact is substantial.
Prerequisites for Creating Laravel Notification System
Before setting up notifications, you need a solid foundation. This keeps the workflow smooth and avoids small issues later.
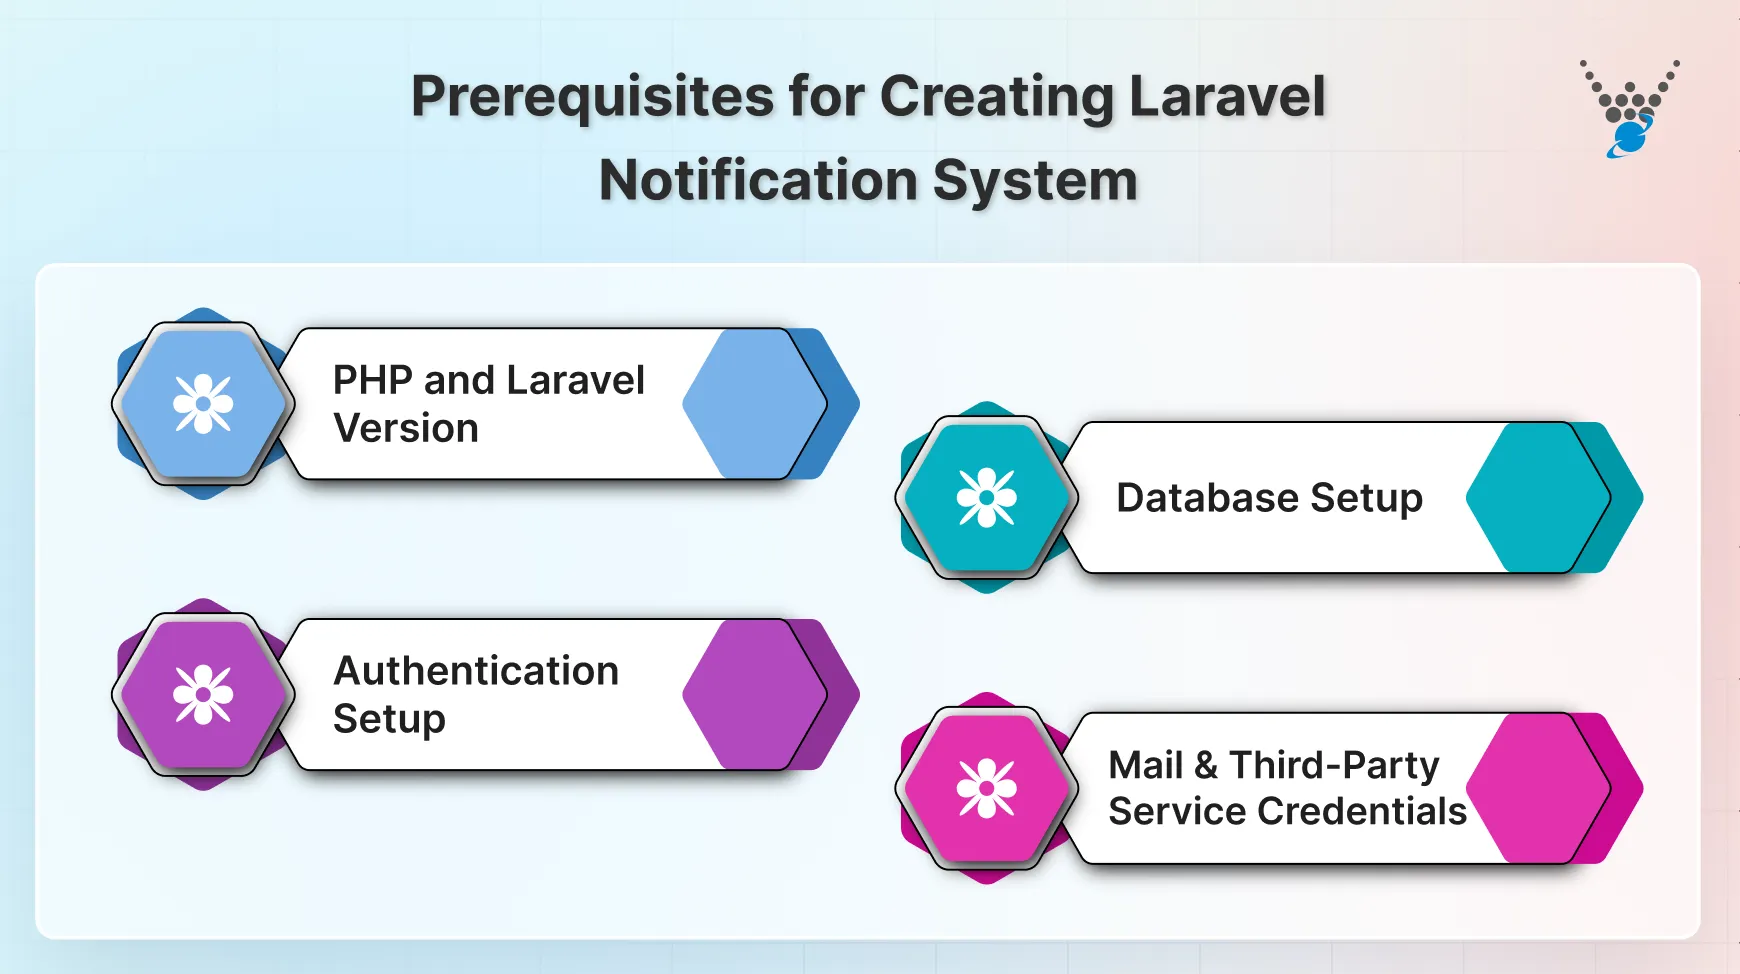
- PHP and Laravel Version: Use PHP 8.1 or higher and Laravel 10 or above. These versions give you better performance, security, and full support for the latest notification features. Keeping your environment updated makes everything more stable.
- Database Setup: Notifications often need a database to store and display messages to users. Make sure your database is connected and configured in your .env file. MySQL, PostgreSQL, or SQLite work well with Laravel.
- Authentication Setup: A basic authentication system must be in place so notifications can be linked to real users. This ensures that each message reaches the right person securely.
- Mail and Third-Party Service Credentials: If you plan to send notifications through email or external platforms, keep your service credentials ready. Providers like Mailgun, Postmark, or Slack require proper configuration. Having this prepared makes the integration smooth.
Once these essentials are set, you can build your Laravel Notification System with confidence, just like when you create contact form using Laravel to handle user messages effectively. Are, you’re ready to explore Laravel’s Notification System and integrate it into your project seamlessly.
How to Set up a Laravel Notification System?
To implement Laravel Notifications, follow these structured steps to ensure smooth integration. We’ll guide you through creating the notification class, configuring the environment, setting up routes, and displaying notifications in the Blade view.
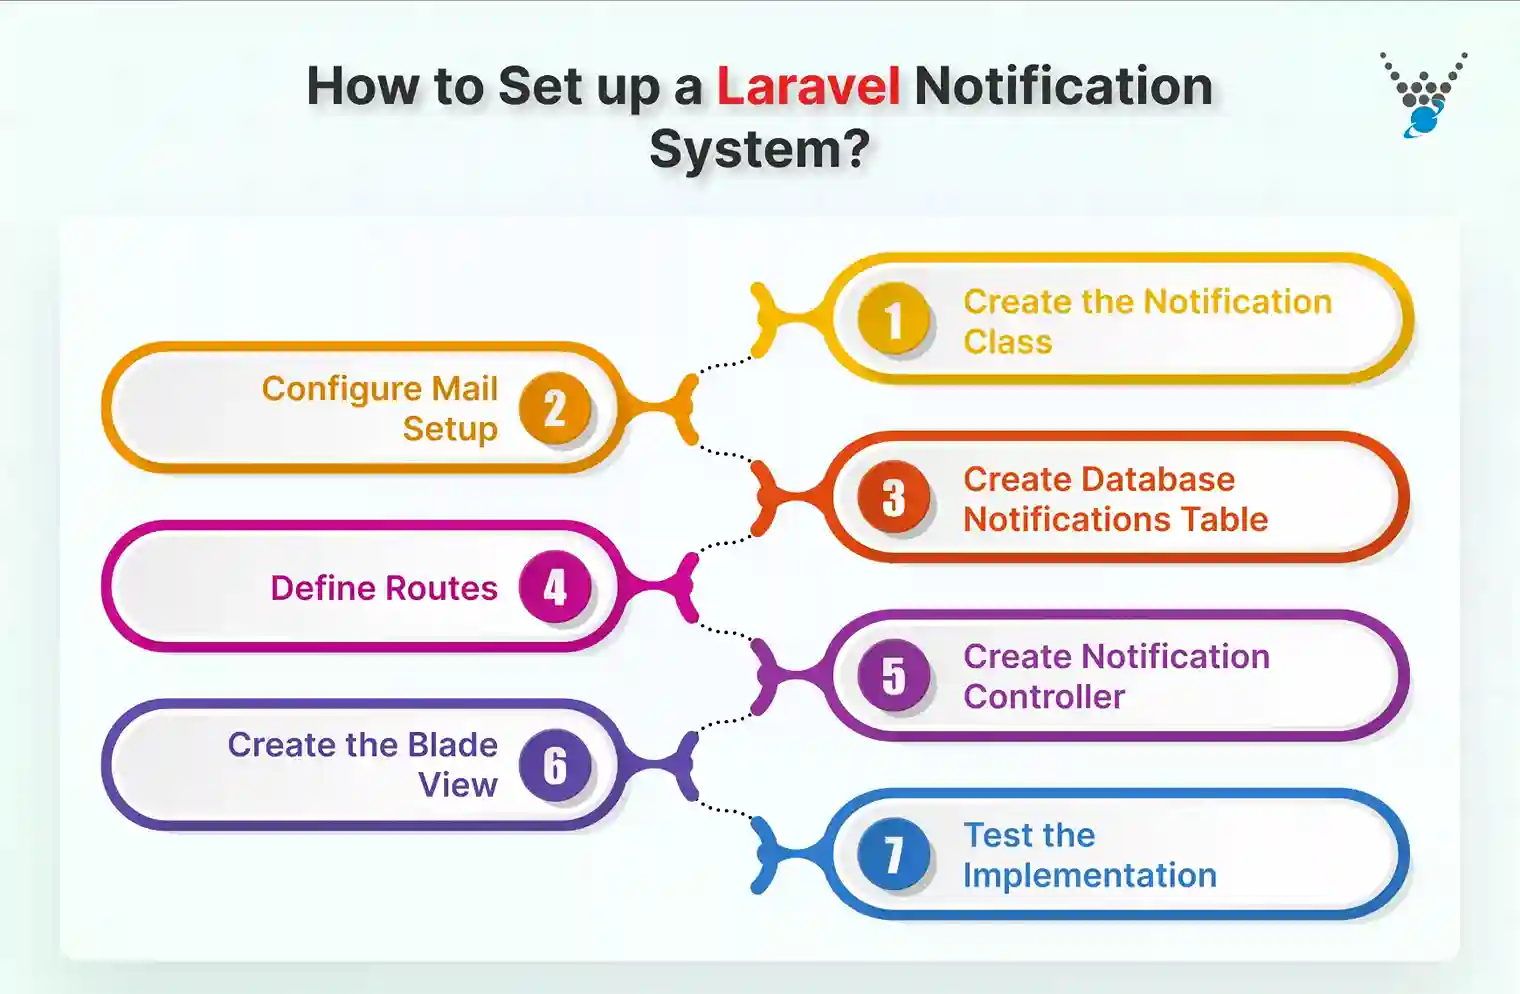
Step 1: Create the Notification Class
First, you need to generate a new notification class. This will allow you to define the content and delivery channels for your notification. Run the following Artisan command to generate the notification:
php artisan make:notification TaskCompleted
This command will create a new file TaskCompleted.php in the app/Notifications/ directory. In this class, we’ll define how the notification is delivered, its content, and the channels it will use.
Code: app/Notifications/TaskCompleted.php
<?php
namespace App\Notifications;
use Illuminate\Bus\Queueable;
use Illuminate\Contracts\Queue\ShouldQueue;
use Illuminate\Notifications\Messages\MailMessage;
use Illuminate\Notifications\Notification;
class TaskCompleted extends Notification
{
    use Queueable;
    private $task;
    public function __construct($task)
    {
        $this->task = $task;
    }
    public function via($notifiable)
    {
       return ['mail', 'database']; // Deliver via email and store in the database
    }
    public function toMail($notifiable)
    {
        return (new MailMessage)
                    ->subject('Task Completed')
                    ->line('Notification from WpWeb Infotech.')
                    ->line($this->task)
                    ->action('View Notifications', url('/notifications'))
                    ->line('Thank you for using our application!');
    }
    public function toArray($notifiable)
    {
        return [
            'task' => $this->task,
            'message' => 'Notification from WpWeb Infotech: ' . $this->task,
        ];
    }
}
This code defines the TaskCompleted notification class. It uses the Queueable trait to queue the notification for delivery, and it specifies two delivery channels: email (toMail) and database (toArray). The constructor accepts a $task parameter, which represents the task message that will be included in the notification.
Step 2: Configure Mail Setup
Ensure that your .env file is set up correctly with mail credentials. You can use Mailtrap for testing your mail notifications. In your .env file, add the following configuration:
MAIL_MAILER=smtp
MAIL_HOST=smtp.mailtrap.io
MAIL_PORT=2525
MAIL_USERNAME=your_username
MAIL_PASSWORD=your_password
MAIL_ENCRYPTION=tls
MAIL_FROM_ADDRESS=your_email@example.com
MAIL_FROM_NAME="${APP_NAME}"
This configuration sets up the mail driver and SMTP details. Mailtrap is a service that helps you catch emails during development for testing purposes, preventing them from being sent to real recipients.
Step 3: Create Database Notifications Table
To store notifications in the database, generate the migration for the notifications table and run it. Here is the command to do so:
php artisan notifications:table
php artisan migrate
The notifications:table command generates the migration to create a table for storing notifications in the database. The migrate command then runs the migration to apply the changes to your database, allowing notifications to be saved for users.
Step 4: Define Routes
Add the necessary routes in the routes/web.php file to handle sending and displaying notifications.
Code: routes/web.php
use App\Notifications\TaskCompleted;
use Illuminate\Support\Facades\Auth;
use Illuminate\Support\Facades\Route;
use App\Http\Controllers\NotificationController;
// Route to send a notification to the authenticated user
Route::middleware('auth')->get('/send-notification', function () {
    $user = Auth::user(); // Get the authenticated user
    $task = 'This is a test notification sent via Laravel by WpWeb Infotech.';
    $user->notify(new TaskCompleted($task)); // Send notification
    return redirect()->route('notifications.index')->with('success', 'Notification sent successfully!');
})->name('send_notification');
// Routes to manage and display notifications
Route::middleware('auth')->group(function () {
    Route::get('/notifications', [NotificationController::class, 'index'])->name('notifications.index');
    Route::patch('/notifications/{id}/read', [NotificationController::class, 'markAsRead'])->name('notifications.read');
});
This code sets up the routes to send a notification and manage notifications. The /send-notification route sends the notification to the authenticated user. The /notifications route displays the list of notifications, and the /notifications/{id}/read route marks a notification as read – a process similar to Laravel delete record using Ajax, where actions are performed dynamically without page reload.
Step 5: Create Notification Controller
Next, create a controller to manage the display and marking of notifications. Here is the Artisan command to generate the controller:
php artisan make:controller NotificationController
Code: app/Http/Controllers/NotificationController.php
<?php
namespace App\Http\Controllers;
use Illuminate\Http\Request;
use Illuminate\Support\Facades\Auth;
class NotificationController extends Controller
{
    public function index()
    {
        $notifications = Auth::user()->notifications; // Fetch notifications for the authenticated user
        return view('notifications.index', compact('notifications'));
    }
    public function markAsRead($id)
    {
        $notification = Auth::user()->notifications()->findOrFail($id);
        $notification->markAsRead();
        return back()->with('success', 'Notification marked as read.');
    }
}
This controller handles the logic for displaying and marking notifications as read. The index method fetches all notifications for the authenticated user, while the markAsRead method marks a specific notification as read.
Step 6: Create the Blade View
Now, create a Blade view to display the notifications. This view will show the notifications stored in the database, along with a button to mark them as read.
Code: resources/views/notifications/index.blade.php
@extends('layouts.app')
@section('title', 'Notifications')
@section('content')
<div class="container">
    <h1 class="mt-4">Your Notifications</h1>
    @if (session('success'))
        <div class="alert alert-success">
            {{ session('success') }}
        </div>
    @endif
    <ul class="list-group">
        @forelse ($notifications as $notification)
            <li class="list-group-item">
                <div><strong>{{ $notification->data['message'] }}</strong></div>
                <div><small>Received at: {{ $notification->created_at->diffForHumans() }}</small></div>
                <div class="mt-2">
                    @if (!$notification->read_at)
                        <form action="{{ route('notifications.read', $notification->id) }}" method="POST" class="d-inline">
                            @csrf
                            @method('PATCH')
                            <button type="submit" class="btn btn-sm btn-primary">Mark as Read</button>
                        </form>
                    @else
                        <span class="badge bg-secondary">Already read</span>
                    @endif
               </div>
            </li>
        @empty
            <li class="list-group-item"><p>No notifications found.</p></li>
        @endforelse
    </ul>
</div>
@endsection
This Blade view renders the list of notifications. It shows the message content, the time the notification was received, and a button to mark the notification as read. If the notification has already been read, it displays a “Already read” badge.
Step 7: Test the Implementation
Finally, log in as a user using the Breeze-provided login functionality. Visit the /send-notification route to trigger the notification. Once the notification is sent, you will be redirected to the /notifications route where the notification will be displayed. You can also mark the notification as read.
By following these steps, you’ll successfully implement the Laravel Notification System to deliver notifications via email and store them in the database. It’s a great way to keep users informed and enhance user experience within your Laravel application. If you are looking to build a website that aligns with your needs, get in touch with our Laravel development company.
Database Notifications in Laravel
Database notifications give your users a simple way to view important updates inside the application. They’re stored securely in the database and can be displayed whenever needed. This makes the experience clean, fast, and reliable.
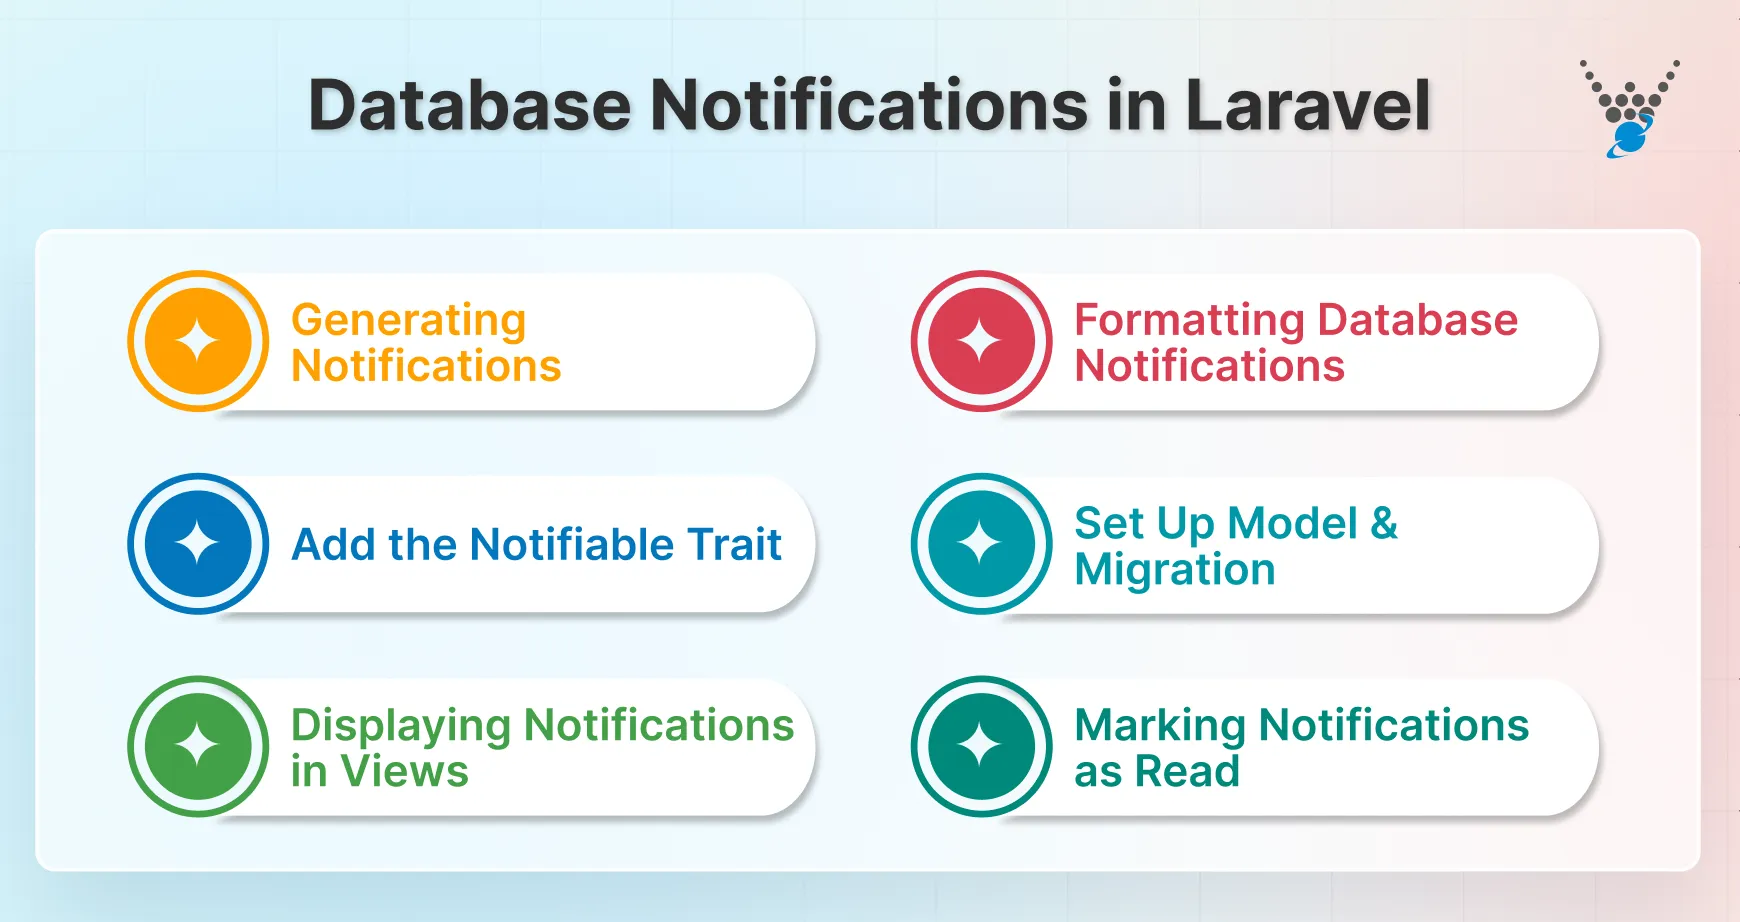
- Generating Notifications: Start by creating a notification class. Laravel makes this easy with a single command. It builds the basic structure so you can focus on the content of the message instead of the setup.
- Formatting Database Notifications: Inside the notification class, define what data you want to store. This can include a title, message, and any extra details you want the user to see. Keep the format simple and structured so it’s easy to display later.
- Add the Notifiable Trait: Your user model should use the Notifiable trait. This gives the model the ability to receive notifications. Without this, the notification won’t reach the user.
- Set Up Model and Migration: Run the notification migration to create the table in your database. This is where all notifications will be stored. Each record holds details about the message, the user, and its read status.
- Displaying Notifications in Views: You can easily fetch and display notifications in your Blade templates. A simple loop can show messages in dashboards, headers, or any section of your app. This keeps users informed without extra steps.
- Marking Notifications as Read: Once a user views the message, you can mark it as read. This helps keep the notification panel organized and clear. It also improves the overall user experience.
Database notification in Laravel keeps everything structured, fast, and easy to manage. With just a few steps, you can build a reliable notification system that feels smooth for both users and developers.
Email Notifications in Laravel
Email notifications are one of the most direct ways to keep users informed. Laravel makes this process smooth with built-in support for popular mail services. With a few steps, you can send professional emails without extra complexity.
Update .env Mail Configurations
Start by setting up your mail credentials in the .env file. Add the host, port, username, and password from your mail provider. Laravel supports services like Mailgun, Postmark, and SMTP. Once saved, these settings make sure your emails are sent securely and on time.
Formatting Mail Notifications
In your notification class, define how the email should look. Laravel’s toMail method lets you create a clean, structured email with a subject, greeting, message, and call-to-action button. Keep the content clear and focused so the user knows exactly why they’re receiving it.
Sending Email Notifications
After formatting, sending the notification is simple. Call the notify() method on the user model. Laravel handles the rest. The email reaches the inbox quickly and reliably.
Email notifications build trust. They keep your users informed without making them log in to the app. With proper configuration, Laravel makes this entire process fast, efficient, and easy to maintain.
Other Notifications in Laravel
Laravel is flexible enough to handle notifications beyond emails and database alerts. You can reach users through Slack or even build your own custom notification systems. This flexibility allows you to create experiences that match your application’s needs.
Slack Notifications in Laravel
Slack notifications are great for team updates, alerts, and internal communication.
- Create Slack Notifications: Laravel provides a notification channel specifically for Slack. Start by creating a new notification class. Inside, define the message you want to send. Keep it concise and clear, as Slack messages are most effective when brief.
- Set Up Incoming Webhook: To send messages, you’ll need a Slack incoming webhook URL. This connects your Laravel app to your Slack workspace securely. Once set, Laravel can push notifications to the correct channel automatically.
Laravel Custom Notification Channel
Sometimes, you need more control than the default channels allow. Building a custom notification system can help deliver tailored experiences to your users.
Why Build a Custom Notification System?
Custom notifications allow you to handle unique use cases, integrate with third-party tools, or display messages in ways that standard channels don’t support – similar to how you create and test an API in Laravel for smooth external integrations. It gives you complete control over the flow and design.
Create Custom Notification Model and Migration
Start by creating a model and database migration for your custom notifications. This will store messages, user references, and read/unread status. Keep the schema flexible to support future features.
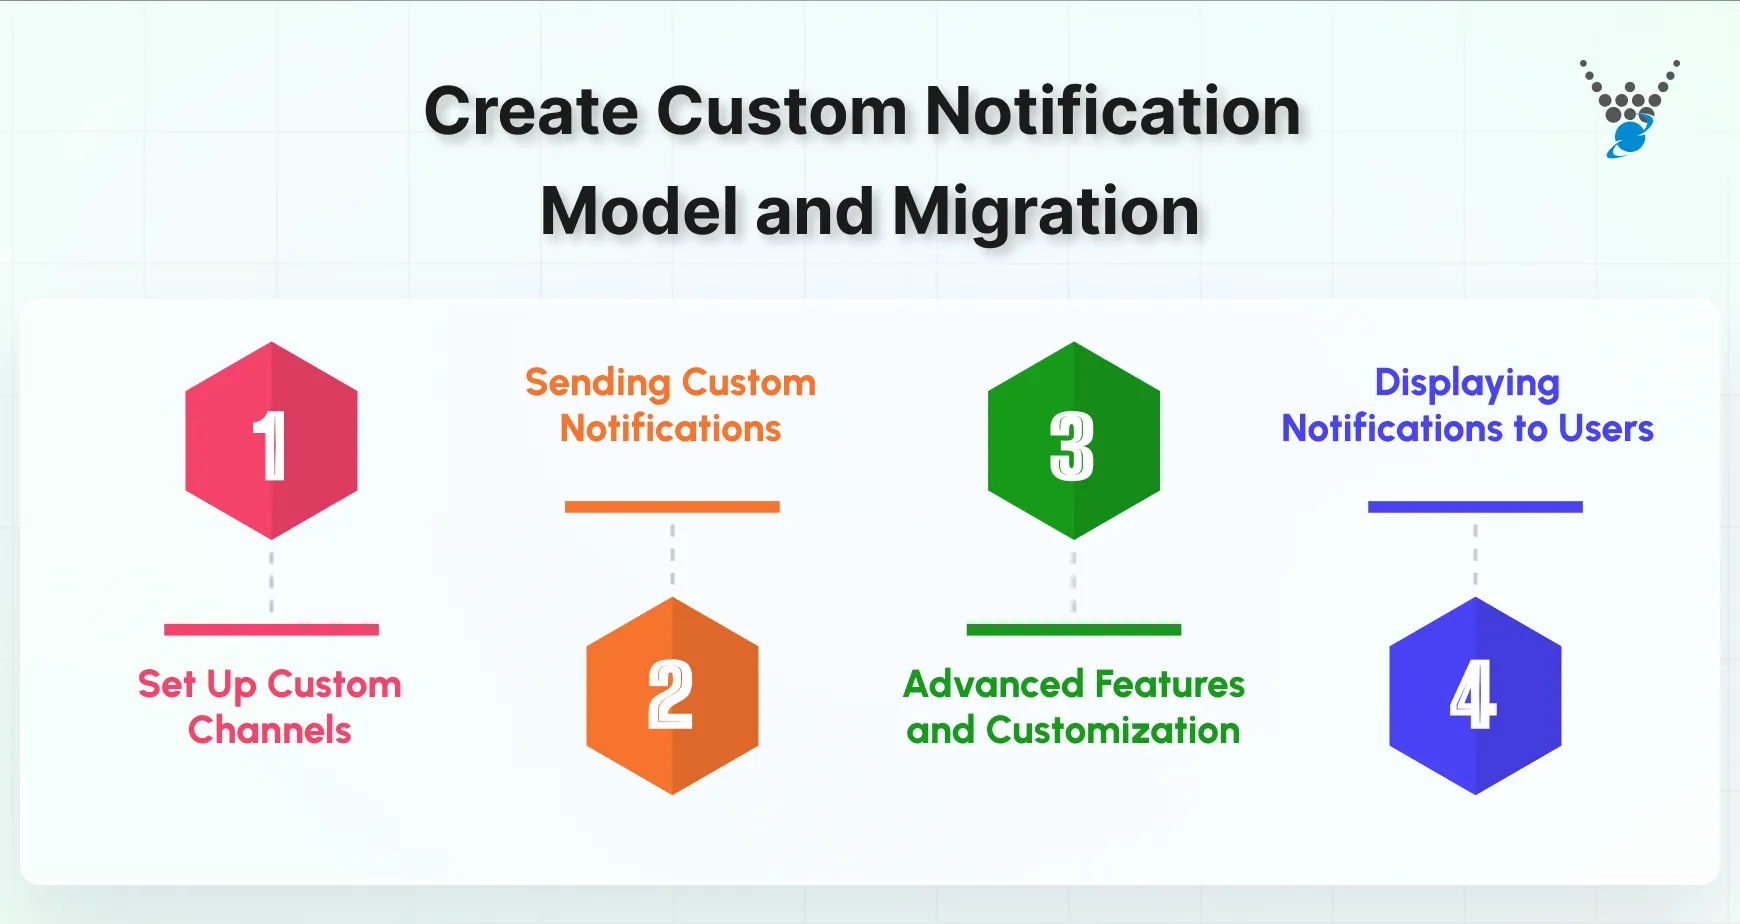
1. Set Up Custom Channels
Laravel allows you to define custom channels. These can send messages through APIs, push notifications, or even in-app systems. Custom channels give you full flexibility in how notifications are delivered.
2. Sending Custom Notifications
Use the notify() method with your custom channels just like built-in channels. This keeps the code simple while delivering fully tailored messages to users.
3. Advanced Features and Customization
Custom notifications can include priorities, expiration times, or conditional sending. You can also attach extra data for better user experiences. This level of detail ensures notifications feel relevant and timely.
4. Displaying Notifications to Users
Render custom notifications in your app using Blade or any front-end framework. Keep the display clear, organized, and interactive so users can act on them quickly.
Testing and Debugging Notifications
Testing notifications is essential to ensure reliability. Laravel allows you to preview messages, use the log channel for debugging, and write automated tests to verify delivery. Always check emails, database entries, and external channels to confirm everything works as expected.
Advanced Tips and Tricks for Laravel Notifications
Laravel’s notification system is incredibly powerful, and when leveraged to its full potential, it can enhance the user experience in your application. Here are some advanced tips and tricks to help you maximize the effectiveness and performance of your notifications.
Queue Notifications for Better Performance
To ensure better performance and avoid blocking the main thread, you can queue notifications for asynchronous processing. By implementing the ShouldQueue interface in your notification class, you can offload the task of sending notifications to a background job.
use Illuminate\Contracts\Queue\ShouldQueue;
class TaskCompleted extends Notification implements ShouldQueue
{
    // Your notification logic here
}
Make sure to configure your queue driver in the .env file to enable background job processing.
Use Custom Notification Channels
Laravel allows you to create custom notification channels to send notifications through platforms like Slack, Twilio, or any third-party API. By defining a custom channel, you can send notifications to virtually any medium you need.
Real-Time Notifications with Pusher
For real-time updates, combine Laravel notifications with services like Pusher or WebSockets. This allows you to push notifications instantly to users without the need for them to refresh the page.
Notification Filtering
Sometimes you may want to retrieve specific types of notifications, such as unread notifications. You can use scopes to filter notifications and only fetch the ones you need, improving performance and user experience.
$unreadNotifications = Auth::user()->unreadNotifications;
Custom Database Tables
By default, Laravel stores notifications in a standard notifications table. However, you can customize the database structure by defining the viaDatabase() method. This allows you to store additional data or modify the table schema to suit your application’s needs.
By implementing these advanced tips, you can enhance both the performance and flexibility of the Laravel notification system, making it more efficient and customized to your needs.
Wrapping Up
Laravel’s Notification System is an essential feature for building applications that keep users informed and engaged. With support for multiple channels like email, SMS, and database, it offers a flexible and efficient way to deliver updates and alerts. Setting up the system requires minimal effort, and advanced features like queuing notifications, creating custom channels, and enabling real-time updates make it even more powerful.
By using these capabilities, developers can create custom notification systems that enhance the user experience and ensure timely communication. Whether for simple alerts or complex real-time interactions, Laravel provides everything needed to implement a reliable notification system.
If you are looking to build a real-time website that performs well and is well-designed, hire Laravel developers with us today!
FAQs About Laravel Notification System
How to create a notification table in Laravel?
To create a notification table in Laravel, run the command php artisan notifications:table, which will generate a migration for the notifications table. Then, run php artisan migrate to create the table in your database.
What is the difference between mail and notification in Laravel?
In Laravel, Mail is used to send emails, whereas Notifications provide a unified API to send alerts across multiple channels (email, SMS, database, etc.). Notifications are more flexible and can be sent to different mediums at once, while Mail is specific to email delivery.
How to create push notifications in Laravel?
To create push notifications in Laravel, you can use services like Pusher or Firebase Cloud Messaging (FCM). First, integrate the service into your Laravel app, then create a notification class and use the service’s API to push notifications to users in real time.