Table of Contents
If you’re looking to build a fast, SEO-friendly website while still managing content easily, combining Gatsby with Drupal is a smart move. Gatsby gives you speed and performance, while Drupal brings in the flexibility of a powerful CMS.
This setup works great for developers who want the best of both worlds — a static frontend with a dynamic content backend. You get full control over content structure without sacrificing site speed or modern web features.
In this guide, we’ll show you how Drupal development professionals use Gatsby and Drupal together, from setting up the server to deploying a live site.
Set Up a Drupal Server
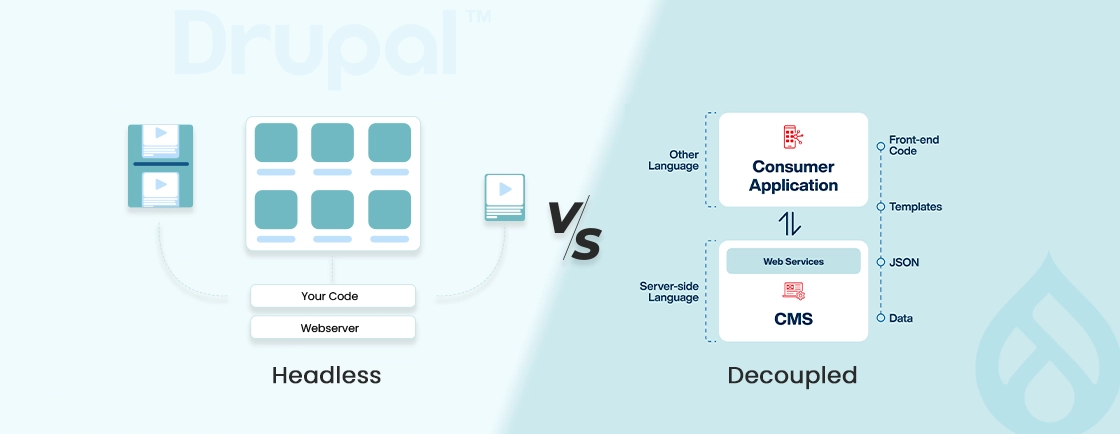
Before you connect Drupal with Gatsby, you need to prepare your Drupal site to serve content via API. Using decoupled Drupal with Gatsby enables the benefits of the JAMstack architecture. If you already have a working Drupal site, feel free to skip this step and move on.
But if you’re starting from scratch, here’s how to get your Drupal backend ready.
Create the Coffee Content Type
We’ll start by creating a content type called Coffee, which will act as the main content model in your Gatsby site.
- Log in to your Drupal admin panel.
- Go to Structure → Content types → Add content type
- Name your content type “Coffee”
Add the following fields:
- Title: This is added by default.
- Body: A text area to describe the coffee.
- Image: Optional, but useful if you want to display visuals.
These fields will be exposed to Gatsby through the API, so make sure to use clear and meaningful names. You can always add more fields later as needed.
Enable the API Server
To allow Gatsby to fetch content from Drupal, you need to expose the content as a JSON-based API.
Luckily, this is built into Drupal core, so the main module JSONAPI is already available. However, to customize things a bit more (like changing endpoints, field visibility, etc.), you’ll also need to install the jsonapi_extras module.
- jsonapi: Already included in Drupal; it exposes your content at /jsonapi.
- jsonapi_extras: Optional but useful. You can install it through the module installer or via Composer.
Tip: After enabling jsonapi_extras, you can control which content types appear in the API and tweak how field values are formatted — this helps make your API cleaner for Gatsby.
Set Permissions for Anonymous Users
By default, your API may be restricted from public access. Since Gatsby will fetch data without logging in, you need to grant API access to anonymous users.
- Go to People → Permissions
- Scroll down to the JSON:API section
- Enable Access JSON:API resource list for the Anonymous role
- Save the permissions
This step is important; skipping it will likely result in 403 or 406 errors when Gatsby tries to connect.
Want to make sure your Drupal backend is set up correctly and securely? We offer Drupal development services to help you configure APIs, permissions, and content types without any guesswork.
Verify the API Server
To test if the API is up and running:
http://[your-drupal-site]/jsonapi
You should see a block of JSON text showing your site’s available content types and endpoints. This confirms that the Drupal backend is working and Gatsby will be able to fetch data.
Tips:
- If you’re using Chrome, you can install the JSON Viewer extension to view the JSON data in a more readable format.
- 406 Error? Check the permissions for Anonymous users.
- 405 Error? Ensure that the jsonapi_extras module is installed and enabled.
With your Drupal server now exposing content through a RESTful API, you’re ready to move on and start building your Gatsby frontend.
Build a Gatsby Site
Now that your Drupal backend is ready, let’s create a Gatsby frontend to display the Coffee content.
Install Node and Gatsby
First, make sure your system has Node.js and npm installed. Open your terminal and check:
node -v
npm -v
If both commands return a version number, you’re good to go. Now install the Gatsby CLI (Command Line Interface) globally:
npm install --global gatsby-cli
Create a New Gatsby Site
Let’s create a fresh Gatsby site. You can name it anything — here we’ll use coffees.gatsby:
gatsby new coffees.gatsby
cd coffees.gatsby
gatsby develop
This will spin up a local development server. Once started, your site should be live at:
http://localhost:8000/
Gatsby will automatically reload your site when changes are made. You’re now ready to pull in data from Drupal. Build customer-centric static sites by synchronizing Drupal CRM data at Gatsby build time.
Fetch Content from the Drupal Server
With your Gatsby site running, the next step is to connect it to your Drupal backend and display the Coffee content.
Create the /coffees Page
Start by creating a new page to list your coffee items.
- Go to the /src/pages/ directory
- Create a file called coffees.js
Paste this basic component:
import React from "react"
const CoffeesPage = () => (
  <div>
    <h1>Different types of coffee</h1>
  </div>
)
export default CoffeesPage
When you navigate to /coffees in your browser, you’ll see the heading. Let’s now connect it to Drupal.
Install the gatsby-source-drupal Plugin
To connect Gatsby to your Drupal site, you’ll need the gatsby-source-drupal plugin. Install it by running the following command in your Gatsby project:
npm install --save gatsby-source-drupal
Configure the Plugin
After installation, configure the plugin in your gatsby-config.js file. Add the following configuration:
module.exports = {
  plugins: [
    {
      resolve: 'gatsby-source-drupal',
      options: {
        baseUrl: 'http://localhost/drupal/web/', // Replace with your Drupal base URL
        apiBase: 'jsonapi', // Optional, defaults to 'jsonapi'
      },
    },
  ],
}
This tells Gatsby to connect to your Drupal server and pull content via the JSON API.
Query Drupal Content with GraphQL
Next, let’s use GraphQL to query the Coffee content from Drupal. Gatsby has a built-in GraphQL tool called GraphQL, which you can access at:
http://localhost:8000/___graphql
Once you’re in GraphiQL, try the following query to get all coffee nodes:
{
  allNodeCoffee {
    edges {
      node {
        id
        title
        body {
          value
          format
          processed
          summary
        }
      }
    }
  }
}
This will fetch all Coffee nodes, including their title and body content.
Display Content on the Page
Now, let’s go back to the coffees.js file and use the GraphQL data. Update your page like so:
import React from "react"
const CoffeesPage = ({ data }) => (
  <div>
    <h1>Different types of coffee</h1>
    {data.allNodeCoffee.edges.map(({ node }) => (
      <div key={node.id}>
        <h3>{node.title}</h3>
        <div dangerouslySetInnerHTML={{ __html: node.body.value }} />
      </div>
    ))}
  </div>
)
export const query = graphql`
  query allNodeCoffee {
    allNodeCoffee {
      edges {
        node {
          id
          title
          body {
            value
            format
            processed
            summary
          }
        }
      }
    }
  }
`
export default CoffeesPage
This code will fetch and display the title and body content of all the Coffee nodes from Drupal.
Publish the Gatsby Site
Once your Gatsby site is working perfectly in the local environment, it’s time to make it live for the world to see.
Build the Static Site
Gatsby is a static site generator, which means it turns your React app into fast, static HTML files. To start the production build, run this command in your terminal:
gatsby build
This will compile and optimize all your pages, images, and content. Once the build is done, Gatsby will create a new folder called /public in your project root. This folder contains everything your site needs to run — HTML, CSS, JS, and all the assets.
Deploy Your Site
Now that you have the static files, you can deploy them on any static hosting service or web server. Here are a few popular options:
- Netlify: Drag and drop the /public folder or connect your Git repo.
- Vercel: Great for JAMstack apps with automatic deployment.
- GitHub Pages: Push the /public folder to your gh-pages branch.
- Traditional Hosting: Upload the contents of /public via FTP or cPanel.
No matter where you host it, just make sure you’re uploading the contents of the /public folder (not the folder itself). Configure headless Drupal webhooks to trigger automatic Gatsby Cloud rebuilds whenever content editors publish updates.
Conclusion
Connecting Drupal with Gatsby gives you the best of both worlds – Drupal’s powerful content management and Gatsby’s blazing-fast frontend performance. It’s a great choice for modern websites that need speed, flexibility, and scalability.
With just a few steps, you can fetch content from your Drupal server and display it beautifully using Gatsby. From setting up your server to deploying the final static site, the process is straightforward and beginner-friendly.
Want expert support for a custom headless site? Hire Dedicated Drupal Developer for complete setup, optimization, and deployment.

Unleash the Potential of Drupal
Access expert guides and insights to leverage Drupal for scalable and secure web solutions.