Quick Summary
Smooth and secure payments are essential for any online business. This guide shows how to integrate Stripe with Laravel step by step. You’ll learn how to set up a Stripe account, get API keys, and choose the right method—Laravel Cashier for quick subscriptions or the Stripe PHP SDK for full customization. Build a payment system your customers can trust.
Table of Contents
Every second counts during checkout; one tiny delay can make customers abandon their carts and take their money elsewhere. For online businesses, a slow or complicated payment process isn’t just frustrating; it’s costly.
That’s why modern businesses are turning to Laravel and Stripe integration. Laravel’s clean, flexible framework combined with Stripe’s secure and lightning-fast payment system makes transactions seamless, reliable, and worry-free.
Here, we’ll break down everything you need to know for Laravel Stripe integration: from prerequisites and key considerations to step-by-step integration and must-have features. So, your payments run smoothly and your customers keep coming back.
What is Stripe Payment Gateway?
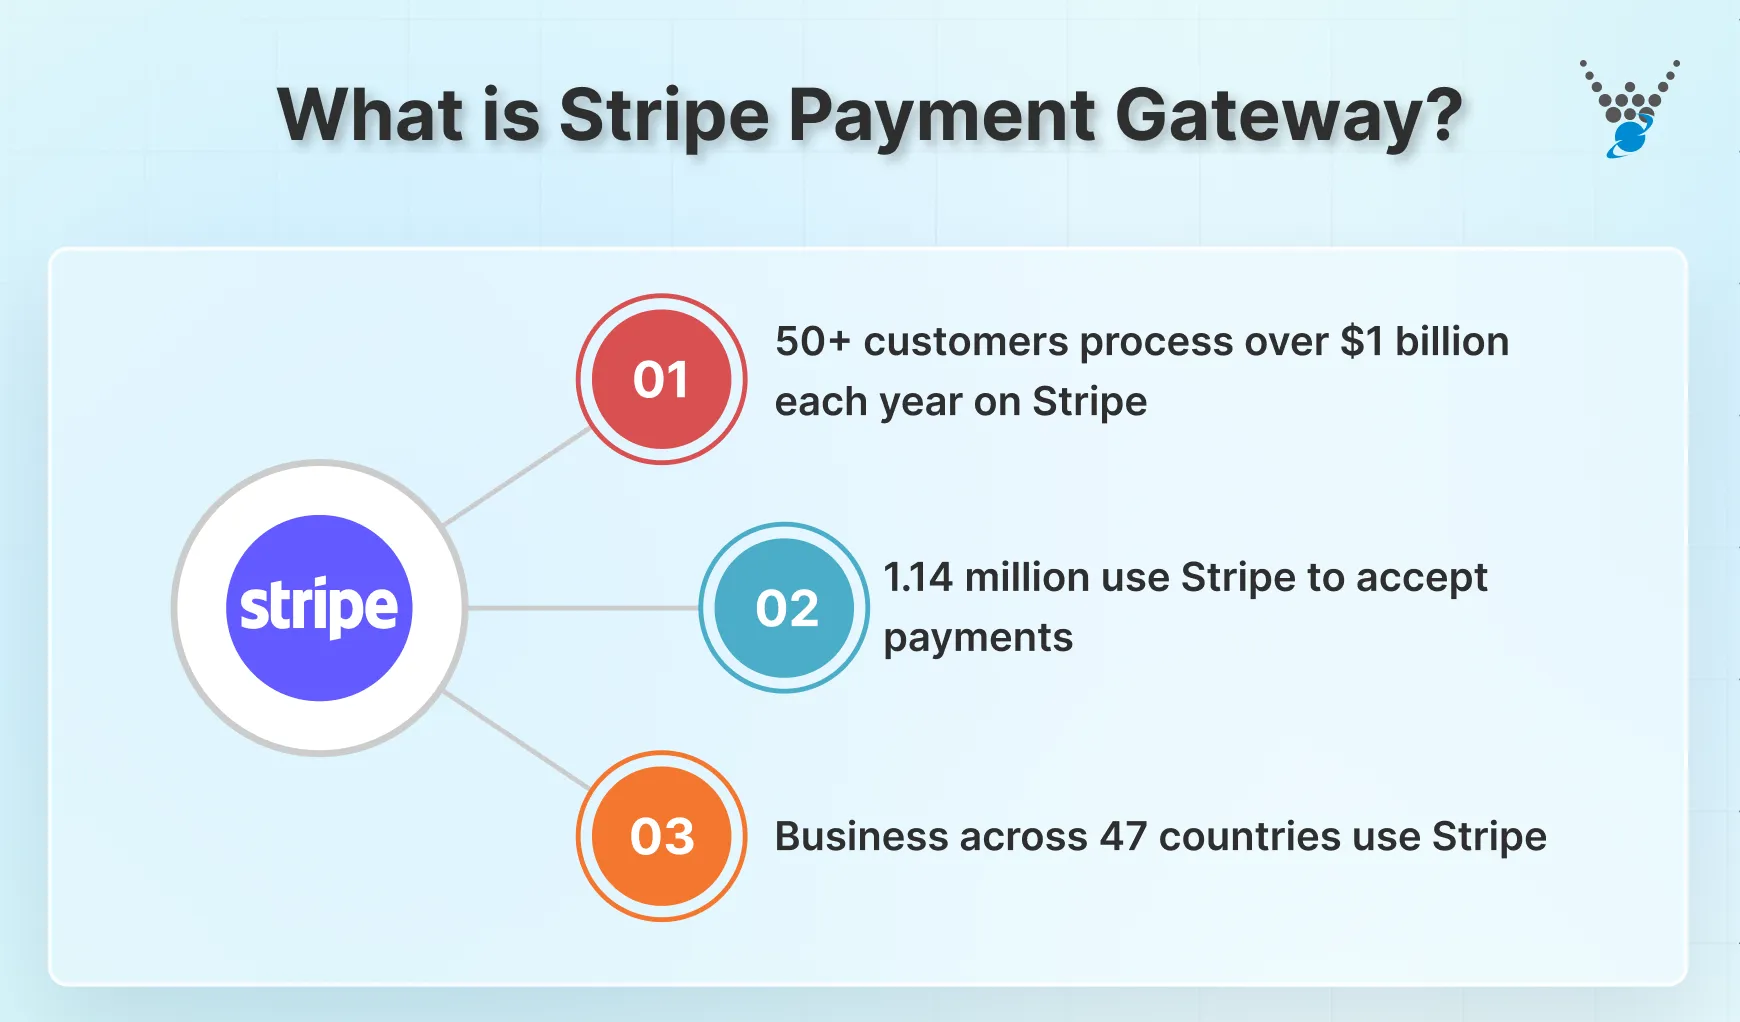
Stripe, the smartest financial infrastructure for the Internet. It simplifies online and in-person payments for businesses of all sizes. Stripe lets web applications accept credit cards, debit cards, and even mobile wallets like Apple Pay with just a few lines of code.
It empowers you to build seamless checkout experiences, automate recurring billing, and even manage subscriptions like a pro. It’s secure, global, and bursting with features, making it the go-to payment gateway for modern businesses.
What is Laravel and Stripe Integration?
Laravel and Stripe integration allows businesses to securely accept online payments, manage subscriptions, process refunds, and handle recurring billing directly within their Laravel applications.
By leveraging Laravel’s clean syntax and Stripe’s powerful API, developers can implement a seamless checkout experience without building complex payment systems from scratch. The integration supports features like:
- One-time & recurring payments
- PCI-compliant security
- Automated invoicing & receipts
- Multi-currency support
Whether you’re running an eCommerce store or a SaaS platform, combining Laravel with Stripe will be suitable. You’ll ensure fast, scalable, and secure transactions.
Why is Laravel and Stripe Integration Important for Payment Processing?
Imagine your website as a storefront filled with awesome products or services. Yet, the checkout line snakes out forever, and the cash register sputters, frustrating your customers and stalling sales. That’s where Laravel and Stripe integration steps in, transforming your checkout into a sleek, frictionless experience that keeps buyers happy and your business booming.
- Laravel, the PHP web framework. It crafts the infrastructure of your website behind the scenes. Laravel offers a clear and organized blueprint for your online home. Thus, makes it easy to build features like product pages, shopping carts, and yes, that all-important checkout process.
- Stripe, the payment processing powerhouse. This is the smooth-talking sales associate who seamlessly handles transactions. Stripe securely connects your website to major payment networks. It accepts credit cards, debit cards, and whisks those payments safely into your account.
Ultimately, Laravel and Stripe integration is more than just accepting payments. It’s about building a seamless, secure, and enjoyable experience for your customers. When your checkout feels like a walk in the park, your sales will blossom like vibrant spring flowers.
So if you want this and other crucial integrations for your web application, consult with a leading Laravel development company.
Steps for Integrating with Laravel Cashier (For Subscriptions)
Laravel Stripe payment gateway integration allows for robust and secure payment processing. You can achieve this in two different ways:
1. Using the Stripe PHP SDK: Offers full control and flexibility for creating custom payment workflows.
2. Using Laravel Cashier: Provides a quick, Laravel-friendly setup with an expressive interface for managing Stripe’s subscription billing services.
If your main goal is to handle subscriptions quickly and efficiently, Laravel Cashier is the go-to solution. It simplifies payment management without requiring extensive custom code.
Just keep in mind, Cashier is ideal for standard subscription workflows, but if you need full control or advanced customization, the complete Stripe integration in Laravel (covered later in this guide) will be a better fit.
1. Install Cashier
The first step is to add the Laravel Cashier package to your project using Composer:
composer require laravel/cashier
This installs all the necessary classes and methods to handle subscriptions, billing, and invoices in a Laravel-friendly way.
2. Publish Migrations
Cashier requires some database columns to store Stripe customer IDs and subscription details. Publish and run the migrations with these commands:
php artisan vendor:publish --tag="cashier-migrations"
php artisan migrate
After running these, your users table will have additional columns like stripe_id, pm_type, pm_last_four, and subscription_status to manage subscription data. This makes tracking and managing payments much easier.
3. Add the Billable Trait to Your User Model
Next, you need to tell Laravel that your User model is “billable.” This allows Cashier to add subscription and payment methods directly to your users.
use Laravel\Cashier\Billable;

class User extends Authenticatable
{
    use Billable;
    // ...
}
By adding the Billable trait, your users can now interact with subscriptions through simple, readable methods provided by Cashier.
4. Configure Your Stripe API Keys
Just like in the basic Stripe Laravel integration, add your Stripe credentials to your .env file:
STRIPE_KEY=your_stripe_public_key
STRIPE_SECRET=your_stripe_secret_key
This ensures Laravel Cashier can communicate securely with Stripe to process payments, manage subscriptions, and handle invoices.
5. Manage Subscriptions
With everything set up, Cashier provides simple, intuitive methods to handle subscriptions directly on the User model. Here are some examples:
A. Create a new subscription:
$user->newSubscription('default', 'price_id')->create($paymentMethod);
B. Swap subscription plans:
$user->subscription('default')->swap('new_price_id');
C. Cancel a subscription:
$user->subscription('default')->cancel();
Cashier also makes it easy to generate invoices, download them as PDFs, and issue refunds if needed.
These methods drastically reduce the amount of boilerplate code you need to write, making subscription management quick and hassle-free.
If you need more info on Laravel Cashier and its integration, refer to our guide on Laravel Cashier.
How to Integrate Laravel and Stripe for Payment Processing?
Navigating the technical procedure of integrating Laravel and Stripe for payment processing can feel overwhelming. Overcoming that, this professional guide will map your course.
Step 1: Set Up a Stripe Account
Before you start integrating Stripe with Laravel, the first step is to set up your Stripe account. This account will handle all your payment processing, customer billing, and payout activities. The process is simple and takes only a few minutes.
1. Creating a Stripe Account
To begin, visit the Stripe website and click on “Start Now” to create a new account. You’ll be asked to add your business information, such as:
- Business type and industry – e.g., individual, company, or nonprofit
- Phone number and email address – For verification and communication
- Business name and address – For billing and legal purposes
Once you submit your details, verify your email address to activate your account. Stripe will also ask you to set up two-factor authentication (2FA) for enhanced account security.
After verification, navigate to your Stripe Dashboard and complete the account activation process. You’ll need to provide additional information, such as:
- Business details (like your company’s registered name and type)
- Bank account details (where Stripe will deposit your payouts)
Stripe requires these details to comply with financial regulations and ensure your payments reach your bank safely.
2. Getting API Keys from Stripe
For Laravel to communicate with Stripe, you’ll need to use Stripe’s API keys. These keys allow your Laravel application to send and receive data securely.
Here’s how to find them:
- In your Stripe Dashboard, go to the Developers section.
- Click on “API keys” in the side menu.
- You’ll see two keys:
- Publishable key: It’s used for client-side (frontend) operations, like handling payment forms.
- Secret key: It’s used for server-side operations such as creating charges or managing subscriptions.
Keep this page open or copy your keys to a secure location, as you’ll need them shortly when configuring Laravel or Laravel Cashier for integration.
Tip: Never share your Secret Key publicly or commit it to your Git repository. Handle it like a password because anyone with access can perform actions on your Stripe account.
Step 2: Install the Stripe PHP Library
With your Stripe account set for payment processing, it’s time to introduce a powerful ally into your Laravel project: the Stripe PHP library. This library serves as a bridge between your Laravel application and Stripe’s vast capabilities. Thus, it enables seamless communication and payment orchestration.
- Open Terminal. Ready your command-line interface. It’s the gateway to interacting with your Laravel project and its dependencies.
- Invoke the Composer. Utilize the following command to summon the Composer. It is the diligent package manager responsible for managing libraries and dependencies within your Laravel project:
composer require stripe/stripe-php
- Observe the Process. Once gathered, Composer will fetch the Stripe PHP library from the online repository and carefully integrate it into your project’s structure.
With the Stripe PHP library now integrated into your Laravel project, you’ve developed a powerful connection to Stripe’s payment processing prowess.
Step 3: Configure Stripe Keys in Laravel
Now, the Stripe PHP library is now integrated into your project. Moving ahead, let’s establish a secure communication channel between your Laravel application and Stripe’s services.
- Locate ‘.env’ File. Undertake this configuration journey by venturing into your Laravel project’s root directory. Within this directory, you’ll find a file named ‘.env’, a secure haven for storing sensitive credentials and settings.
- Introduce API Keys. Within the ‘.env’ file, carefully transcribe the following lines. It should replace the placeholder values with your actual Stripe API keys, retrieved from your Stripe account:
STRIPE_KEY=your_stripe_public_key
STRIPE_SECRET=your_stripe_secret_key
- Safeguard Secrets. Exercise extreme caution when handling your secret key. It grants full access to your Stripe account’s functionalities. Never expose it publicly or commit it to version control systems.
- Accessing Keys Within Laravel. To access these keys within your Laravel application, utilize the ‘env’ helper function. It is a powerful tool for retrieving values from the ‘.env’ file:
$stripeKey = env('STRIPE_KEY');
$stripeSecret = env('STRIPE_SECRET');
With your Stripe keys now securely integrated into your Laravel environment, you have a trusted connection now. This paves the way for secure and efficient payment processing.
Step 4: Create a Payment Controller
To direct payment processing within your Laravel application, you’ll need a wise overseer—a Payment Controller. This controller acts as the central conductor, elegantly handling payment requests, and managing transaction outcomes.
- Call Artisan. Gather the power of Laravel’s Artisan command-line tool within your application. Use the following command to create the PaymentController:
php artisan make:controller PaymentController
- Locate New Controller. Upon completion, you’ll find the newly forged ‘PaymentController’ residing within your ‘app/Http/Controllers’ directory, ready to receive your instructions.
- Envision the Flow. Within this controller, you’ll carefully define actions. These methods are responsible for handling specific payment-related tasks. These actions might include:
- Handling payment form submissions
- Processing payments with Stripe’s API
- Displaying payment confirmation pages
- Managing potential errors or exceptions
With your ‘PaymentController’ in place, you’ve established a cornerstone for payment processing within your Laravel SaaS application. Further, we’ll build a gateway for your customers to submit their payment details and initiate transactions.
Step 5: Build a Payment Form
It is for capturing the essential details of each transaction and initiating payment processing. This form covers the gap between your customers and the payment gateway. It acts as a secure conduit for sensitive card information.
- Laravel Blade. Employ Laravel’s Blade templating to elegantly craft the payment form’s structure and design. Blade provides a powerful syntax for blending HTML elements with dynamic data. This ensures a seamless integration within your views.
- Essential Elements. Construct the form with the following key elements:
- Card Number Field. A secure input field designed specifically for capturing card numbers.
- Expiration Date Fields. Separate fields for collecting the card’s expiration month and year.
- CVC Field. A space for the card’s security code is often found on the back of the card.
- Submit Button. A prominent button that triggers the form’s submission, initiating the payment process.
- Stripe Elements for Improved Security. Integrate Stripe Elements. It offers a collection of pre-built UI components that include security and user experience. These elements simplify card input, validation, and formatting, streamlining the payment process.
<form action="{{ route('payment.process') }}" method="POST">
    @csrf
    <div id="card-element"></div>
    <button type="submit">Pay Now</button>
</form>
<script src="https://js.stripe.com/v3/"></script>
<script>
    // Initialize Stripe Elements and create card element
    // ...
</script>
With this secure and elegant payment form in place, your customers can go through a seamless payment experience. Your users can now submit their information, knowing it’s protected by the latest security measures.
Step 6: Process Payment with Stripe API
Your payment form is ready to capture customer information! It’s now to employ a dialogue with Stripe’s API to initiate payment processing and securely transmit card details.
- Within ‘PaymentController’. Within the designated action of your ‘PaymentController’, receive the payment form data and prepare to interact with Stripe’s API.
- Set Up a Stripe Client. Establish a connection to Stripe’s API using your secret key:
\Stripe\Stripe::setApiKey(env('STRIPE_SECRET'));
- Create a Charge. Utilize the Stripe library’s methods to create a charge object, representing the payment transaction:
$charge = \Stripe\Charge::create([
    'amount' => 1000, // Amount in cents
    'currency' => 'usd',
    'source' => $request->stripeToken, // Token from Stripe.js
    'description' => 'Laravel Payment',
]);
With the Stripe API humming along, your payment system has started to live! The communication between your form and Stripe is seamless, securely transmitting precious payment details and initiating the charge.
Step 7: Handle Payment Response
As the payment journey unfolds, Stripe delivers a crucial response. It is a detailed account of the transaction’s outcome, whispering tales of success or failure.
- Receive the Response. Within your PaymentController’s action, carefully examine the response object returned by Stripe’s API. This object holds vital information about the transaction’s status and any potential errors.
- Assess Success or Failure. Analyze the status property of the response object. This determines if the payment was successful or if any issues arose.
- Redirect Upon Success. If the payment was successful, redirect the customer to a confirmation page, providing a sense of completion.
- Display Errors Gracefully. In cases of failure, display informative error messages to the customer. It must include guiding them toward resolving any issues and retrying the transaction.
if ($charge->status == 'succeeded') {
    // Payment successful, redirect to confirmation page
    return redirect()->route('payment.success');
} else {
    // Payment failed, display error message
    return redirect()->back()->withErrors(['payment_error' => 'Payment failed. Please try again.']);
}
With careful handling of Stripe’s responses, you’ve become a master of transaction outcomes. These practices adeptly guide your customers through both successful payments and unexpected challenges.
Step 8: Implement Error Handling
In the unpredictable world of online payments, unexpected challenges can arise. To safeguard your application’s integrity, provide informative feedback to customers. It will help you to ensure a resilient payment experience, it’s crucial to implement robust error-handling mechanisms.
- Try-Catch Construct. Utilize PHP’s try-catch blocks to handle potential exceptions that may occur during payment processing. This approach allows you to intercept and manage errors before they disrupt the user experience.
- Catch Specific Exceptions. Catch specific exception types thrown by Stripe’s library. One of the usual examples includes ‘\Stripe\Exception\CardException’ for card-related errors.
- Log Errors Meticulously. Record encountered errors in a log file or error tracking service for debugging purposes.
- Display User-Friendly Messages. Refrain from exposing technical details of errors to customers. Instead, present clear and informative messages that guide them towards resolving issues or retrying the transaction.
try {
    // Process payment with Stripe API
    // ...
} catch (\Stripe\Exception\CardException $e) {
    // Handle card errors
    return back()->withErrors(['card_error' => $e->getMessage()]);
} catch (\Exception $e) {
    // Handle other errors
    \Log::error($e);
    return back()->withErrors(['general_error' => 'Something went wrong. Please try again.']);
}
With error handling, you’ve transformed potential disruptions into opportunities for clarity and customer support. This foresight ensures a robust and adaptable payment experience, fostering trust and resilience in your application.
Step 9: Test Your Integration
Before unveiling your payment system to the world, it’s crucial to conduct a rigorous trial. This last step involves simulating various payment scenarios, identifying and addressing potential issues before they impact your customers.
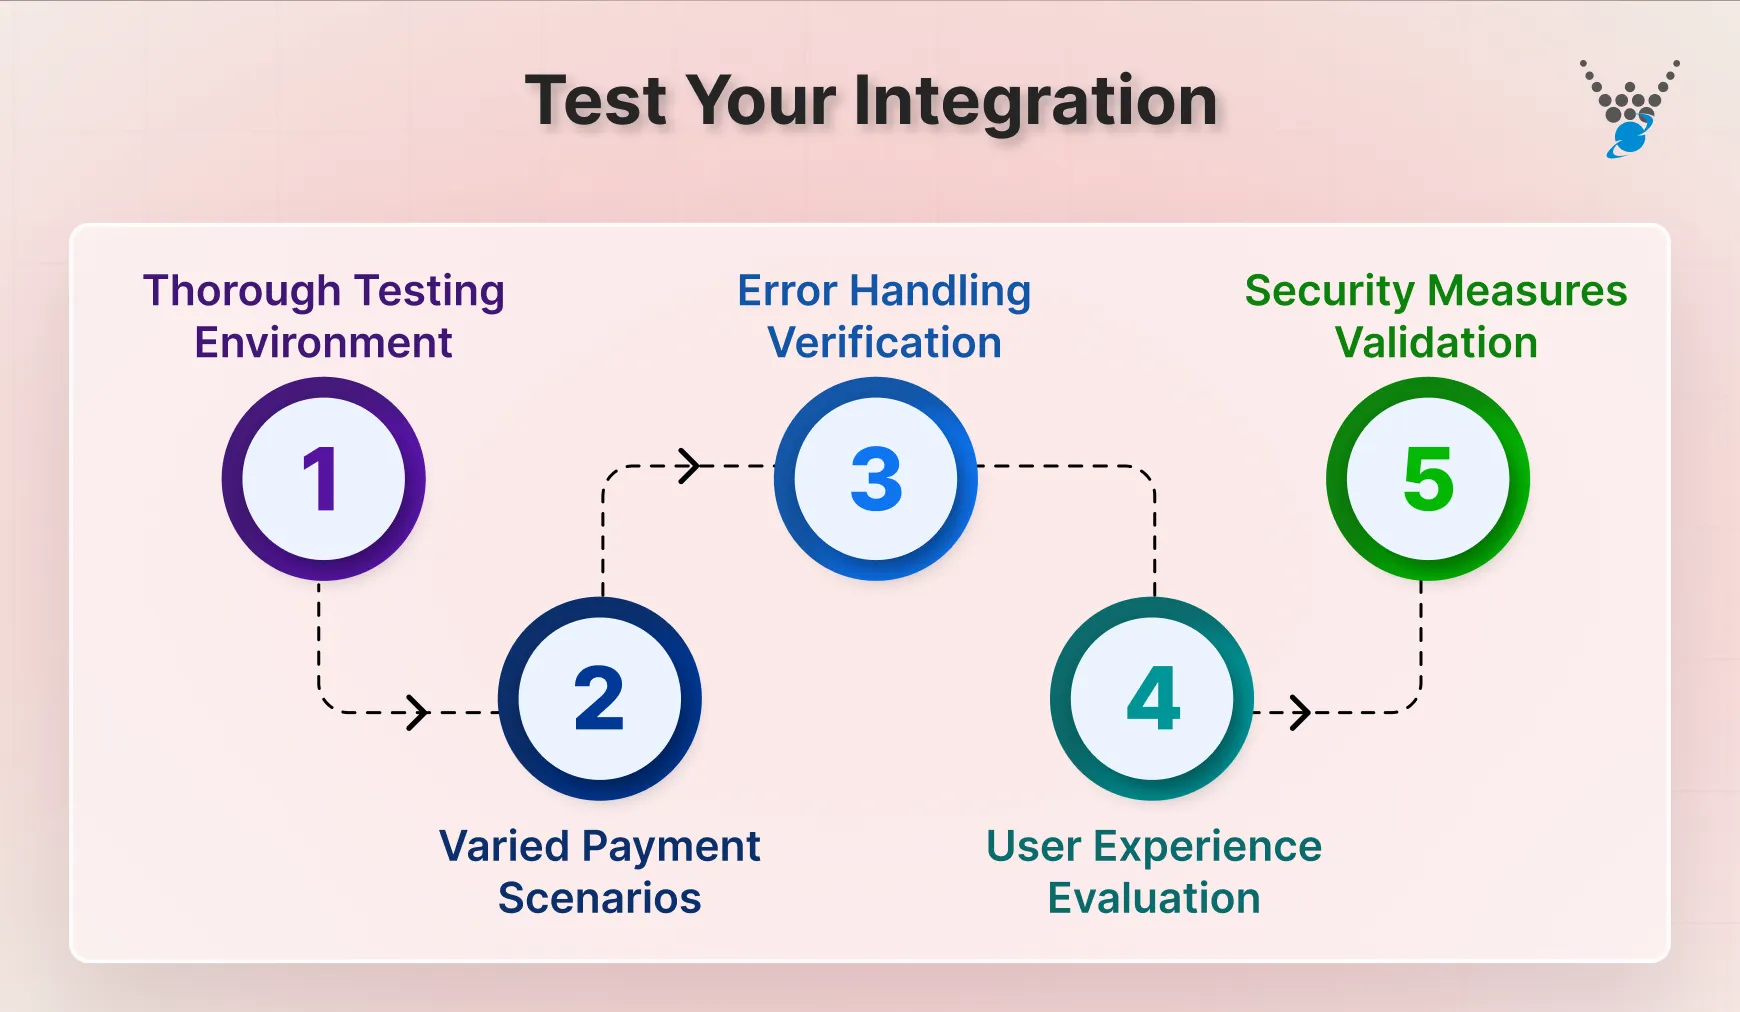
- Thorough Testing Environment. Establish a dedicated testing environment. It mirrors your production setup, ensuring accurate testing without affecting live transactions.
- Varied Payment Scenarios. Simulate different payment scenarios, including:
- Successful payments with valid card details
- Failed payments due to invalid card information, insufficient funds, or other errors
- Different payment amounts and currencies
- Error Handling Verification. Test your error handling mechanisms by intentionally triggering various exceptions and ensuring they’re handled gracefully.
- User Experience Evaluation. Evaluate the user experience from both successful and failed payment perspectives. This ensures clarity and guidance throughout the process.
- Security Measures Validation. Verify the effectiveness of your security measures, including:
- Data encryption
- Protection against common vulnerabilities like XSS and CSRF attacks
With this thorough testing, you can transform your payment system from a promising concept into a fully validated and battle-tested solution. This meticulous approach ensures a smooth and secure payment experience for your customers.
Must-Have Laravel and Stripe Integration Features
While a basic Laravel and Stripe integration handles transactions, true magic happens when you unlock its advanced features. Here are 5 must-haves that will boost your payment gateway and delight your customers:
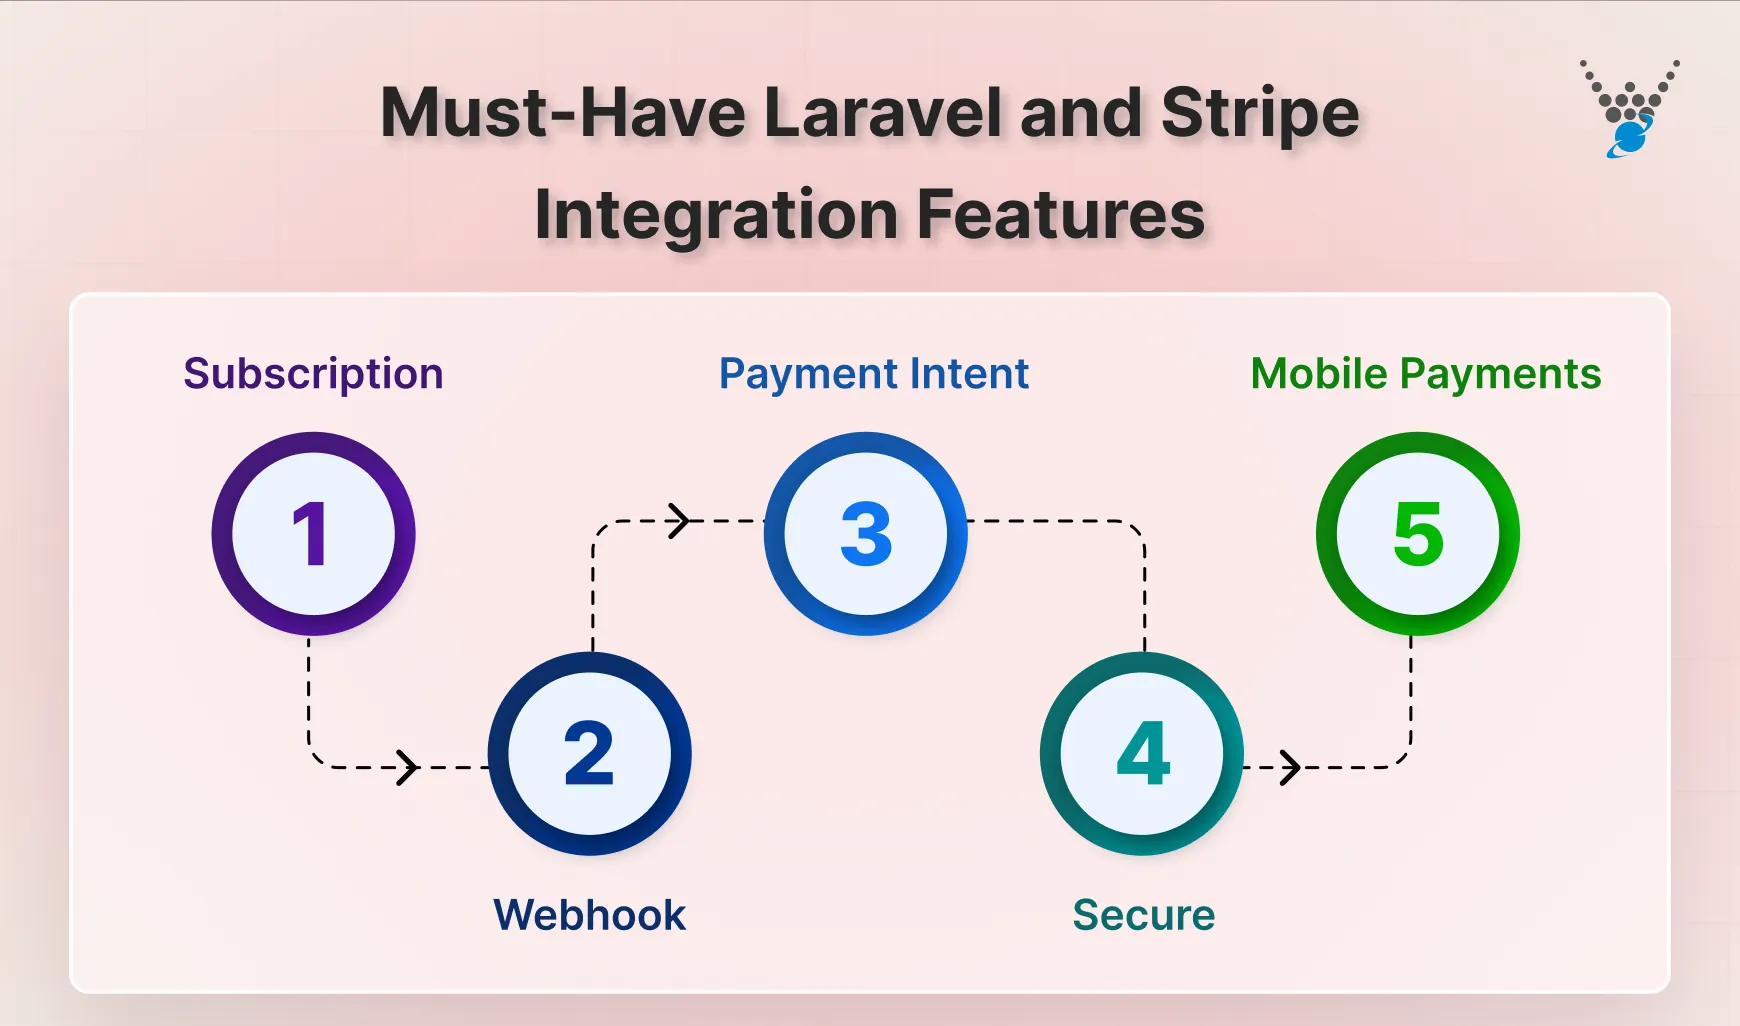
- Subscription. Ditch manual billing hassles with Stripe’s subscription engine. Laravel Stripe seamlessly integrates, letting you manage plans, recurring charges, and renewals with ease.
- Webhook. Webhooks keep your system in the loop about every payment event, from successful charges to refunds. Automate workflows, send timely updates, and never miss a beat.
- Payment Intent. Give customers flexibility with Payment Intents. Collect their details upfront, confirm orders later, and capture funds at the perfect time. Perfect for complex purchases or adding that extra layer of security.
- Secure. Stripe’s got your back with Strong Customer Authentication (SCA) compliance. This means extra security checks for certain transactions, like two-factor authentication, protecting both you and your customers from fraud.
- Mobile Payments. Go mobile-first with Apple Pay and Google Pay integration. Stripe makes it seamless, letting your customers pay in a snap with just their phone. Watch conversion rates soar as checkout friction vanishes!
These features are about building trust, boosting convenience, and staying ahead of the curve. You’re creating a payment experience that’s not just secure, but also flexible, modern, and customer-centric.
Let’s Conclude
From humble beginnings to a fully functional payment gateway, your Laravel and Stripe integration journey has reached an exciting milestone. You’ve navigated the technical elaboratenesses, mastered essential features, and built a system poised to streamline transactions and delight your customers. Now, it’s time to catch the charm in action.
- Frictionless Checkout Experiences. Your customers glide through the payment process, secure in the knowledge their information is protected and their transactions are efficient.
- Boosted revenue streams. Open the door to diverse payment options, subscriptions, and recurring billing. Unlock new avenues for financial growth.
- Improved brand image. A secure and user-friendly payment system fosters trust and loyalty. This strengthens your brand’s reputation and attracts new customers.
But why stop here? Let our Laravel developers for hire take care of your requirements today!
FAQs About Laravel and Stripe Integration for Payment Processing
How can I handle webhooks for Stripe events in a Laravel application?
Laravel provides an excellent way to handle Stripe webhooks using the built-in “Cashier” package. Ensure that your application is configured to receive and process Stripe webhook events securely.
What security measures should I implement for handling payments in Laravel with Stripe?
Security is paramount when dealing with payments. Confirm that your Laravel application uses HTTPS, validate user inputs, and follow the best secure coding.
Can I test payments without making real transactions in my Laravel and Stripe integrated application?
Yes, Stripe provides a test environment that allows you to simulate transactions without affecting real financial data. In Laravel, you can switch to the Stripe test mode by using the provided test API keys.