
Quick Summary
Laravel Socialite provides a seamless, secure solution for integrating OAuth social authentication. This official package eliminates the complexity of building custom login systems for providers like Google and Facebook. It simplifies the entire flow, from redirecting users to handling callbacks, enabling rapid implementation of social logins that enhance user experience and accelerate development.
Table of Contents
User authentication is a foundational task for web applications. But building a secure, custom login system can be complex and time-consuming. Socialite eliminates this burden for you.
Laravel Socialite handles the intricate protocols, so you can integrate social logins in minutes. This streamlines user onboarding and improves the user experience by removing password fatigue. And for the developers, this means less code to write, test, and maintain–faster development cycles while upholding the security standards.
This blog showcases everything about Laravel Socialite and how you can use it for user authentication. Without further ado, let’s begin.
What is Laravel Socialite?
Laravel Socialite is an official, streamlined package for authenticating with OAuth providers. Instead of building complex, custom integrations for every social platform, Socialite handles the basic, repetitive code excerpts. So you can add secure, social authentication to your application with minimal effort.
How Does Laravel Socialite Work?
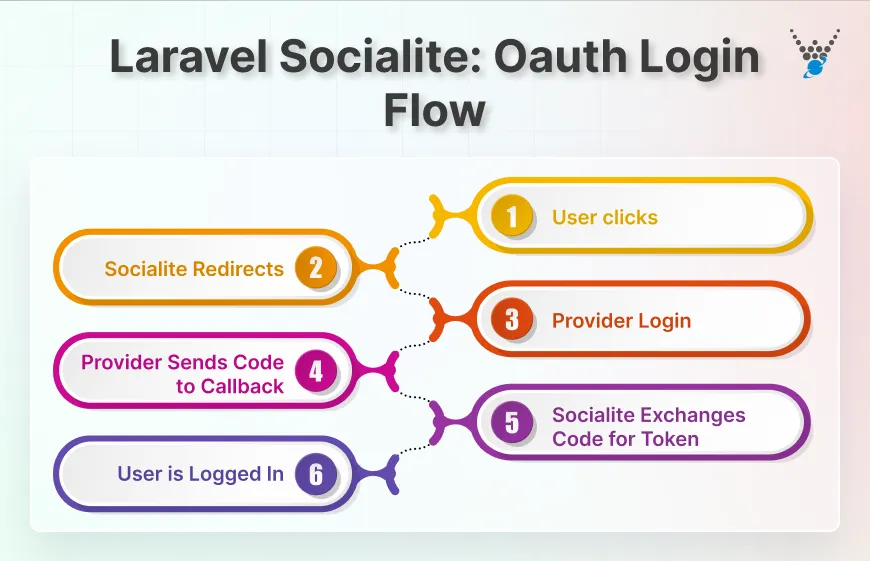
The process is straightforward and follows the standard OAuth2 flow:
- Redirect: Your application redirects the user to the social provider’s login page (e.g., Google).
- Callback: After the user grants permission, the provider redirects them back to a predefined callback URL in your application.
- User Data: Socialite retrieves the user’s profile information from the provider. It gives you a convenient User object to create or authenticate an account in your database.
Basically, Laravel Socialite acts as a bridge between your application and major identity provider. Like Google, Facebook, Twitter, and LinkedIn.
Why Use Laravel Socialite?
Laravel Socialite is one of the top Laravel packages beneficial for both developers and end users. It directly impacts the security, user experience, and development efficiency. Let’s discuss the benefits.
Enhanced User Experience
It removes friction from registration and login. Users can sign in with a single click using existing credentials. It eliminates the need to remember another password and streamlining onboarding, which can boost conversion rates.
Rapid Development
Socialite abstracts the complex OAuth protocol. Instead of writing and testing hundreds of lines of code for each provider, you can implement a fully functional social login in minutes, significantly accelerating your time-to-market.
Robust Security
With Socialite, your application leverages battle-tested OAuth flows from major providers like Google. It delegates the responsibility of password storage and security to these experts. This reduces your risk surface for credential management and associated security vulnerabilities.
You can also use Laravel Passport to protect API endpoints or enable OAuth2 authorization for complex app architectures.
(What is OAuth2?
OAuth 2.0 is a framework that allows an application to get limited access to a user’s account on another service, without giving away the user’s password.)
Access to Rich Social Data
Upon user consent, Socialite provides seamless access to the user’s social profile information, such as their name, email address, and avatar. This allows for immediate personalization of their experience within your application.
You can configure various aspects of the authentication process. Like, provider selection, user data retrieval, and error handling, to meet your specific requirements. Apart from this, Laravel Sanctum is another top choice for SPA, mobile, or API token management alongside social login flows.
(What is an SPA?
SPA, or Single Page Application, is a type of website that loads once and updates content without refreshing the whole page (like Gmail or Facebook).)
How to Install & Set Up Laravel Socialite?
Laravel Socialite is a sure-shot way to implement social authentication. You install the package, configure your credentials, and build the authentication flow.
Install Laravel Socialite via Composer
Begin by installing the package into your Laravel project using Composer. Open your terminal, navigate to your project directory, and run the following command:
composer require laravel/socialite
This command downloads and installs the Socialite package, making its classes available within your application. No further service provider or alias registration is needed in modern Laravel versions. It’s handled automatically by the package.
If you want to upgrade, Laravel Jetstream includes ready-made support for social logins and can be customized for team and user management.
Configure Social Media API Credentials
To communicate with providers like Google or Facebook, you must create and register application credentials (Client ID and Secret) in your .env file.
First, create a developer application on your chosen provider’s platform (e.g., Google Cloud Console). Then, add the provided credentials to your .env file:
GOOGLE_CLIENT_ID=your-google-client-id
GOOGLE_CLIENT_SECRET=your-google-client-secret
GOOGLE_REDIRECT_URI="${APP_URL}/auth/google/callback"
Next, define these credentials in config/services.php. This is where Socialite looks for the configuration.
'google' => [
    'client_id' => env('GOOGLE_CLIENT_ID'),
    'client_secret' => env('GOOGLE_CLIENT_SECRET'),
    'redirect' => env('GOOGLE_REDIRECT_URI'),
],
Laravel authentication systems can provide you with a broader scope for security and user management through custom guards and permissions.
Add Routes and Controllers
The final step is to create the routes and controller logic to handle the authentication redirect and callback. Create two routes in your routes/web.php file:
Route::get('/auth/redirect', [AuthController::class, 'redirect']);
Route::get('/auth/callback', [AuthController::class, 'callback']);
Then, generate a controller and implement the methods. The redirect method sends the user to the provider, and the callback method handles the user’s return.
php artisan make:controller AuthController
In your AuthController:
use Laravel\Socialite\Facades\Socialite;
use App\Models\User;
public function redirect()
{
    return Socialite::driver('google')->redirect();
}
public function callback()
{
    $googleUser = Socialite::driver('google')->user();

    // Find or create the user in your database
    $user = User::updateOrCreate([
        'google_id' => $googleUser->id,
    ], [
        'name' => $googleUser->name,
        'email' => $googleUser->email,
    ]);
    // Log the user in
    Auth::login($user);
    return redirect('/dashboard');
}
Social media authentication is a major part of the site’s user-friendliness. So if you are not adept with this process, consult with a Laravel development company. But if you want to DIY, go ahead with the next section.
How to Use Laravel Socialite for Social Media Authentication?
Using Laravel Socialite involves a clear, two-step handshake between your application and the OAuth provider. The entire process is managed through a dedicated controller.
Redirect Users to the Social Media Login Page
The process begins by redirecting the user to the authentication page of the social provider (e.g., Google). This is typically triggered by a “Login with Google” button.
In your controller, you use Socialite’s redirect method. This method generates the correct OAuth URL and sends a redirect response.
use Laravel\Socialite\Facades\Socialite;
public function redirectToProvider()
{
    return Socialite::driver('google')->redirect();
}
When users click the button and hit this route, they are seamlessly taken to Google’s secure login page. There, they can grant your application permission.
For advanced workflows like role assignments and permission management after social login, refer to resources focusing on advanced user management in Laravel.
Handle Callback and Retrieve User Information
After the user authenticates with the provider, they are redirected back to your application at a predefined callback URL. This is where you process the response.
Socialite’s user() method makes a request to the provider to retrieve the user’s profile information using the authorization code provided in the callback. This method returns a User object containing details like ID, name, email, and avatar.
public function handleProviderCallback()
{
    $socialUser = Socialite::driver('google')->user();
    // $socialUser now contains:
    // - id, name, email, avatar
    // - token (for API calls, if needed)
}
Store User Information in the Database
The final step is to persist the user’s information in your database, typically by finding an existing user or creating a new one, and then logging them in.
This is commonly done using the Laravel updateOrCreate method to efficiently manage the user record based on the provider’s unique ID.
use App\Models\User;
use Illuminate\Support\Facades\Auth;
public function handleProviderCallback()
{
    $googleUser = Socialite::driver('google')->user();
    $user = User::updateOrCreate([
        'google_id' => $googleUser->id,
    ], [
        'name' => $googleUser->name,
        'email' => $googleUser->email,
        'avatar' => $googleUser->avatar,
        // Update other fields on each login if needed
    ]);
    Auth::login($user, true); // Log the user in and "remember" them
    return redirect('/dashboard'); // Redirect to the intended page
}
This three-step process creates a complete, secure, and user-friendly social authentication system. Consider pairing Socialite with Laravel Fortify for robust session-based authentication and flexible backend integration.
To Summarize
Laravel Socialite presents a powerful and user-friendly solution for integrating social media authentication into your Laravel applications. Its robust features and ease of use allow you to implement a seamless and secure login process that enhances user experience and promotes user engagement.
Social media logins allow users to easily share your application and content with their networks, driving organic growth and engagement. Socialite utilizes secure OAuth protocols, ensuring the protection of user data and preventing unauthorized access.
So, if you want to ensure a secure and efficient social login experience for your users, I suggest you hire Laravel developers with us today!
FAQs on Laravel Socialite for Social Media Authentication
How does Laravel Socialite work?
Laravel Socialite uses the OAuth protocol to allow users to authorize your application to access their information from social media platforms. It handles the entire authentication process, including redirecting users to the appropriate platform, receiving and storing authentication tokens, and fetching user data.
Is Laravel Socialite only for Laravel applications?
Yes, Laravel Socialite is a package specifically designed for Laravel applications. It utilizes Laravel’s authentication system and integrates seamlessly with the framework. It may not be compatible with other PHP frameworks or applications.
Do I need to create separate apps for each social media platform?
Yes, in order to use Laravel Socialite, you will need to create separate apps for each social media platform you want to integrate with. This involves registering your application with the platform and obtaining API keys and secrets, which will be used for authentication.
Can Laravel Socialite be combined with Laravel Breeze for authentication?
Integrating Laravel Breeze with Socialite is a common approach to handle both traditional email/password login and social media authentication in a single Laravel application.


