
Quick Answer: To build a task management app with React, you must know HTML, CSS, & JavaScript; React fundamentals; React hooks; npm & Node.js; and browser localStorage. In this guide, we will use React Hooks (useState, useEffect), component-based architecture, and local storage for persistence to build a task management app with React.
Building a task management app with React is a practical way to learn how React components, state, Hooks, and user interactions work together in a real-world application. A basic task manager can include features such as adding tasks, marking them as complete, deleting tasks, and filtering tasks by status.
For beginners, this type of project provides hands-on experience with some of React’s core concepts without the complexity of a large application. You can start with a simple component structure and gradually introduce shared state, event handling, and data persistence as the application grows.
Many businesses reach out to leading ReactJS development companies for modular & scalable task management app development and support. You can follow the steps we discuss in this blog to build a secure, scalable task management app.
Prerequisites
Before starting to build a Task Management App with React, you must have a basic understanding of:
1. HTML, CSS, and JavaScript
- HTML: Structure the user interface elements like forms, input boxes, and task lists.
- CSS: Style your layout, buttons, and task completion status to make the app look clean and usable.
- JavaScript: Master modern features like arrow functions, array methods (map, filter, reduce), destructuring, and asynchronous code (async/await), which form the backbone of React logic.
2. React Fundamentals
- JSX: Write HTML-like syntax directly inside your JavaScript file.
- Components: Build reusable UI components like TaskForm, TaskList, and individual TaskItem blocks.
- Props: Pass data downward from parent components to child components.
3. React Hooks
- useState: Manage local component state to handle adding, updating, and deleting the tasks.
- useEffect: Handle side effects like saving tasks to the browser’s localStorage or fetching data.
- Other Hooks: Use hooks like useRef for form inputs or useContext for global theme or user settings.
4. npm & Node.js
- Node.js: Run JavaScript tools and a modern build server on your local computer.
- Npm (Node Package Manager): Install external libraries, packages, and build tools (like Vite or React itself)
5. Browser localStorage
You should understand localStorage, which allows browsers to save data as key-value pairs. In this project, tasks are converted to JSON and stored so they stay handy after you refresh the page.
Steps to Build a Task Management App with React
Building a task management app with React helps you understand component-based architecture and state lifecycle. The following are the steps to build a modular, persistent task management app using React functional components.
| Note: We will use React Hooks (useState, useEffect), component-based architecture, and local storage for persistence. |
Step 1: Set Up Your Project
In the first step, create the project using the following command
npx create-react-app task-manager

cd task-manager

npm start
This creates a ready-to-use React project structure, so you don’t have to manually configure React, Babel, Webpack, and other development tools. Basically, a React project has a development environment that compiles your JSX and JavaScript and serves the application in the browser.
Step 2: Create Folder Structure
Next, organize the application into separate folders and files to separate responsibilities.
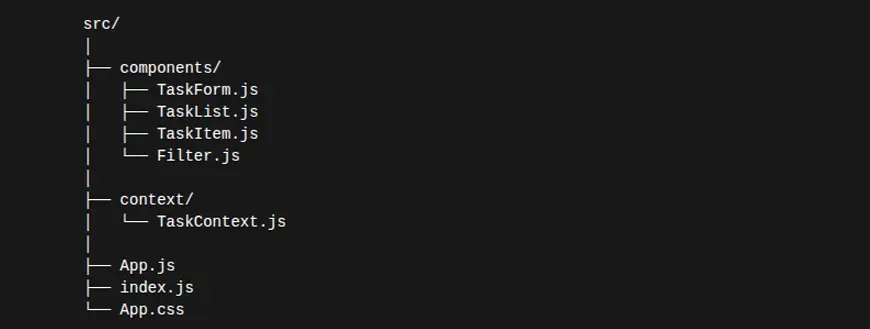
Instead of putting the entire application into a single large file, each part has a specific responsibility, like:
- TaskForm: Captures user input via a text field to create a new item and passes it to the global state handler.
- TaskList: Loops through the task collection and generates a structured list layout on the screen.
- TaskItem: Displays a single task alongside individual action triggers like completing or deleting it.
- Filter: Switches the active visibility view between all, finished, and pending assignments.
- TaskContext: Manages data persistence and hosts the global logic for adding, deleting, and syncing tasks with localStorage.
- App: Assembles the complete layout by wrapping the components in the data provider and managing the filtered view state.
Step 3: Create Context (Global State)
Here, TaskContext acts as a global brain of your application by creating a central data hub that eliminates the need to pass props manually through multiple component layers. It initializes your task array directly from the browser’s localStorage using lazy state functions that run only once at bootup, ensuring fast performance.
A useEffect hook automatically watches this state, converting and saving the data back to storage whenever an item updates. Inside this provider wrapper, action handlers like addTask, deleteTask, and toggleTask use immutable JavaScript methods to safely modify state before exposing these variables and functions globally via <TaskContext.Provider value={…}> to any child component that tunes in using useContext.
import React, { createContext, useState, useEffect } from "react";
export const TaskContext = createContext();
export const TaskProvider = ({ children }) => { const [tasks, setTasks] = useState(() => {   const savedTasks = localStorage.getItem("tasks");   return savedTasks ? JSON.parse(savedTasks) : []; });

 // Save to localStorage useEffect(() => {   localStorage.setItem("tasks", JSON.stringify(tasks)); }, [tasks]);
 const addTask = (title) => {   if (!title.trim()) return;   setTasks([     ...tasks,     { id: Date.now(), title, completed: false }   ]); };
 const deleteTask = (id) => {   setTasks(tasks.filter(task => task.id !== id)); };
 const toggleTask = (id) => {   setTasks(tasks.map(task =>     task.id === id ? { ...task, completed: !task.completed } : task   )); };
 return (   <TaskContext.Provider value={{ tasks, addTask, deleteTask, toggleTask }}>     {children}   </TaskContext.Provider> );};
Step 4: Create Task Form Component
TaskForm captures user input to add new items to your application by combining local form state with your global data pipeline.
import React, { useState, useContext } from "react";import { TaskContext } from "../context/TaskContext";
const TaskForm = () => { const [title, setTitle] = useState(""); const { addTask } = useContext(TaskContext);
 const handleSubmit = (e) => {   e.preventDefault();   addTask(title);   setTitle(""); };
 return (   <form onSubmit={handleSubmit}>     <input       type="text"       placeholder="Enter task..."       value={title}       onChange={(e) => setTitle(e.target.value)}     />     <button>Add Task</button>   </form> );};
export default TaskForm;
Step 5: Create Task Item Component
TaskItem displays an individual task and links user interactions directly to global state actions. It receives a single task object as a prop from its parent list component and renders its structural template inside a distinct layout block. Using the useContext hook to extract toggleTask and deleteTask from TaskContext, the component connects these actions directly to the UI elements.
Clicking on the text fires toggleTask(task.id), which dynamically adjusts the visual presentation by applying a conditional inline style (textDecoration: task.completed ? “line-through” : “none”) to signify completion. Simultaneously, clicking the “Delete” button triggers deleteTask(task.id), removing that specific element from the underlying data layer.
import React, { useContext } from "react";

import { TaskContext } from "../context/TaskContext";

const TaskItem = ({ task }) => {

 const { deleteTask, toggleTask } = useContext(TaskContext);

 return (

   <div className="task">

     <span

       onClick={() => toggleTask(task.id)}

       style={{

         textDecoration: task.completed ? "line-through" : "none",

         cursor: "pointer"

       }}

     >

       {task.title}

     </span>

     <button onClick={() => deleteTask(task.id)}>Delete</button>

   </div>

 );

};

export default TaskItem;
Step 6: Create Task List Component
The TaskList.js component acts as an organizing container for your tasks. Its primary job is to take the collection of your tasks you have created and safely format them into a readable list on the web page. Instead of focusing on individual task styles or behaviors, it focuses on managing the overall group of tasks.
import React, { useContext } from "react";import { TaskContext } from "../context/TaskContext";import TaskItem from "./TaskItem";
const TaskList = () => { const { tasks } = useContext(TaskContext);
 return (   <div>     {tasks.length === 0 ? (       <p>No tasks available</p>     ) : (       tasks.map(task => <TaskItem key={task.id} task={task} />)     )}   </div> );};
export default TaskList;
Step 7: Create Task Filter Component
In this step, the Filter.js component acts as a control panel for your task manager. It gives users clickable buttons that switch between different views of their tasks: seeing everything, seeing only what is finished, and seeing what is left to do.
The component receives a function called setFilter as a prop from the main application hub (App.js). This function is like a remote control that commands the app which tasks it should actively display.
import React from "react";
const Filter = ({ setFilter }) => { return (   <div>     <button onClick={() => setFilter("all")}>All</button>     <button onClick={() => setFilter("completed")}>Completed</button>     <button onClick={() => setFilter("pending")}>Pending</button>   </div> );};
export default Filter;
Step 8: Assemble Main App Component
The App.js is an absolute control of your entire application. Its primary goal is to set up a global data system, read the user’s active filter settings, and cleanly arrange the visual structure of your app.
import React, { useState, useContext } from "react";import { TaskProvider, TaskContext } from "./context/TaskContext";import TaskForm from "./components/TaskForm";import TaskList from "./components/TaskList";import Filter from "./components/Filter";import "./App.css";import TaskItem from "./components/TaskItem";
const AppContent = () => { const { tasks } = useContext(TaskContext); const [filter, setFilter] = useState("all");
 const filteredTasks = tasks.filter(task => {   if (filter === "completed") return task.completed;   if (filter === "pending") return !task.completed;   return true; });
 return (   <div className="app">     <h1>Task Manager</h1>     <TaskForm />     <Filter setFilter={setFilter} />
     {filteredTasks.length === 0 ? (       <p>No tasks found</p>     ) : (       filteredTasks.map(task => (         <TaskItem key={task.id} task={task} />       ))     )}   </div> );};
function App() { return (   <TaskProvider>     <AppContent />   </TaskProvider> );}
export default App;
Step 9: Add Basic Styling
The next step is to implement basic styling, using the following code:
body { font-family: Arial; background: #f5f5f5;}
.app { max-width: 500px; margin: auto; background: white; padding: 20px;}
.task { display: flex; justify-content: space-between; margin: 10px 0;}
Step 10: Run and Test Task Management App
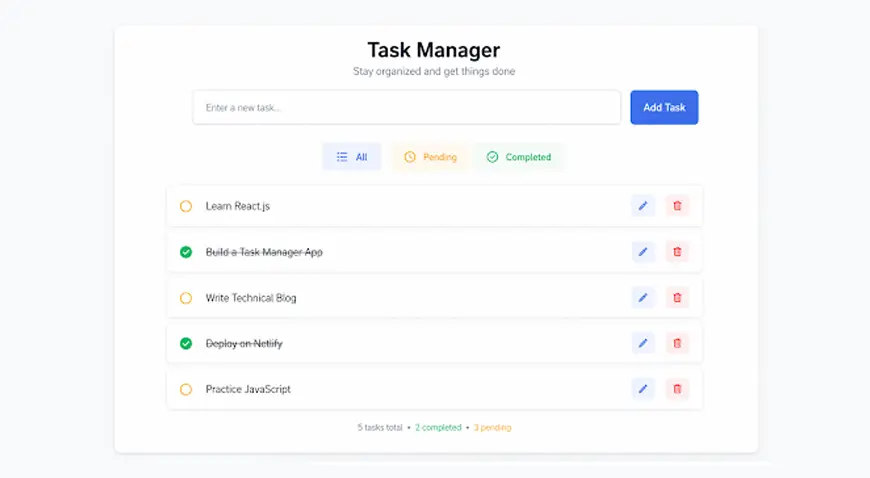
The last step is all about running, previewing, and enhancing your application. Now that your state management, components, and styles are wired up, this step takes your code from a local folder and hosts it as a live, interactive website on your computer. You can also add Tailwind CSS for better UI, as per your choice. If you are still in a dilemma, you can contact a JavaScript development company that builds a high-performing, secure, and scalable custom task management app for your business.
Conclusion
Building a task management app with React is a practical way to understand how components, React Hooks, Context API, and localStorage work together to create a functional application. By following this guide, you can build the core functionality of a task manager while gaining hands-on experience with React’s component-based approach and state management.
Once the basic application is working, you can extend it with features such as task editing, due dates, categories, search, authentication, backend integration, and a more advanced user interface. These enhancements can help turn a simple learning project into a more complete task management solution.
If you’re planning to build a production-ready task management application with advanced features, custom integrations, and scalable architecture, you can hire ReactJS developers to handle the development and help turn your requirements into a fully functional React application.
FAQs
How can I integrate other technologies like databases or APIs into my React-based task management app?
You can connect your React-based task management app to databases or APIs by building or using backend services that expose REST and GraphQL endpoints.
What are the 3 pillars of React?
The three fundamental pillars of React are components, props, and state.
What are the best practices for ensuring that my task management app is scalable and maintainable?
To keep your task management app scalable and maintainable, adopt a modular, loosely coupled architecture with stateless services and optimized data flow.
What is the best IDE for React?
Visual Studio Code (VS Code) is considered the best IDE for React because of its lightweight code editor and massive ecosystem, which lets it function as a powerful, fully customizable Integrated Development Environment (IDE).
What is the difference between React and React Native?
React is a JavaScript library for building web applications, while React Native is a framework for building native mobile applications for iOS and Android.
Table of Contents