Quick Summary
This guide provides a practical blueprint for creating a real-time chat application. You will learn to construct a robust Laravel backend API, build a reactive Vue.js frontend interface, and seamlessly connect them using Pusher’s WebSockets for live data synchronization. The result is a fully functional, dynamic messaging system built with modern web technologies.
Table of Contents
Real-time chat apps are among the most used web and mobile applications. Users now expect instant interaction, whether in a customer service widget, a team collaboration tool, or a social platform. While this real-time functionality seems complex, modern development stacks have made it remarkably accessible.
For the best results, you can integrate the robust backend architecture of Laravel with the reactive user interface of Vue.js. Plus Pusher helps effortlessly manage the live data flow for a streamlined development.
So, through this blog, we explain the procedure of building a real-time chat app using Laravel, Vue.js, and Pusher. Let’s begin.
What is Laravel Pusher?
Pusher is a hosted service that acts as a real-time messenger for your application. Imagine your Laravel backend needs to instantly notify your Vue.js frontend about a new chat message.
Without Pusher, this is like having to manually check your mailbox every few seconds. Pusher, instead, installs a direct pneumatic tube between them.
How Does Pusher Work?
- Your Server Sends a Message: When something happens in your Laravel app (e.g., a new message is sent), it triggers Pusher.
- Pusher Delivers It Instantly: Pusher maintains a constant, open connection to all your users’ browsers. It immediately pushes the new data down this tube.
- Your Client Receives It Live: Your Vue.js app is listening on the other end. It receives the data instantly and updates the interface for the user in real-time, without anyone having to refresh the page.
This “persistent connection” is the core of real-time functionality. Pusher manages all its complexity for you, with easy-to-use libraries for almost every programming language.
Real-Time Chat Lifecycle: How Instant Messaging Works
Each time a user sends a message, several steps occur almost instantly to display it on another user’s screen. Here’s what goes on behind the scenes:
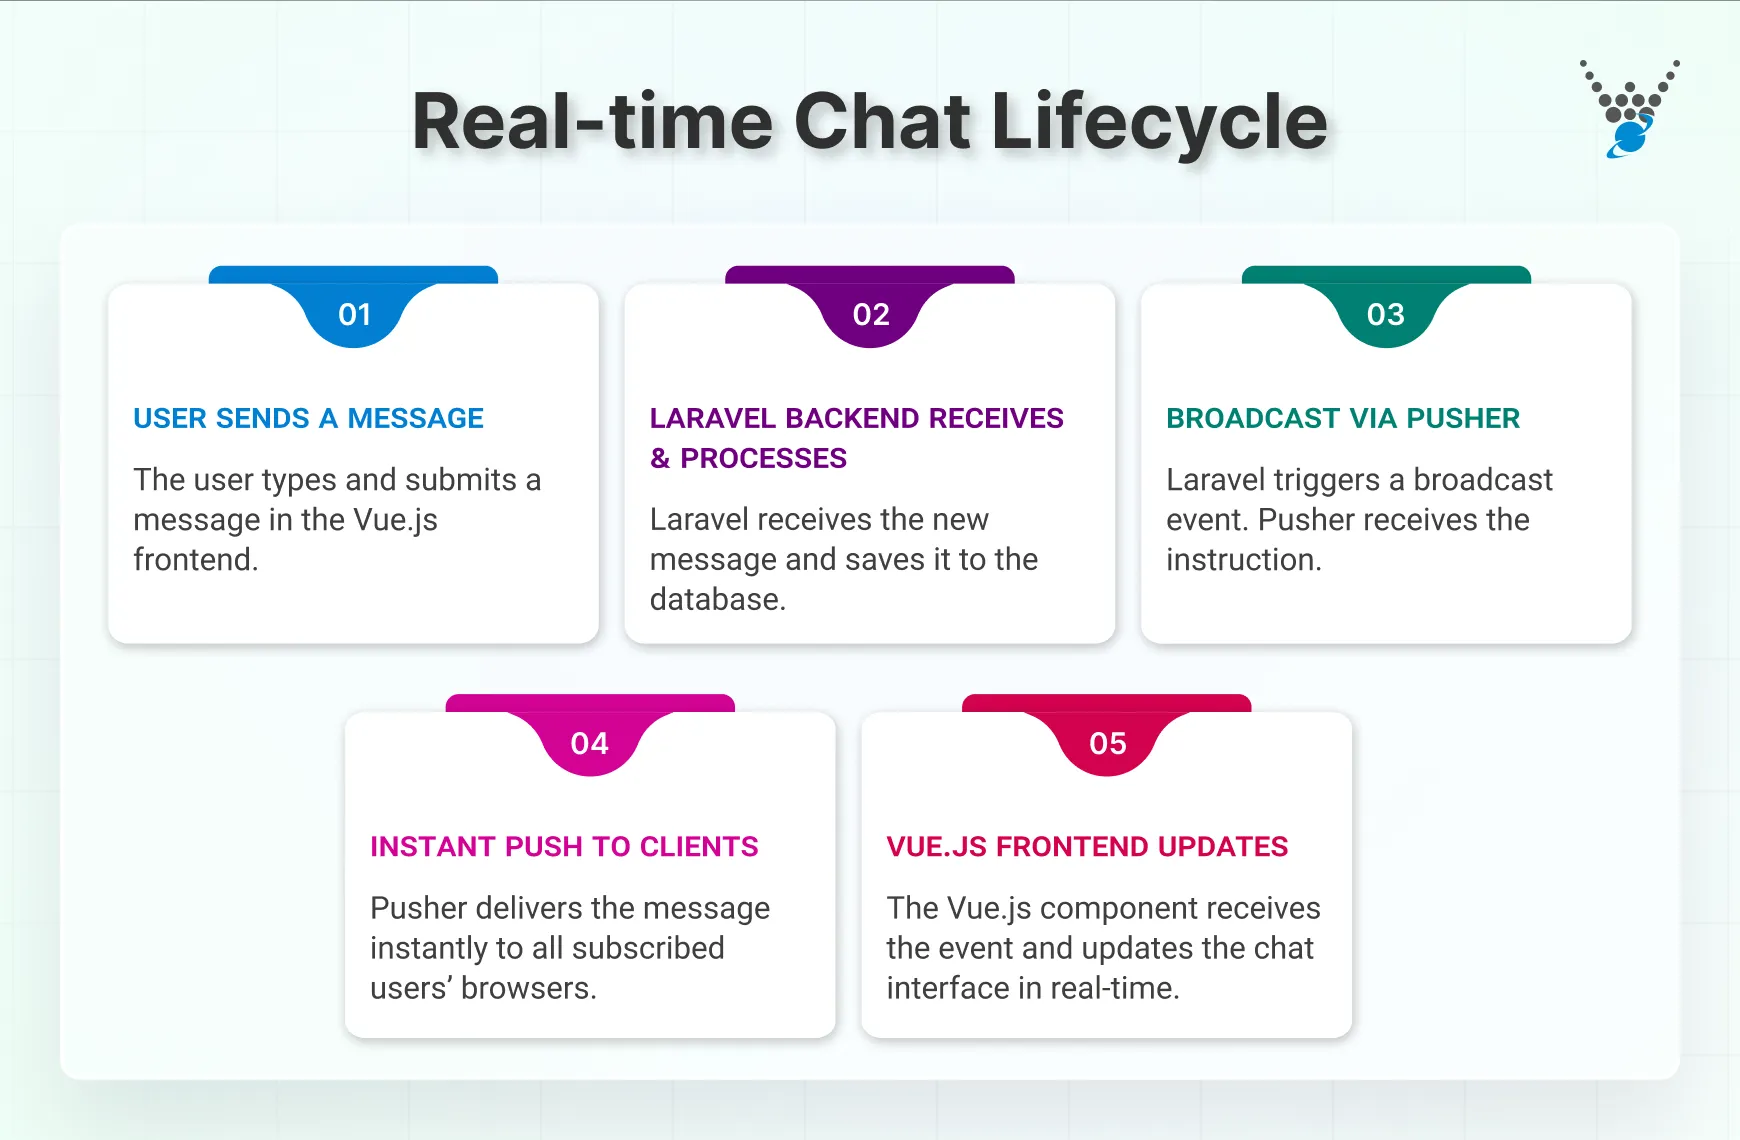
1. User Initiates a Message
The process starts when a user types a message in the Vue.js-powered chat interface and hits Send.
2. Laravel Backend Receives the Message
The message travels from the frontend to the Laravel backend. Here, Laravel processes the message, stores it securely in the database, and prepares it for broadcasting to other users.
3. Message Broadcast via Pusher
Next, Laravel triggers a broadcast event indicating that a new message has been sent. Pusher, acting as the real-time communication bridge, picks up this event and prepares to distribute the update to all connected clients.
4. Instant Delivery to Clients
Pusher’s WebSocket-based infrastructure ensures the message is delivered instantly to every active user in the chat. There’s no need to refresh the page or manually check for updates.
5. Vue.js Frontend Updates in Real Time
Once the message arrives, the Vue.js frontend detects the incoming event and updates the chat interface automatically. All users in the conversation see the new message appear in real time.
Together, Laravel, Pusher, and Vue.js form the foundation of a smooth, modern chat experience. Laravel manages the backend logic, Pusher handles instant message delivery, and Vue.js keeps the interface dynamic and interactive.
Prerequisites for Building Real-time Chat App (Using Laravel, Vue.js, and Pusher)
Before you go about the development, there are a few prerequisites to take care of. It’s to make sure you are not starting from absolute zero.
- PHP 8.3 (or higher) installed on your system.
- Node.js and NPM installed (to manage dependencies and run the Vue.js frontend).
- Composer installed globally (for managing PHP dependencies).
- A Pusher account (if you don’t already have one).
- A basic understanding of WebSockets (and how they enable real-time communication).
- Familiarity with the Vue.js framework (helpful and recommended but not mandatory).
With these requirements taken care of, you can go about the development.
How to Build Real time Chat App Using Laravel, Vue.js, and Pusher?
Follow these steps to set up the backend for your Laravel-based real-time chat application. We’ll guide you through creating the project, scaffolding authentication, configuring Pusher for real-time communication, setting up the database model, and preparing the event broadcast system.
Backend Setup for a Real-Time Chat App
Follow these steps to set up the backend for your Laravel-based real-time chat application. We’ll guide you from creating the project to setting up the database model, and preparing the event broadcast system. Here are the stepwise process you can follow:
Step 1: Scaffold a New Laravel Project
Begin by creating a fresh Laravel project. Open your terminal and run the following commands:
composer create-project laravel/laravel chat-app
cd chat-app
Next, install Laravel Breeze for scaffolding authentication:
composer require laravel/breeze
Once Laravel Breeze is installed, set up authentication with it by running the following commands:
php artisan breeze:install
npm install
npm run dev
Follow the prompts, and proceed with the necessary selections.
Step 2: Install and Configure WebSocket and Event Broadcasting
After scaffolding authentication, we’ll set up WebSocket and event broadcasting. Run the following command to add the necessary configuration files:
php artisan install:broadcasting
This command will generate two key configuration files:
- channels.php in the routes folder
- broadcasting.php in the config folder
These files manage WebSocket connections and install the required client libraries (Laravel Inertia and pusher-js). After that, start your application server by running:
php artisan serve
Once the server is running, visit http://localhost:8000/ in your browser to see the default Laravel welcome page. You’ll have the option to log in or register.
Step 3: Configure Pusher
Pusher is a cloud service that simplifies adding real-time functionality to your app. To configure Pusher:
- Install the Pusher PHP server package:
composer require pusher/pusher-php-server
- Create a new Pusher app via the Pusher dashboard by clicking on Create App under Channels.
- Once created, find your App ID, App Key, Secret, and Cluster in the Pusher dashboard.
Now, open the .env file located in the root of your Laravel project and add the following configuration values (replace the placeholder values with your actual credentials):
PUSHER_APP_ID=<your_pusher_app_id>
PUSHER_APP_KEY=<your_pusher_app_key>
PUSHER_APP_SECRET=<your_pusher_app_secret>
PUSHER_APP_CLUSTER=<your_pusher_app_cluster>
VITE_PUSHER_APP_KEY="${PUSHER_APP_KEY}"
VITE_PUSHER_APP_CLUSTER="${PUSHER_APP_CLUSTER}"
BROADCAST_CONNECTION=pusher
This configuration connects your application to Pusher’s cloud servers and sets it as the broadcast driver.
Step 4: Set Up the Database Model and Migration
Now that the backend and WebSocket setup are done, let’s define the database schema and model for storing chat messages. Here is how:
First create the ChatMessages model along with its migration file:
php artisan make:model -m ChatMessages
Update the generated ChatMessages.php model located in app/Models:
<?php
namespace App\Models;
use Illuminate\Database\Eloquent\Factories\HasFactory;
use Illuminate\Database\Eloquent\Model;
class ChatMessages extends Model
{
    use HasFactory;
    protected $fillable = ['sender_id', 'receiver_id', 'text'];
    public function sender()
    {
        return $this->belongsTo(User::class, 'sender_id');
    }
    public function receiver()
    {
        return $this->belongsTo(User::class, 'receiver_id');
    }
}
In the above model, we define the fillable fields (sender_id, receiver_id, and text) and the relationships between the ChatMessages model and the User model. To modernize and speed up development workflows, you can utilize Laravel Volt for rapid prototyping and efficient handling of interactive features in your chat app.
Next, update the migration file (create_chat_messages_table.php) in the database/migrations folder:
<?php
use Illuminate\Database\Migrations\Migration;
use Illuminate\Database\Schema\Blueprint;
use Illuminate\Support\Facades\Schema;
return new class extends Migration
{
    public function up(): void
    {
        Schema::create('chat_messages', function (Blueprint $table) {
            $table->id();
            $table->foreignId('sender_id')->constrained('users');
            $table->foreignId('receiver_id')->constrained('users');
            $table->string('text');
            $table->timestamps();
        });
    }
    public function down(): void
    {
        Schema::dropIfExists('chat_messages');
    }
};
This migration defines the schema for storing chat messages. It includes:
- An id for each message.
- sender_id and receiver_id foreign keys linking to the users table.
- A text column for storing the message content.
- timestamps for recording the message creation and update times.
Now perform the migration to apply the changes to your database:
php artisan migrate
Step 5: Set Up Event Broadcasting
To set up event broadcasting, first configure the broadcast channel. Open routes/channels.php and update it as follows:
<?php
use Illuminate\Support\Facades\Auth;
use Illuminate\Support\Facades\Broadcast;
Broadcast::channel('chat', function ($user) {
    return Auth::check();
});
Then, create the MessageSent event that will be broadcasted to clients. Run the following command:
php artisan make:event MessageSent
Update the generated MessageSent.php event in the app/Events folder:
<?php
namespace App\Events;
use App\Models\ChatMessages;
use Illuminate\Broadcasting\Channel;
use Illuminate\Broadcasting\PrivateChannel;
use Illuminate\Contracts\Broadcasting\ShouldBroadcast;
use Illuminate\Foundation\Events\Dispatchable;
use Illuminate\Queue\SerializesModels;
use App\Models\User;
class MessageSent implements ShouldBroadcast
{
    use Dispatchable, SerializesModels;
    public $user, $chatMessage;
    public function __construct(User $user, ChatMessages $chatMessage)
    {
        $this->user = $user;
        $this->chatMessage = $chatMessage;
    }
    public function broadcastOn(): array
    {
        return [
           new PrivateChannel("chat"),
        ];
    }
    public function broadcastWith()
    {
        return ['message' => $this->chatMessage];
    }
}
The MessageSent event broadcasts the message data to the chat private channel, allowing real-time updates.
Step 6: Create the Chat Controller
Now, create a controller in Laravel that handles the application logic for sending and receiving chat messages. To create the controller run the following command:
php artisan make:controller ChatController
Next, open the ChatController.php file in app/Http/Controllers and update it as follows:
<?php
namespace App\Http\Controllers;
use App\Events\MessageSent;
use App\Models\ChatMessages;
use App\Models\User;
use Illuminate\Http\Request;
use Illuminate\Support\Facades\Auth;
class ChatController extends Controller
{
    public function index(User $user)
    {
        $messages = ChatMessages::with(['sender', 'receiver'])
            ->whereIn('sender_id', [Auth::id(), $user->id])
            ->whereIn('receiver_id', [Auth::id(), $user->id])
            ->get();
        return response()->json($messages);
    }
    public function store(User $user, Request $request)
    {
        $message = ChatMessages::create([
            'sender_id' => Auth::id(),
            'receiver_id' => $user->id,
            'text' => $request->message,
        ]);
        broadcast(new MessageSent($user, $message))->toOthers();
        return response()->json($message);
    }
}
The index() method fetches messages between the authenticated user and the selected user, while store() creates a new message and broadcasts it.
Step 7: Update Routes
Finally, define the routes to handle the chat functionality. Open routes/web.php and add the following routes:
use App\Http\Controllers\ChatController;
use App\Models\User;
use Illuminate\Support\Facades\Auth;
Route::get('/dashboard', function () {
    return view('dashboard', [
        'users' => User::where('id', '!=', Auth::id())->get()
    ]);
})->middleware(['auth', 'verified'])->name('dashboard');
Route::get('/chat/{user}', function (User $user){
    return view('chat', [
        'user' => $user
    ]);
})->middleware(['auth', 'verified'])->name('chat');
Route::resource('messages/{user}', ChatController::class, ['only' => ['index', 'store']])->middleware(['auth']);
These routes set up the chat application endpoints, allowing users to view their dashboard, access chat with a specific user, and send/receive messages.
By following these steps, you’ll have a backend setup ready for a real-time chat app with Laravel, Vue.js, and Pusher. The app will allow users to send and receive messages in real time, using WebSockets.
Frontend Setup for a Real-Time Chat App
Now that the backend of the real-time chat application is complete, it’s time to set up the user interface. Follow these step-by-step instructions to configure the frontend using Vue.js, Pusher, and Laravel Echo.
Step 1: Install Vue.js
To begin, install Vue.js and the required plugins for handling Vue components. Run the following commands:
npm install vue vue-loader
npm install --save-dev @vitejs/plugin-vue
This installs Vue.js, its loader, and the Vite plugin to support Vue components.
Step 2: Create a Vue.js Component
- Navigate to the resources/js directory and create a new folder named components.
- Inside the components folder, create a file named ChatBox.vue.
- Add the following code to the ChatBox.vue file:
<template>
    ...
</template>
<script>
    ...
</script>
<style scoped>
    ...
</style>
This component includes a chat interface with input and display areas. Messages are conditionally styled to distinguish between sent and received messages.
Step 3: Update the Echo Configuration
Update the resources/js/echo.js file to configure Laravel Echo with Pusher. Replace its content with:
import Echo from 'laravel-echo';
import Pusher from 'pusher-js';
window.Pusher = Pusher;
window.Echo = new Echo({
    broadcaster: 'pusher',
    key: import.meta.env.VITE_PUSHER_APP_KEY,
    cluster: import.meta.env.VITE_PUSHER_APP_CLUSTER,
    forceTLS: true
});
This setup connects the application to the Pusher service using the credentials defined in the .env file.
Step 4: Set Up the App.js File
Replace the content of resources/js/app.js with:
import './bootstrap';
import { createApp } from 'vue';
import ChatBox from './components/ChatBox.vue';
createApp({})
    .component('chat-box', ChatBox)
    .mount('#app');
This initializes the Vue application, registers the ChatBox component, and mounts it to the #app element in your Blade templates.
Step 5: Configure Vite
To ensure Vite processes Vue.js components correctly, update the vite.config.js file in the root directory with the following:
import { defineConfig } from 'vite';
import laravel from 'laravel-vite-plugin';
import vue from '@vitejs/plugin-vue';
export default defineConfig({
    plugins: [
        laravel({
            input: ['resources/css/app.css', 'resources/js/app.js'],
            refresh: true,
        }),
        vue({
            template: {
                transformAssetUrls: {
                    base: null,
                    includeAbsolute: false,
                },
            },
        }),
    ],
    resolve: {
        alias: {
            vue: 'vue/dist/vue.esm-bundler.js',
        },
    },
});
This configuration ensures Vue components are recognized and bundled correctly during development and build stages. For extended interactivity beyond chat, consider adding a Laravel comment system to let users leave threaded responses or feedback tied to specific messages.
Step 6: Update the Blade Templates
For updating the dashboard template, go to resources/views/dashboard.blade.php and add the following code:
<x-app-layout>
    ...
    <div class="grid grid-cols-1 gap-6 sm:grid-cols-2 lg:grid-cols-3">
        @foreach ($users as $user)
            <div class="p-6">
                <a href="{{ route('chat', $user) }}">
                    <div>{{ $user->name }}</div>
                    <div>{{ $user->email }}</div>
                </a>
            </div>
        @endforeach
    </div>
</x-app-layout>
To create chat template go to resources/views/chat.blade.php and include the following content:
<x-app-layout>
    ...
    <div id="app">
        <chat-box :receiver="{{ $user }}" :sender="{{ Auth::user() }}" />
    </div>
</x-app-layout>
This sets up the chat interface and passes the authenticated user and the selected user as props to the ChatBox component.
By following these steps, you will have successfully set up the frontend for your real-time chat app using Laravel, Vue.js, and Pusher. The UI will now be able to send and receive messages, seamlessly integrating with the backend functionality.
Test the Chat Application
It’s finally time to see your real-time chat application in action! Follow the steps below to test the functionality of your chat app effectively.
Step 1: Start the Queue Worker
By default, Laravel events are dispatched on queues. To ensure your events are processed, start a queue worker instance by running the following command in your terminal:
php artisan queue:listen
This command ensures that any chat messages or events generated are correctly processed and displayed in real time.
Step 2: Register Two Users
To test the chat functionality, create two separate user accounts. Use these accounts to simulate a real chat scenario.
- Open a regular browser tab and log in with one user account.
- Open an incognito tab or a different browser and log in with the other user account.
Step 3: Start a Conversation
In both tabs, select the other user as the recipient for the chat. Then start sending messages to each other and observe how the messages are instantly updated in real time.
By following these steps, you should be able to test and confirm that your chat application is fully functional and performing as expected. If any issues arise, revisit your code and ensure that your Laravel, Vue.js, and Pusher configurations are correct.
Common Errors and Debugging Tips
Even after clearly following the frontend, backend, and testing procedure, there may be some issues. Here are a few common ones and their fixes.
“The channel is not authorized.”
Cause
Your Laravel backend is rejecting the subscription request to the private channel.
Fix
Make sure you have defined the channel authorization logic in your routes/channels.php file and that the user is authenticated.
Messages Not Broadcasting
Cause
The most common issue is an incorrect Pusher configuration.
Fix
- Triple-check your Pusher credentials (app_id, key, secret, cluster) in the .env file.
- Verify BROADCAST_DRIVER is set to pusher.
- Confirm you have uncommented App\Providers\BroadcastServiceProvider in config/app.php.
Event Broadcasting but Not Receiving on Frontend
Cause
The frontend is not listening to the correct channel or event name.
Fix
- Make sure the channel name in your Vue.js component exactly matches the name returned by the event’s broadcastOn() method.
- Check that you are binding to the correct event name. By default, use the full class name (e.g., MessageSent).
CORS (Cross-Origin Resource Sharing) Errors
Cause
Your Laravel API and frontend are on different domains or ports during development, blocking requests.
Fix
Make sure your Laravel CORS configuration (config/cors.php) allows requests from your frontend’s origin.Here’s a pro debugging tip: Open your browser’s developer console and monitor the “Network” tab for WebSocket connections (ws://). Go for the “Console” for any JavaScript errors. On the backend, check Laravel’s storage/logs/laravel.log file for detailed error messages.
And if you would like to go for a more professional approach to building a real-time chat app, consult with our Laravel development company.
How to Add Authentication for Private Chat Channels?
By default, any user can subscribe to public channels. For a private chat, you must authenticate users to ensure they have permission to listen. Here’s how to secure your channels.
Step 1: Make Your Channel Private
In your Laravel event, change the channel from Channel to PrivateChannel.
// In your MessageSent event class
public function broadcastOn()
{
    // Prefix the channel name with 'private-'
    return new PrivateChannel('chat.room.1');
}
Step 2: Authorize the Channel
Define the authorization logic in routes/channels.php. This function determines if the authenticated user is allowed to listen.
// In routes/channels.php
Broadcast::channel('chat.room.{roomId}', function ($user, $roomId) {
    // Example: Check if the user is a member of the chat room
    return $user->isMemberOfRoom($roomId); // Implement this logic based on your app
});
Step 3: Update Your Frontend Subscription
In your Vue.js component, you must now subscribe to the private channel using the correct naming convention.
// In your Vue component
const channel = pusher.subscribe('private-chat.room.1');
channel.bind('MessageSent', (data) => {
    // Handle the incoming message
});
How It Works
Let’s say your Vue app attempts to subscribe to a private channel. Then Pusher automatically makes a POST request to your Laravel backend (/broadcasting/auth).Laravel then executes the authorization callback you defined. Only if it returns true will the connection be established, securing your real-time data.
Wrapping Up
Building a real-time chat application becomes much simpler and more efficient with the right tools. Using Laravel for backend management, Vue.js for a dynamic frontend, and Pusher for real-time communication creates a seamless experience. Starting with backend setup, we prepared the foundation for smooth data handling.
The frontend integration brought the interface to life, making interactions user-friendly and responsive. Finally, testing ensured that real-time features worked flawlessly. Understanding this process lets you build a chat app and also helps you get a better idea when working with other similar projects.
If you are looking to build a real-time application that is well-designed and performs well, hire Laravel developers with us today!
FAQs on Building Real-time Chat Apps
Can I build this without using a service like Pusher?
Yes, you can use Laravel WebSockets or Soketi to host your own WebSocket server. However, this requires additional server configuration and maintenance. Pusher is a hosted solution that manages scalability and infrastructure for you, simplifying development.
Can I create a real-time chat app with Laravel Livewire?
Yes! Laravel Livewire offers real-time and reactive capabilities using its server-driven components, making it possible to build interactive chat functionality with minimal JavaScript.
Is this chat application scalable for thousands of users?
The architecture is inherently scalable. Pusher is built to handle massive concurrent connections. Your Laravel application’s scalability will then depend on your server infrastructure and database optimization. But the real-time layer is effectively handled for you.
Do I need to use Vue.js, or can I use another frontend framework?
You can use any frontend framework like React or Angular. The principles remain the same. Your frontend needs to subscribe to Pusher channels and listen for events. Vue.js pairs exceptionally well with Laravel, making the integration process very smooth.
How can I simplify route management in my Laravel chat app project?
You can streamline your chat app’s route mapping by using Laravel Folio, which automatically generates routes from Blade templates and helps maintain an organized project structure.