Quick Summary
Discover how to generate, customize, and deploy QR codes in Laravel 12. From static to dynamic codes, learn to adjust size, colors, logos, margins, and error correction. See how to display codes in Blade, enable downloads as PNG or SVG, and embed them in emails or API responses. Master full QR code integration, practical real-world use cases, and best practices to make your Laravel apps interactive, professional, and user-friendly.
Table of Contents
QR codes enhance user experiences by making interactions seamless, whether it’s accessing websites or connecting to Wi-Fi. Laravel offers an easy way to generate and customize these QR codes, letting developers adjust size and colors and even add logos.
In this blog, we’ll start with a prerequisite and learn how you can generate QR codes in Laravel. We’ll also learn about various customization options and how to implement them.
Additionally, we’ll dive into different types of QR codes, such as URLs, SMS, and Wi-Fi codes. So, let’s begin with the prerequisites that we need before moving to generating a QR code.
What is a QR Code and Why Use It in Laravel?
A QR code is a compact way to store and share data. It’s a two-dimensional barcode that can hold text, links, or any digital information. When scanned, it instantly takes users to the intended content.
For a Laravel developer, QR codes open up a world of convenience. They can simplify how users interact with your app, reduce manual steps, and create faster access to information. Laravel’s smooth structure makes integrating QR codes easy, even for those new to backend development.
Real-world Use Cases
QR codes fit naturally into many web projects, much like how screenshot automation is handled with Browsershot Laravel. Here are a few practical ways they’re used:
- User Logins: Allow users to sign in securely without entering passwords. Scanning a QR code can link a device directly to a session.
- Product Tracking: Attach QR codes to products for quick inventory checks or shipment tracking. Each scan reveals real-time data stored in your Laravel system.
- Event Tickets: Generate dynamic QR codes for digital tickets to enable fast, contactless entry.
These examples show how QR codes can turn basic web features into smooth, interactive experiences.
Tools Used
If you want to generate QR code in Laravel 12, one of the best tools is the SimpleSoftwareIO Simple QrCode package. It’s lightweight, easy to install, and works seamlessly with Laravel 11. The package lets you generate static or dynamic QR codes with just a few lines of code. You can also customize their size, color, and format without having to touch complex libraries.
With simple-qrcode, you can add QR code functionality to your Laravel project in minutes.
Prerequisites for Generating QR Codes in Laravel 12
Before you start creating QR codes in Laravel 12, a few basics need to be in place. Having the right setup ensures everything runs smoothly and saves you from common installation errors.
What You Need
- PHP 8.2 or Higher: Laravel 12 requires PHP 8.2 or above. Make sure PHP is installed and properly configured on your system. You can confirm the version by running:
php -v
- Composer Installed: Composer is essential for managing Laravel dependencies. It handles all required packages and updates. Check if it’s installed using:
composer --version
- Laravel 12 Installed: You’ll need a working Laravel 12 project. If you haven’t set it up yet, create one with:
composer create-project laravel/laravel project-name
- Internet Connection for Package Installation: A stable internet connection is needed to download and install the required packages, including the SimpleSoftwareIO Simple QrCode library.
Once these prerequisites are ready, you can move on to building your Laravel 12 QR code generator with confidence.
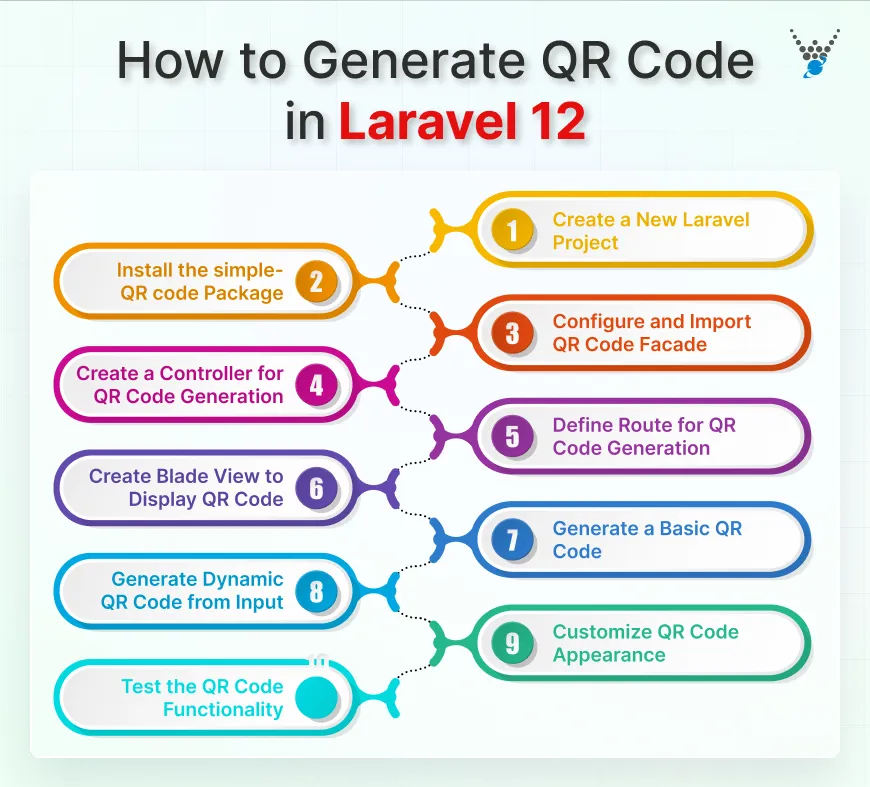
How to Generate QR Code in Laravel 12
The process to generate QR code in Laravel 12 is straightforward once your environment is ready. Follow these steps to create both static and dynamic QR codes and customize them to fit your needs.

Step 1: Create a New Laravel Project
Start by creating a fresh Laravel 12 project if you don’t already have one. Run:
composer create-project laravel/laravel qr-demo
This sets up a clean project structure with all necessary dependencies.
Step 2: Install the simple-qrcode Package
Next, install the SimpleSoftwareIO Simple QrCode package, which is widely used and reliable for Laravel QR code generation:
composer require simplesoftwareio/simple-qrcode
Step 3: Configure and Import QrCode Facade
In Laravel 12, the package uses the QrCode facade. Add the following at the top of your controller file:
use SimpleSoftwareIO\QrCode\Facades\QrCode;
This allows you to generate QR codes easily in your controllers or views.
Step 4: Create a Controller for QR Code Generation
Create a controller to handle QR code generation logic:
php artisan make:controller QrCodeController
Inside the controller, you will add methods to generate both static and dynamic QR codes.
Step 5: Define Route for QR Code Generation
Set up a route in web.php to display the QR code:
Route::get('/qr-code', [QrCodeController::class, 'index']);
This route will point to a controller method that renders the QR code view.
Step 6: Create Blade View to Display QR Code
Create a Blade file resources/views/qr.blade.php to show the QR code:
<!DOCTYPE html>
<html>
<head>
    <title>QR Code Demo</title>
</head>
<body>
    <h1>QR Code Example</h1>
    {!! $qrcode !!}
</body>
</html>
The QR code will be injected from the controller.
Step 7: Generate a Basic QR Code (Static Example)
In your QrCodeController, add:
public function index() {
    $qrcode = QrCode::size(200)->generate('https://example.com');
    return view('qr', compact('qrcode'));
}
This creates a static QR code pointing to a fixed URL.
Step 8: Generate Dynamic QR Code from Input
For dynamic QR codes, capture input from users:
public function index(Request $request) {
    $url = $request->input('url', 'https://example.com');
    $qrcode = QrCode::size(200)->generate($url);
    return view('qr', compact('qrcode'));
}
Now the QR code changes based on user input.
Step 9: Customize QR Code Appearance
You can adjust size, color, and style:
$qrcode = QrCode::size(250)
                ->backgroundColor(255, 255, 204)
                ->color(0, 0, 0)
                ->style('round')
                ->generate('https://example.com');
This lets you match the QR code to your app’s design.
Step 10: Test the QR Code Functionality
Visit your /qr-code route in a browser. Scan the QR code with a smartphone to ensure it directs to the correct URL. For dynamic QR codes, test different inputs to confirm everything works as expected.
With these steps, you can integrate QR codes into user logins, product tracking, event tickets, or any interactive feature in your app.
Customizing the Generated QR Code
Laravel makes it easy to generate QR codes. Beyond just creating a basic code, you can fully customize it to match your branding, improve readability, and even allow downloads. Below, we explore all major customization options in one place.
Adjust Size and Format
You can control the QR code’s dimensions and output format to fit your needs:
QrCode::format('png')
      ->size(400)
      ->generate('https://example.com');
- format(‘png’): Sets the output format. Supported formats include PNG, SVG, and others.
- size(400): Sets the QR code to 400×400 pixels, making it readable across devices.
Add Colors (Foreground and Background)
Colors help QR codes match your brand or design theme:
QrCode::format('png')
      ->size(300)
      ->color(0, 0, 255)            // Blue foreground
      ->backgroundColor(255, 255, 0) // Yellow background
      ->generate('https://example.com');
- color(R, G, B): Sets the QR code’s foreground color.
- backgroundColor(R, G, B): Sets the background color.
Note: Some scanners may have trouble reading highly colored codes. Test across devices.
Add a Logo or Brand Image
Embedding a logo in the QR code strengthens branding and visual appeal, especially when using media optimization tools like Laravel Cloudinary.
QrCode::format('png')
      ->size(300)
      ->merge(public_path('logo.png'), 0.3, true)
      ->generate('https://example.com');
- merge(): Adds an image in the center.
- Second parameter (0.3): Controls logo size relative to QR code.
- Third parameter (true): Maintains transparency for better readability.
Add Margins and Border
Margins improve scannability by adding whitespace around the QR code:
QrCode::format('png')
      ->size(300)
      ->margin(10)
      ->generate('https://example.com');
- margin(10): Adds 10 units of padding around the QR code.
Set Error Correction Level
Error correction allows a QR code to remain scannable even if partially damaged:
QrCode::format('png')
      ->size(300)
      ->errorCorrection('H')
      ->generate('https://example.com');
Here, the errorCorrection(‘H’) ensures that up to 30% of the QR code can be damaged and still be scannable. Other levels include Q, M, and L. Here is in brief about them:
| Level | Value | Bytes that can be restored |
|---|---|---|
| High | H | 30% |
| Quartile | Q | 25% |
| Medium | M | 15% |
| Low | L | 7% |
Generate a Branded or Downloadable QR Code Example
Here’s a complete example applying all the above customizations in a Laravel 12 controller:
<?php
namespace App\Http\Controllers;
use Illuminate\Http\Request;
use SimpleSoftwareIO\QrCode\Facades\QrCode;
class QrCodeController extends Controller
{
    public function show()
    {
        $qrCode = QrCode::size(300)
            ->backgroundColor(255, 255, 0)
            ->color(0, 0, 255)
            ->margin(2)
            ->style('round')
            ->eye('circle')
            ->errorCorrection('H')
            ->format('png')
            ->merge(public_path('logo.png'), 0.3, true)
            ->generate('https://example.com');
        return view('qrcode', compact('qrCode'));
    }
    public function download()
    {
       $qrCode = QrCode::size(300)
            ->backgroundColor(255, 255, 0)
            ->color(0, 0, 255)
            ->margin(2)
            ->style('round')
            ->eye('circle')
            ->errorCorrection('H')
            ->format('png')
            ->merge(public_path('logo.png'), 0.3, true)
            ->generate('https://example.com');
        return response($qrCode)
            ->header('Content-Type', 'image/png')
            ->header('Content-Disposition', 'attachment; filename="qrcode.png"');
    }
}
Routes (routes/web.php)
use App\Http\Controllers\QrCodeController;
Route::get('/qrcode', [QrCodeController::class, 'show']);       // Display QR code
Route::get('/qrcode/download', [QrCodeController::class, 'download']); // Download QR code
Blade View (resources/views/qrcode.blade.php)
<!DOCTYPE html>
<html lang="en">
<head>
    <meta charset="UTF-8">
    <meta name="viewport" content="width=device-width, initial-scale=1.0">
    <title>Custom QR Code</title>
</head>
<body>
    <h1>Custom QR Code</h1>
    <div>
        {!! $qrCode !!}
    </div>
    <br>
    <a href="{{ url('/qrcode/download') }}" download>Download QR Code</a>
</body>
</html>
Ensure the logo path and encoded content are correct for your application. Test scanning across devices for reliability.
Downloading and Exporting QR Codes
Generating a QR code is just the first step. In many projects, users or systems need to download, share, or embed these codes. Laravel makes this simple and flexible.
Download QR Code as PNG or SVG
You can allow users to download QR codes directly from your application. The SimpleSoftwareIO Simple QrCode package supports multiple formats like PNG or SVG:
public function download()
{
    $qrCode = QrCode::format('png')
        ->size(300)
        ->generate('https://example.com');
    return response($qrCode)
        ->header('Content-Type', 'image/png')
        ->header('Content-Disposition', 'attachment; filename="qrcode.png"');
}
- format(‘png’) can be changed to ‘svg’ to generate vector graphics.
- The Content-Disposition header triggers a download in the browser.
This approach is ideal for allowing users to save QR codes for printing, offline use, or sharing.
Return QR Code via Controller
Sometimes you may want to return the QR code directly in an API response or render it in a view.
public function show()
{
    $qrCode = QrCode::size(250)
        ->color(0, 0, 0)
        ->backgroundColor(255, 255, 255)
        ->generate('https://example.com');
    return response($qrCode)
        ->header('Content-Type', 'image/png');
}
- This returns a ready-to-display image without downloading.
- It works well for embedding in web pages, dashboards, or frontend frameworks.
Embed QR Codes in Emails or API Responses
QR codes can be sent in emails or returned via APIs for dynamic use. You can further automate and personalize this process through AI-powered features using Laravel OpenAI.
For Emails:
Mail::to('user@example.com')->send(new QrCodeMail($qrCode));
- Generate the QR code as a base64 string and embed it in your email template.
- This ensures the code is visible directly in the email without attachments.
For APIs:
return response()->json([
    'qr_code' => base64_encode(QrCode::size(200)->generate($url))
]);
- Encodes the QR code in base64, making it easy to display in apps or mobile clients.
- Ideal for apps where QR codes are generated on-the-fly for authentication, tickets, or product tracking.
By offering downloadable files, direct responses, and API-ready QR codes, you make your Laravel application versatile and user-friendly. Users can save, share, or scan codes instantly. If you want to build a site with interactive, customized features, consider contacting a professional Laravel development company.
Example of a Customized and Downloadable QR Code
You can use the below code directly to customize your QR code with the necessary changes as per your need and preference. Here is the code you can add to app/Http/Controllers/QrCodeController.php for applying the customization:
<?php
namespace App\Http\Controllers;
use Illuminate\Http\Request;
use SimpleSoftwareIO\QrCode\Facades\QrCode;
class QrCodeController extends Controller
{
    public function show()
    {
        $qrCode = QrCode::size(300)
            ->backgroundColor(255, 255, 0)
            ->color(0, 0, 255)
            ->margin(2)
            ->style('round')
            ->eye('circle')
            ->errorCorrection('H')
            ->format('png')
            ->merge(public_path('logo.png'), 0.3, true)
            ->generate('https://example.com');
        return view('qrcode', compact('qrCode'));
    }
}
To add the download option for the code generated here is the code you can add to your controller file. Add the following code to the QrCodeController class in the app/Http/Controllers/QrCodeController.php file:
public function download()
    {
        $qrCode = QrCode::size(300)
            ->backgroundColor(255, 255, 0)
            ->color(0, 0, 255)
            ->margin(2)
            ->style('round')
            ->eye('circle')
            ->errorCorrection('H')
            ->format('png')
            ->merge(public_path('logo.png'), 0.3, true)
            ->generate('https://example.com');
        return response($qrCode)
            ->header('Content-Type', 'image/png')
            ->header('Content-Disposition', 'attachment; filename="qrcode.png"');
    }
After that, add the routes in routes/web.php:
use App\Http\Controllers\QrCodeController;
Route::get('/qrcode', [QrCodeController::class, 'show']); //displays the customized QR code
Route::get('/qrcode/download', [QrCodeController::class, 'download']); //allows users to download the QR code
Create a view file resources/views/qrcode.blade.php:
<!DOCTYPE html>
<html lang="en">
<head>
    <meta charset="UTF-8">
    <meta name="viewport" content="width=device-width, initial-scale=1.0">
    <title>Custom QR Code</title>
</head>
<body>
    <h1>Custom QR Code</h1>
    <div>
        {!! $qrCode !!}
    </div>
    <br>
    <a href="{{ url('/qrcode/download') }}" download>Download QR Code</a>
</body>
</html>
Remember to adjust the logo path and encoded content as needed for your specific use case. Also, ensure that you have the simple-qrcode package installed with proper set up in your Laravel project. If you want to build a site with interactive and customized features consider getting in touch with professional Laravel development company.
Types of QR Code in Laravel
QR codes come in various types, each serving a specific use case. Similarly, if you want to make these codes easily searchable or indexed within your Laravel app, Laravel Scout is an excellent tool for efficient search functionality.
Below is an overview of different QR code types, along with code examples to create them using Laravel and the SimpleSoftwareIO\QrCode package:
URL
It is the most common type of QR code, which redirects the user to a website URL when scanned. It’s widely used for marketing campaigns or sharing websites quickly.
QrCode::format('png')
      ->size(300)
      ->generate('https://example.com');
Text
Displays plain text upon scanning. Useful for sharing brief messages, discount codes, or simple instructions without requiring internet access.
QrCode::format('png')
      ->size(300)
      ->generate('Hello, welcome to our service!');
Opens the default email app with pre-filled recipient, subject, and body fields. Ideal for automating communication with users.
QrCode::format('png')
      ->size(300)
      ->generate('mailto:info@example.com?subject=Inquiry&body=Please provide more details.');
Phone
When scanned, it opens the phone’s dialer with the specified number. This type of QR code is convenient for customer service and support lines.
QrCode::format('png')
      ->size(300)
      ->generate('tel:+1234567890');
SMS
This type of QR code encodes an SMS message, including the recipient’s phone number and the message content. When scanned, it pre-populates the SMS app with the details, allowing users to send the message with a single tap.
QrCode::format('png')
      ->size(300)
      ->generate('sms:+1234567890?body=Hello, I need more information.');
Wi-Fi
This code allows users to connect to a Wi-Fi network without manually entering the SSID and password. It’s perfect for events or public places like cafés.
QrCode::format('png')
      ->size(300)
      ->generate('WIFI:T:WPA;S:NetworkName;P:password123;');
Explanation: T:WPA is the network type, S is the SSID, and P is the password.
Geolocation
Opens the location on a map application. Useful for events, tourism, or guiding customers to physical stores.
QrCode::format('png')
      ->size(300)
      ->generate('geo:37.7749,-122.4194');
Explanation: The coordinates (latitude (37.7749) and longitude (,-122.4194)) are used to specify the location.
VCard (Contact Information)
Stores contact information like name, phone number, email, and address. It adds the contact directly to the user’s phonebook upon scanning. If your application stores large volumes of QR data or user contact info, consider using Laravel with MongoDB for scalable and flexible data management.
QrCode::format('png')
      ->size(300)
      ->generate('BEGIN:VCARD
VERSION:3.0
FN:John Doe
TEL:+1234567890
EMAIL:john@example.com
END:VCARD');
Each type of QR code serves a unique purpose, ranging from sharing URLs to managing contact information. These codes are easy to generate with Laravel, offering versatility for personal, business, or event-based websites. If you are looking to build a site for your business, hire Laravel developers.
Wrapping Up
Generating QR codes in Laravel simplifies user interactions, making them ideal for various applications. By using simple-qrcode package you can generate QR code in Laravel easily.
You can generate a simple QR code by configuring the chosen package and defining the route along with creating a Blade view. Once created, you can perform various customizations, such as adding a logo, colors, and more. Based on your requirements, you can use different types of QR codes such as URL, Wi-Fi, Email, and SMS.
If you are looking to create a site that ensures the best user experience and is robust, connect with Laravel development services.
FAQs About Generating QR code in Laravel
Can I integrate QR code generation into my Laravel views and APIs?
Yes, you can integrate QR code generation into your Laravel views and APIs. In your view, you can generate the QR code and display it as an image. In your APIs, you can generate the QR code and return it as an image response.
What is the difference between static and dynamic QR codes?
A static QR code contains fixed information that cannot be changed. A dynamic QR code allows you to update the content or URL behind it without changing the code itself.
Can one QR code have two links?
A QR code can only store one link at a time. However, you can work around this by using a redirect URL or a landing page that offers multiple options. For example, a QR code can direct users to a page that contains multiple links or redirects based on user selection.
Want to add advanced QR code features to your Laravel project?
Let our Laravel developers help you integrate secure, scalable, and fully customized QR code features.


