
Quick Summary
Learn how to upload images in Laravel with ease. This guide covers both single and multiple uploads, showing you step-by-step how to handle files, store them securely, and keep your code clean. Written for beginners and seasoned developers alike, it makes image uploads simple, reliable, and efficient—helping you build smooth, professional web applications without confusion or unnecessary complexity.
Table of Contents
Images are among the most engaging aspects of a website or app. So let’s say a user tries to upload a profile picture, but the image fails to save. Or maybe even worse, it exposes your app to security risks. Needless to say, handling image uploads is a common yet critical task in web development.
But how to upload images in Laravel? It is more than just moving files. It involves ensuring security, validation, and efficient storage. Laravel uses the Flysystem PHP package to provide a simple API across storage options, making it easier to manage files locally, on cloud services, or third-party storage.
You can upload images in Laravel with built-in features and third-party packages, ensuring security and efficiency. However, improper implementation can lead to performance issues or security vulnerabilities.
This blog walks you through the best practices for uploading images in Laravel, covering validation, storage, and optimization. You’ll learn how to use Laravel’s file system and handle uploads securely. But first, the image formats.
Overview of Laravel Image Upload
Uploading images in Laravel involves receiving the file from a form, validating it, storing it securely, and optionally saving its path to a database. Laravel simplifies this process using its built-in file storage system powered by the Flysystem PHP package, offering a simple and consistent API across storage options.
To upload an image, you create a Blade form with enctype=”multipart/form-data”, define a route to handle the POST request, and build a controller method that validates and stores the file (e.g., in the public/images directory). By learning Laravel file upload techniques, you can greatly enhance the UX of your projects. This ensures both security and performance. With these steps, you can seamlessly integrate image upload functionality into any Laravel project.
How to Configure Settings to Upload Image in Laravel?
Before you upload images, you need to configure Laravel file storage. This is done in the config/filesystems.php file. It controls where and how your files are stored.
1. Understand the filesystems.php File
This file defines storage disks.
- A disk represents a storage driver and a file location.
- You can use multiple disks for different storage options like local, public, or cloud (e.g., Amazon S3).
- Laravel uses these disks whenever you store or retrieve files.
2. Add or Edit Disks
Open config/filesystems.php. You’ll see a disks array.
Each entry inside this array defines a disk’s configuration. You can edit existing disks or create new ones.
Example:
'disks' => [
    'public' => [
        'driver' => 'local',
        'root' => storage_path('app/public'),
        'url' => env('APP_URL') . '/storage',
        'visibility' => 'public',
        'throw' => true,
    ],
    's3' => [
        'driver' => 's3',
        'key' => env('AWS_ACCESS_KEY_ID'),
        'secret' => env('AWS_SECRET_ACCESS_KEY'),
        'region' => env('AWS_DEFAULT_REGION'),
        'bucket' => env('AWS_BUCKET'),
        'throw' => true,
    ],
],
3. Use the throw Option
The throw key is a small detail that makes a big difference.
- When set to true, Laravel throws an exception if a file write fails.
- This helps you catch errors early and keep file uploads reliable.
In short, before uploading images, configure Laravel’s file storage in config/filesystems.php by defining disks for local, public, or cloud storage. This setup ensures that when you store images in Laravel, you can manage them reliably, and using the throw option helps catch failed writes early.
Which Drivers Are Used to Upload Image in Laravel?
Laravel offers multiple storage drivers to handle image uploads, each suited for different scenarios.
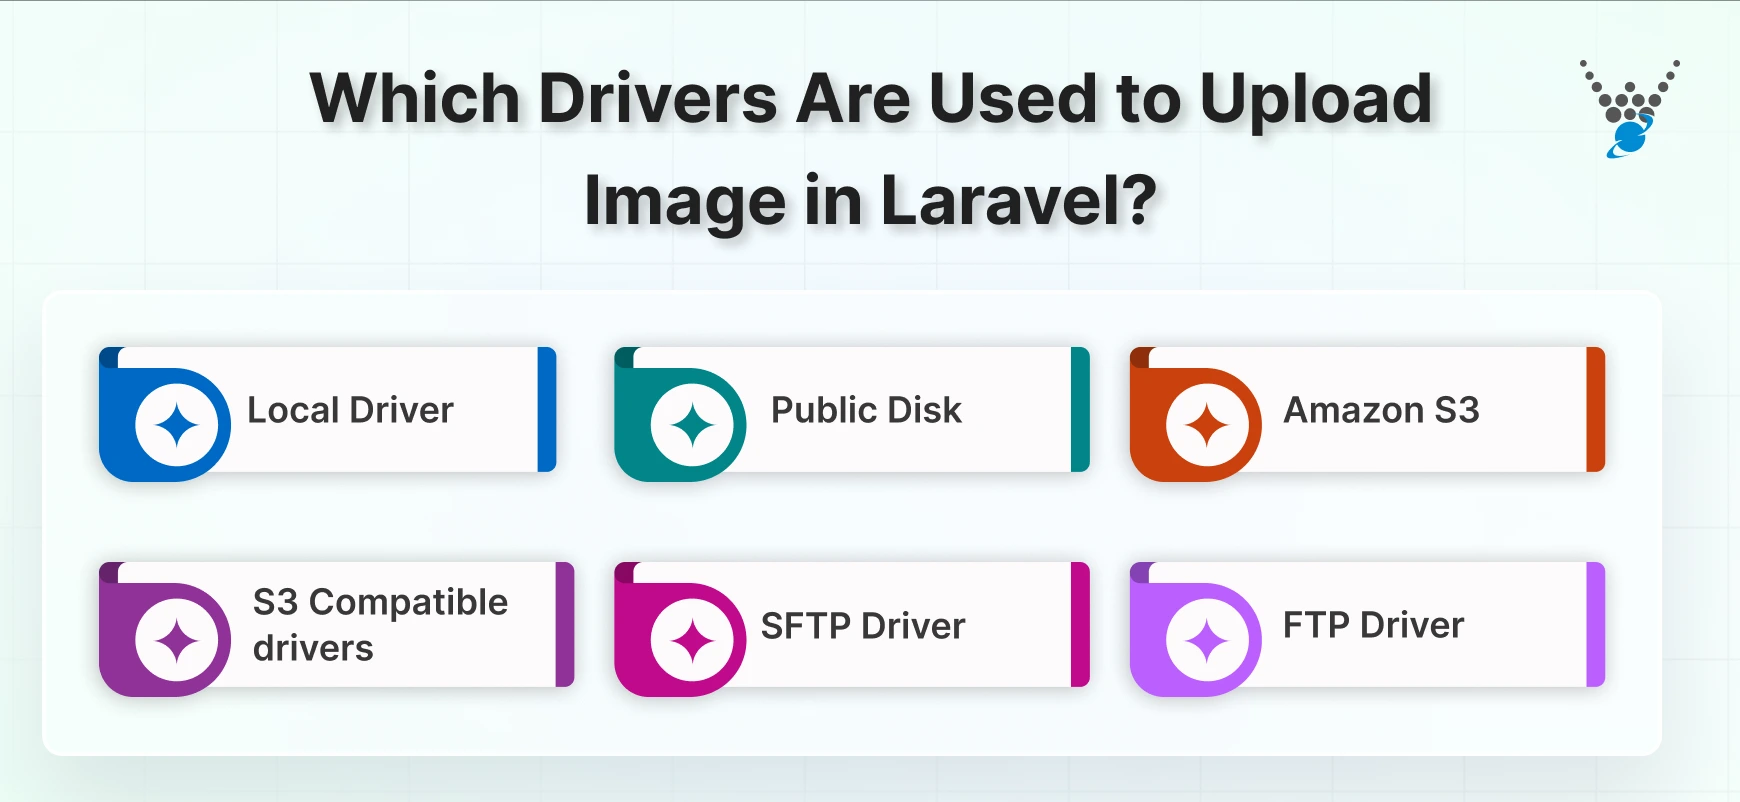
- Local Driver stores files directly on your server. The files are saved relative to the root directory, which defaults to storage/app/private. This driver is ideal for private files that should not be publicly accessible.
- Public Disk is intended for files that need to be publicly available. It uses the local driver by default and stores files in storage/app/public. To make files accessible, you need to create a symbolic link using php artisan storage:link. Once linked, files can be accessed easily via Laravel’s asset() helper. Always optimize Laravel database queries to ensure your application remains fast, even with large numbers of uploads.
- Amazon S3 (s3) allows storing files in Amazon’s cloud storage. It requires the league/flysystem-aws-s3-v3 package and uses environment variables like AWS_ACCESS_KEY_ID, AWS_BUCKET, and AWS_SECRET_ACCESS_KEY to connect and manage storage securely.
- S3 Compatible drivers support services like MinIO, DigitalOcean Spaces, Vult, and Cloudflare R2. They require updating the endpoint option (AWS_ENDPOINT) in the disk configuration to work with these alternative cloud providers.
- SFTP Driver enables storing files on a remote server using SFTP, providing secure server-to-server file transfers.
- FTP Driver allows file storage on a remote server using standard FTP. While simpler to set up, it is less secure compared to SFTP and is generally used in legacy systems.
In short, Laravel offers multiple drivers to store images in Laravel, including Local, Public, Amazon S3, S3-compatible, SFTP, and FTP, each suited for different storage needs. These drivers make it easy to manage files securely and efficiently, supporting both private and public access for your Laravel image upload and display.
How to Manage Disks and Instances for Image Upload in Laravel?
Laravel provides flexible ways to manage storage disks and instances, giving you full control over where and how images are stored.
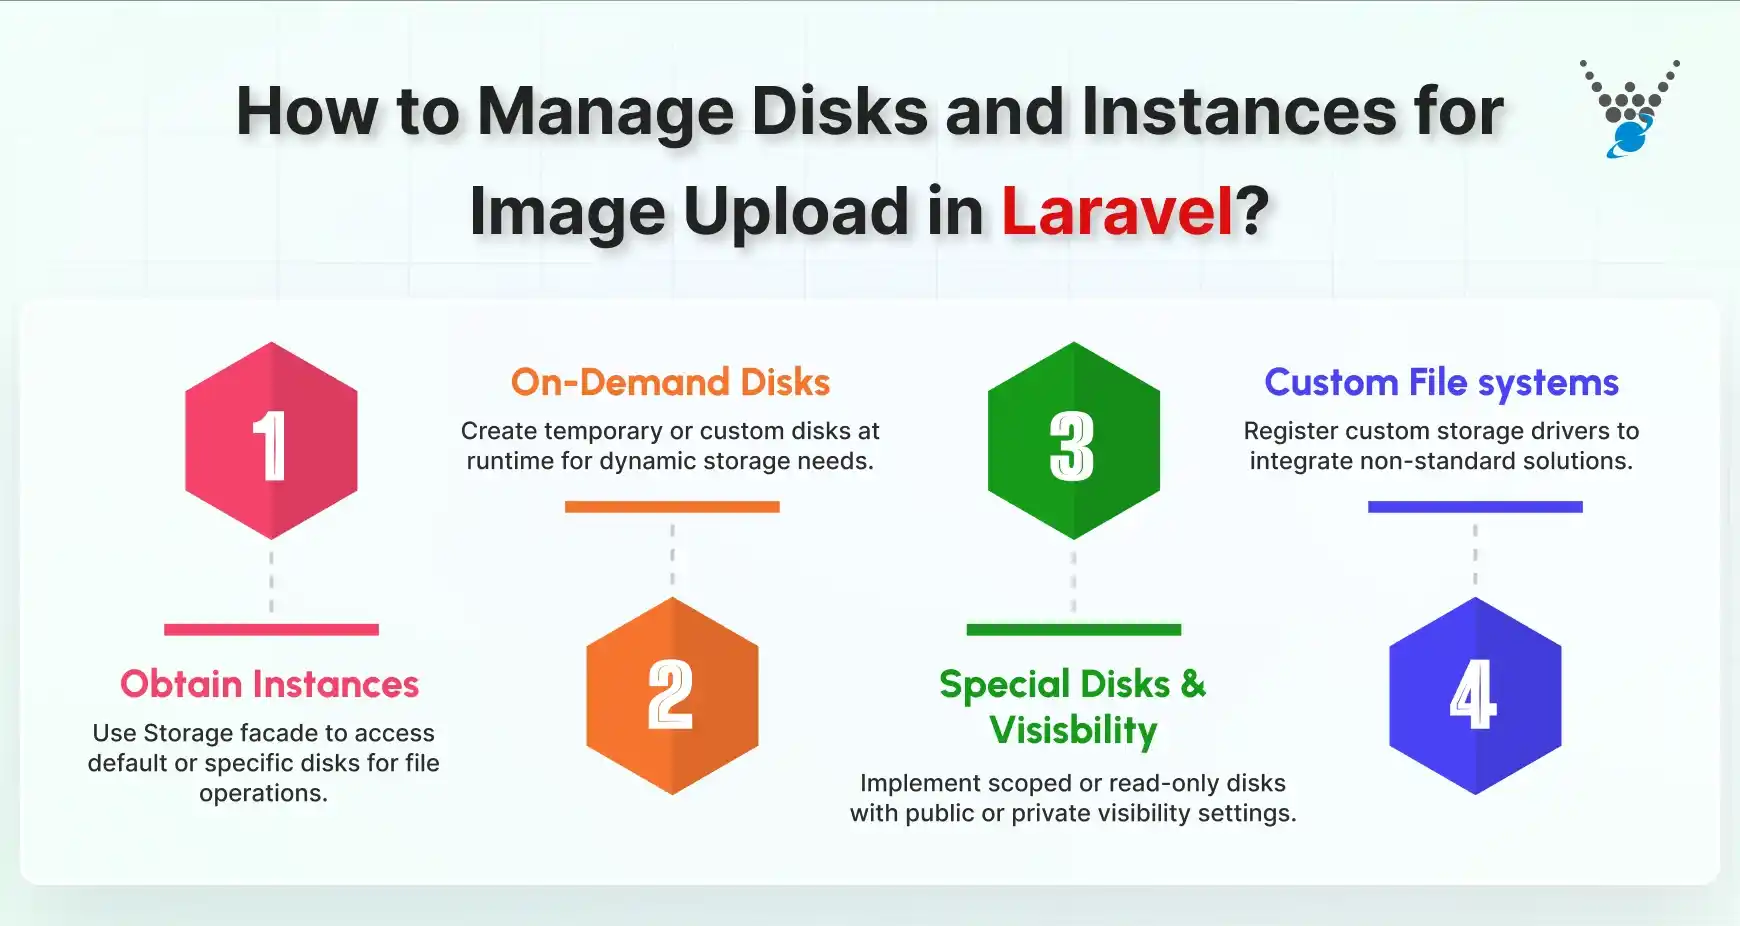
Obtaining Instances
You can get a disk instance easily using Laravel’s Storage facade. By default, Storage points to the default disk defined in config/filesystems.php. For a specific disk, use Storage::disk(‘name’) to target that storage location directly. This allows you to read, write, or delete files on any configured disk effortlessly.
On-Demand Disks
Laravel allows creating storage disks at runtime using Storage::build(config_array). This is useful when you need a temporary or custom disk without defining it in filesystems.php. On-demand disks are flexible and perfect for dynamic storage needs.
Custom Filesystems
You can register custom storage drivers in your ServiceProvider::boot() method. Use Storage::extend(‘driver_name’, Closure) to define how the disk behaves. This approach is ideal for integrating non-standard storage solutions or modifying existing drivers for your application.
Special Disks & Visibility
Laravel also supports special disks and visibility settings. Scoped filesystems use the scoped driver and require the league/flysystem-path-prefixing package. Read-only disks can be created by setting ‘read-only’ => true, which requires league/flysystem-read-only. Visibility settings allow you to define files as either public or private, controlling access at the filesystem level.
Laravel lets you manage storage disks and instances flexibly, allowing you to read, write, or delete files on any configured disk. This makes image upload in Laravel seamless, supporting custom, on-demand, and special disks with public or private visibility.
How to Perform File Operations While Uploading Image in Laravel?
Laravel provides a powerful and intuitive API to perform all file operations during image uploads. You can store, retrieve, manipulate, and manage files with simple methods.
- Storing Files: To save files, Laravel offers multiple methods. Use put(path, contents) to write a file, prepend(path, contents) to add content at the beginning, and append(path, contents) to add at the end. You can also copy(old, new) to duplicate files or move(old, new) to relocate them. These methods make writing and organizing files straightforward.
- Retrieving Files: Reading files is just as simple. Use get(path) to retrieve raw content, or json(path) to decode JSON files directly. Check if a file exists with exists(path) or verify it’s missing using missing(path). These functions ensure you can safely access files before processing them.
- URLs and Downloads: Laravel helps generate URLs and downloads with ease. download(path, filename, headers) triggers file downloads. Use url(path) to get a full URL, or temporaryUrl(path, expiration) for temporary access. For S3 disks, temporaryUploadUrl(path, expiration) allows secure temporary uploads.
- Metadata: Retrieve file information with built-in methods. size(path) returns file size in bytes, lastModified(path) gives the UNIX timestamp of the last update, mimeType(path) provides the file type, and path(path) returns the absolute or relative path. This metadata is helpful for validation and management.
- Deletion: Deleting files is straightforward. Use delete(file_or_array) to remove a single file or multiple files at once, keeping storage clean and organized.
- Directories: Laravel also provides full control over directories. Use files() to list files or allFiles() for a recursive listing. Retrieve subdirectories with directories() or allDirectories(). Create new folders using makeDirectory() and remove them with deleteDirectory(). This gives complete control over folder structures during uploads.
Concisely, Laravel provides a simple and powerful API to upload images in Laravel, allowing you to store, retrieve, and manage files efficiently. It also supports file metadata, URLs, downloads, deletion, and full directory control for seamless file handling.
Image Formats Supported By Laravel
When handling image uploads in Laravel, you’ll typically work with common formats like JPEG, PNG, GIF, WEBP, and SVG.
- JPEG (.jpg, .jpeg): Best for photographs (lossy compression).
- PNG (.png): Ideal for transparency and lossless quality.
- GIF (.gif): Used for animations and simple graphics.
- WEBP (.webp): Modern format with superior compression.
- SVG (.svg): Vector-based, perfect for logos and scalable graphics.
Laravel itself doesn’t restrict file types. Instead, it relies on PHP’s file handling and your server’s configuration. However, proper validation ensures only allowed formats are accepted, improving security and performance.
How to Upload an Image in Laravel? (Single Image)
Uploading and displaying images is a common requirement in Laravel applications. In this guide, we’ll walk you through the complete process of uploading a single image and displaying it in Laravel 11, including setting up the upload form and showing the uploaded images dynamically.
Prerequisites
Before handling file uploads, running Laravel migrations ensures your database tables are ready to associate images with users or models. Other prerequisites are:
- Laravel 11 Installed: If you haven’t installed Laravel 11, you can do so by running the following commands:
composer create-project laravel/laravel example-app
cd example-app
- PHP 8.2+: Laravel 11 requires PHP 8.2 or later.
- Local Development Server: Use Laravel Sail, Valet, or XAMPP for running the application.
Once these prerequisites are ready, let’s begin with the steps to upload and display images.
Step 1: Set Up the Directory for Image Storage
Images will be stored in the public/uploads directory. You can also use database seeding in Laravel to populate your tables with images for development purposes. Laravel will automatically create this folder when you upload an image, but you need to ensure that the public/ directory is writable.
Step 2: Create the Controller
Create a controller that will handle the image upload and display logic:
php artisan make:controller ImageUploadController
This will create a new ImageUploadController.php file in the app/Http/Controllers directory.
Step 3: Define Routes
Next, define the routes for the upload form, image upload handling, and displaying uploaded images. Open routes/web.php and add the following routes:
use App\Http\Controllers\ImageUploadController;
Route::get('/upload', [ImageUploadController::class, 'showForm'])->name('image.form');
Route::post('/upload', [ImageUploadController::class, 'upload'])->name('image.upload');
Route::get('/images', [ImageUploadController::class, 'listImages'])->name('images.list');
These routes will handle:
- Displaying the upload form (GET /upload).
- Handling image uploads (POST /upload).
- Listing all uploaded images (GET /images).
Step 4: Implement Controller Logic
Now, implement the controller logic in the ImageUploadController.php file. Consider wrapping the upload and record creation in database transactions in Laravel to maintain data integrity if anything fails during the upload process.
Display the Upload Form
public function showForm()
{
    return view('upload');
}
Handle Image Uploads
use Illuminate\Http\Request;
public function upload(Request $request)
{
    // Validate the image
    $request->validate([
        'image' => 'required|image|mimes:jpeg,png,jpg,gif|max:2048',
    ]);
    // Create the uploads directory if it doesn't exist
    $uploadPath = public_path('uploads');
    if (!file_exists($uploadPath)) {
        mkdir($uploadPath, 0755, true);
    }
    // Store the image
    if ($request->file('image')) {
        $imageName = time() . '.' . $request->image->extension();
        $request->image->move($uploadPath, $imageName);

        return redirect()->route('image.form')
            ->with('success', 'Image uploaded successfully!')
            ->with('image', $imageName);
    }
    return redirect()->route('image.form')->with('error', 'Image upload failed.');
}
Display All Uploaded Images
public function listImages()
{
    $images = glob(public_path('uploads/*.*')); // Retrieve all files in the uploads directory
    $images = array_map(function ($image) {
        return asset('uploads/' . basename($image)); // Convert file paths to URLs
    }, $images);
    return view('images', compact('images'));
}
Step 5: Create Blade Templates
There are various pages for which you need to create and use Blade templates. Here is the code for each of the required blade templates:
Upload Form (resources/views/upload.blade.php)
Here’s a simple and responsive image upload form:
<!DOCTYPE html>
<html lang="en">
<head>
   <meta charset="UTF-8">
   <meta name="viewport" content="width=device-width, initial-scale=1.0">
   <title>Image Upload</title>
   <style>
       /* Styling for form */
       /* Add styles for better design */
   </style>
</head>
<body>
   <div class="container">
       <h1>Upload an Image</h1>
       @if(session('success'))
           <div class="success">
               {{ session('success') }}
           </div>
           <img src="{{ asset('uploads/' . session('image')) }}" alt="Uploaded Image">
       @endif
       @if(session('error'))
           <div class="error">
               {{ session('error') }}
           </div>
       @endif
       <form action="{{ route('image.upload') }}" method="POST" enctype="multipart/form-data">
           @csrf
           <label for="image">Choose an Image:</label>
           <input type="file" name="image" id="image" required>
           <button type="submit">Upload</button>
       </form>
       <a href="{{ route('images.list') }}">View All Uploaded Images</a>
   </div>
</body>
</html>
Images List (resources/views/images.blade.php)
This page will display all uploaded images in a responsive grid:
<!DOCTYPE html>
<html lang="en">
<head>
   <meta charset="UTF-8">
   <meta name="viewport" content="width=device-width, initial-scale=1.0">
   <title>Uploaded Images</title>
   <style>
       /* Styling for gallery */
       /* Add responsive grid and hover effects */
   </style>
</head>
<body>
   <div class="container">
       <h1>Uploaded Images</h1>
       @if(count($images) > 0)
           <div class="gallery">
               @foreach($images as $image)
                   <img src="{{ $image }}" alt="Uploaded Image">
               @endforeach
           </div>
       @else
           <p>No images uploaded yet.</p>
       @endif
       <a href="{{ route('image.form') }}">Upload Another Image</a>
   </div>
</body>
</html>
Step 6: Test the Application
Once everything is set up, you can visit the /upload route to upload images. After uploading, you can view the uploaded image on the same page. To see all uploaded images, go to the /images route, where they will be displayed in a grid layout. Here is the kind of output you will see:

Now, you may click on the “Choose file” button and upload the images. Once you add the images you will be displayed with the images as below:

With that, we have successfully built an image upload and display system in Laravel 11. This system allows users to upload images, view success/error messages, and browse all uploaded images in a gallery. You can further customize and extend this functionality to suit your application’s needs.
This process can be a little tricky for those without the know-how of Laravel and PHP syntax. For them, partnering with a Laravel development agency would make more sense.
How to Upload Images in Laravel? (Multiple Images)
We have seen how to upload a single image in Laravel, now let’s dive into how to upload multiple images. So, let’s dive into the process!
Step 1: Create the Controller
The first step is to create a controller to handle the image upload logic, display the form, and list the uploaded images. Run the following command to create the MultipleImageUploadController:
php artisan make:controller MultipleImageUploadController
Once the controller is created, open the file located at app/Http/Controllers/MultipleImageUploadController.php and add the following methods:
- showForm: Displays the upload form.
- upload: Handles the image upload process.
- listImages: Retrieves and displays the list of uploaded images.
Here’s the code to add to your controller:
namespace App\Http\Controllers;
use Illuminate\Http\Request;
use Illuminate\Support\Facades\Storage;
class MultipleImageUploadController extends Controller
{
    // Show the form to upload multiple images
    public function showForm()
    {
        return view('multi-upload');
    }
    // Handle the image upload
    public function upload(Request $request)
    {
        $request->validate([
            'images.*' => 'required|image|mimes:jpeg,png,jpg,gif|max:2048', // Validation for each image
        ]);
        if ($request->hasFile('images')) {
            foreach ($request->file('images') as $image) {
                $image->store('uploads/multiple', 'public'); // Store in 'public' disk
            }
        }
        return redirect()->route('multi.image.form')->with('success', 'Images uploaded successfully!');
    }
    // Show all uploaded images
    public function listImages()
    {
        $images = Storage::disk('public')->files('uploads/multiple');
        return view('multi-images', ['images' => $images]);
    }
}
Step 2: Define the Routes
Next, define the routes to handle the form display, image upload, and viewing uploaded images. Add these routes to routes/web.php:
use App\Http\Controllers\MultipleImageUploadController;
Route::get('/multi-upload', [MultipleImageUploadController::class, 'showForm'])->name('multi.image.form');
Route::post('/multi-upload', [MultipleImageUploadController::class, 'upload'])->name('multi.image.upload');
Route::get('/multi-images', [MultipleImageUploadController::class, 'listImages'])->name('multi.images.list');
Here’s what each route does:
- GET /multi-upload: Displays the form for uploading images.
- POST /multi-upload: Handles the upload process.
- GET /multi-images: Displays the list of uploaded images.
Step 3: Create the Upload Form View
You need two Blade views: one for the upload form and another to display the uploaded images. First, let’s create the blade view for upload form. It displays a simple form for users to upload multiple images. Save the following code in resources/views/multi-upload.blade.php:
<!DOCTYPE html>
<html lang="en">
<head>
    <meta charset="UTF-8">
    <meta name="viewport" content="width=device-width, initial-scale=1.0">
    <title>Multiple Image Upload</title>
    <style>
        /* Add your styling here */
    </style>
</head>
<body>
    <div class="container">
        <h1>Upload Multiple Images</h1>
        @if(session('success'))
            <div class="success">{{ session('success') }}</div>
        @endif
        <form action="{{ route('multi.image.upload') }}" method="POST" enctype="multipart/form-data">
            @csrf
            <label for="images">Choose Images:</label>
            <input type="file" name="images[]" id="images" multiple required>
            <button type="submit">Upload</button>
        </form>
        <a href="{{ route('multi.images.list') }}">View Uploaded Images</a>
    </div>
</body>
</html>
Step 4: Create the Gallery View
This view displays all the uploaded images in a grid layout. Save the following code in resources/views/multi-images.blade.php:
<!DOCTYPE html>
<html lang="en">
<head>
    <meta charset="UTF-8">
    <meta name="viewport" content="width=device-width, initial-scale=1.0">
    <title>Uploaded Images</title>
    <style>
        /* Add your styling here */
    </style>
</head>
<body>
    <div class="container">
        <h1>Uploaded Images</h1>
        @if(count($images) > 0)
            <div class="gallery">
                @foreach($images as $image)
                    <img src="{{ asset('storage/' . $image) }}" alt="Uploaded Image">
                @endforeach
            </div>
        @else
            <p>No images uploaded yet.</p>
        @endif
        <a href="{{ route('multi.image.form') }}">Upload More Images</a>
    </div>
</body>
</html>
Step 5: Final Adjustments
Ensure the public directory has write permissions. Here is how you can set them:
chmod -R 775 storage
chmod -R 775 public/storage
Plus, if you haven’t already, create a symlink for public storage by running:
php artisan storage:link
Step 6: Test the Setup
Once everything is in place, navigate to /multi-upload to upload images. Here is the kind of interface you will see on your screen:

After successful upload, click the link to view uploaded images in /multi-images, there you will see all the uploaded images:

With this setup, you now have a functional multiple image upload feature in your Laravel application. Feel free to enhance it with additional features like image deletion or adding advanced validation.
Alternate Ways to Implement Image Upload in Laravel
Laravel provides multiple methods to implement image upload, catering to diverse use cases and preferences. Here are some alternate approaches for achieving this functionality effectively:
Using Laravel’s Built-in File Upload (No Package)
Laravel’s built-in file upload system allows seamless handling of single images using methods like store() or storeAs(). Here are the steps to do so:
- Create a form with enctype=”multipart/form-data”.
- Access the uploaded file using the Request object.
- Store the file in the desired directory (e.g., public, local, or a custom disk).
- Optionally validate the file for image type and size.
Uploading multiple images follows a similar process but involves iterating through the uploaded files. To upload multiple images:
- Use a form input that allows multiple file selection (<input type=”file” name=”images[]” multiple>).
- Loop through the uploaded files in the controller using foreach and store them individually.
- Return a success message after all files are uploaded.
- If your application spans several storage backends, you might explore Laravel’s multiple databases support alongside distributed file storage.
Using the Intervention Image Package
Intervention Image is a versatile library that provides advanced image manipulation features like resizing and cropping during the upload process. Here is the composer command you can use to install the package:
composer require intervention/image
After that, configure the package, validate and manipulate the image (e.g., resize) before storage. Here is the example code to use image intervention package:
use Intervention\Image\Facades\Image;
public function upload(Request $request)
{
    $request->validate([
        'image' => 'required|image|mimes:jpeg,png,jpg,gif|max:2048',
    ]);
    $image = $request->file('image');
    $imageName = time() . '.' . $image->getClientOriginalExtension();
    // Resize the image
    $img = Image::make($image)->resize(300, 200);
    $img->save(public_path('uploads/images/' . $imageName));
}
Using Livewire for Image Upload
Livewire simplifies the process of building dynamic interfaces in Laravel, including image uploads, without requiring full-page reloads. Here is the composer command you can use to get livewire in your project:
composer require livewire/livewire
Once it is required, create a component for file uploads and use Livewire’s support for handling file uploads seamlessly. Here is the code for using Livewire for image upload:
use Livewire\Component;
class ImageUpload extends Component
{
    public $image;
    public function uploadImage()
    {
        $this->validate([
            'image' => 'image|max:2048',
        ]);
        $imageName = time() . '.' . $this->image->getClientOriginalExtension();
        $this->image->storeAs('images', $imageName, 'public');
        session()->flash('message', 'Image uploaded successfully!');
    }
    public function render()
    {
        return view('livewire.image-upload');
    }
}
Each method offers unique advantages depending on your project’s requirements. Whether using Laravel’s built-in features, the Intervention Image package, or the dynamic capabilities of Livewire, you can implement image uploads customized to your needs.
How to Handle Uploaded Files in Laravel?
Laravel provides simple and powerful methods to handle uploaded files securely and efficiently.
- Basic Upload Methods: There are multiple ways to store uploaded files. Use $request->file(‘field’)->store(‘path’) to save a file to the default disk. $request->file(‘field’)->storeAs(‘path’, ‘filename’, ‘disk’) allows specifying a custom filename and disk. You can also use Storage::putFile(‘path’, $fileInstance) or Storage::putFileAs(‘path’, $fileInstance, ‘filename’) for more control over storage.
- Automatic Streaming: Methods like putFile and putFileAs automatically handle streaming of files. They accept Http\File or Http\UploadedFile instances and generate a unique filename by default, reducing the risk of overwriting existing files.
- Public Uploads: For files meant to be publicly accessible, use storePublicly(‘path’, ‘disk’) or storePubliclyAs(‘path’, ‘filename’, ‘disk’). This ensures files have public visibility while keeping storage operations simple.
- File Naming: Laravel provides convenient options for file naming. hashName() generates a unique, random filename. extension() returns the file extension based on its MIME type. Avoid using getClientOriginalName() directly, as it may lead to unsafe or conflicting filenames.
Basically, you get secure methods to upload image to Laravel, including storing files with store or storeAs, automatic streaming, and public uploads. It also provides flexible file naming options like hashName() and extension() for safe and unique filenames. Don’t forget to regularly back up your media and data. Use Laravel MySQL dump to export database contents and secure your uploaded images.
Wrapping Up
Uploading images in Laravel is a straightforward process, thanks to its built-in tools and functionalities. By following the steps outlined in this guide—creating a form, setting up routes and writing the controller logic you can easily integrate image uploads into your Laravel project.
With these basics covered, you can now enhance your application further, like adding validation, resizing images, or even implementing file management systems. Plus, you can use alternate methods like, using Livewire form implementing image upload functionality on your website.
If you need advanced functionalities for your Laravel app, hire dedicated Laravel developers with us today!
FAQs About How to Upload Image in Laravel
What’s the best way to validate image uploads?
Laravel’s validation rules like image, mimes:jpeg,png, and max:2048 (2MB) ensure only valid images are uploaded.
Where should I store uploaded images?
Save images in storage/app/public and create a symlink (php artisan storage:link) to make them accessible in public/storage. If you encounter unexpected issues during upload, verify if Laravel MySQL strict mode is enabled, as it can affect how data is inserted or validated during uploads.
How do I display uploaded images in views?
Use the asset helper: <img src="{{ asset('storage/filename.jpg') }}"> after creating the storage symlink.
Can I upload images to cloud storage like S3?
Yes. Configure config/filesystems.php to use the s3 disk and call $request->file('image')->store('path', 's3').


