Quick Summary
Laravel Vapor makes it simple to run and grow your Laravel apps. It removes the need for servers and uses AWS to keep everything fast, secure, and always online. Your app can handle big jumps in traffic without slowing down, and storing files or data in the cloud becomes easy. This blog covers how Vapor improves performance, manages deployments, and helps your app scale smoothly, so you can confidently support more users and new ideas as your project grows.
Table of Contents
Deploying a Laravel app should be feel simple. Yet, many developers still struggle with servers, scaling issues, and unexpected downtime. Every update becomes a worry. Every traffic spike feels like a risk.
That’s where Laravel Vapor comes in.
Vapor offers a clean way to host Laravel apps on the cloud, eliminating the need to manage any server. Your app runs on AWS, scales automatically, stays fast, and lets you focus on building features instead of fixing infrastructure. It brings the idea of serverless Laravel to life, without the chaos or steep learning curve.
But you may wonder:
- Is Vapor right for my project?
- How does deployment work?
- What about cost and support?
- And where does Laravel Vapor pricing fit into real-world budgets?
In this blog, we’ll break down how Vapor works, the benefits and limits, how it pairs with AWS, and whether it’s the right path for your next Laravel cloud deployment. So, let’s dive in!
What is Laravel Vapor?
Laravel Vapor is an auto-scaling, serverless deployment platform built specifically for Laravel applications. It leverages the power of Amazon Web Services (AWS) Lambda, similar to how you can deploy Laravel on AWS Elastic Beanstalk for scalable cloud hosting solutions. So you can deploy your Laravel website without managing servers or infrastructure.
Basically, Vapor takes care of the behind-the-scenes stuff, so you can focus on building and customizing your Laravel website. Here are a few key features and benefits of Laravel Vapor.

- Database Management: Vapor integrates with various database options and offers features like point-in-time restores and scaling to ensure data integrity and performance.
- Redis Cache Management: Similar to databases, Vapor allows management of Redis clusters, including scaling capabilities for optimal caching performance.
- Database and Cache Tunnels: For development and debugging purposes, Vapor provides tunnels to access your database and cache locally. That streamlines the development workflow.
- Environment Management: Vapor simplifies environment variable and secret management. So your sensitive information is secure and easily accessible to your application.
- Cost-effectiveness: The serverless nature of Vapor means you only pay for the resources your website actually uses. This can be a significant cost-saving advantage compared to traditional hosting setups.
- Sandbox Environment: Vapor offers a free sandbox tier to experiment with the platform. So you can deploy a small-scale Laravel application without any upfront commitment. It’s a great way to test the waters before diving into a paid plan.
- Automatic CloudFront CDN Integration: Assets like images and static files are automatically uploaded to CloudFront CDN. That means faster delivery to users globally.
- Custom Domains and DNS Management: Vapor lets you use custom domains for your application and simplifies DNS management. That reduces configuration overhead.
- Automatic SSL Certificate Management: Vapor takes care of SSL certificate management and renewal. That ensures a secure connection for your website.
With these features, you can create high-performing, scalable Laravel websites with minimal overhead. It takes over the infrastructure burdens, so you can focus on creating exceptional web experiences.
That’s why it is used by the experts alongside the other Laravel packages.
Why Use Laravel Vapor?
Laravel Vapor takes the burden of server management off your shoulders. You can ditch the complexities of server configuration, scaling, and maintenance. And you can dedicate your time and energy to building and customizing your site’s core functionalities.
- AWS Integration: Vapor seamlessly integrates with various AWS services, including databases, storage, caching, and more. You can leverage the full power of AWS with features like Amazon RDS, DynamoDB, S3, and ElastiCache.
- Automatic Scaling: Vapor automatically scales your website’s resources based on traffic demands. So you won’t experience slowdowns during traffic spikes and won’t waste money on underutilized servers.
- Serverless Deployment: With Vapor, you don’t need to manage servers or worry about server configuration. It simplifies the deployment process and frees you from infrastructure headaches.
- Integration with Laravel: Vapor integrates seamlessly with Laravel’s core features, offering a familiar development experience. You can leverage your existing Laravel knowledge without needing to learn a new platform.
- Zero-downtime Deployments: Vapor facilitates deployments and rollbacks without any downtime for your website. This ensures a smooth user experience during updates and minimizes disruption.
Overall, Laravel Vapor provides a powerful platform for deploying, scaling, and managing serverless Laravel sites effectively.
Serverless vs Traditional Architecture
Understanding the difference between serverless Laravel and traditional setups is key when planning your app deployment. Here’s a quick comparison:
| Basis | Serverless Architecture | Traditional Architecture |
|---|---|---|
| Management | Managed by cloud providers like AWS Vapor. Developers don’t need to handle servers. | Developers manage servers themselves along with app development. |
| Costing | You pay only when your app is running. Costs scale with usage. | You pay fixed server costs, regardless of traffic volume. |
| Scalability | Automatically scales to handle traffic spikes without manual setup. | Requires adding servers manually to handle higher traffic. |
| Maintenance | The cloud provider handles updates, security, and maintenance for your Laravel apps. | Developers are responsible for patching, updates, and security. |
| Deployment | Simplified deployment via Laravel Vapor, minimal manual intervention. | Developers must deploy and manage apps themselves using traditional methods. |
How Does Laravel Vapor Work?
Laravel Vapor uses AWS Lambda, a serverless compute service from Amazon Web Services, to deploy Laravel applications efficiently. The process aligns closely with standard deployment practices outlined in how to deploy Laravel app, ensuring scalability and smooth performance. Here’s a simplified overview of the workflow:
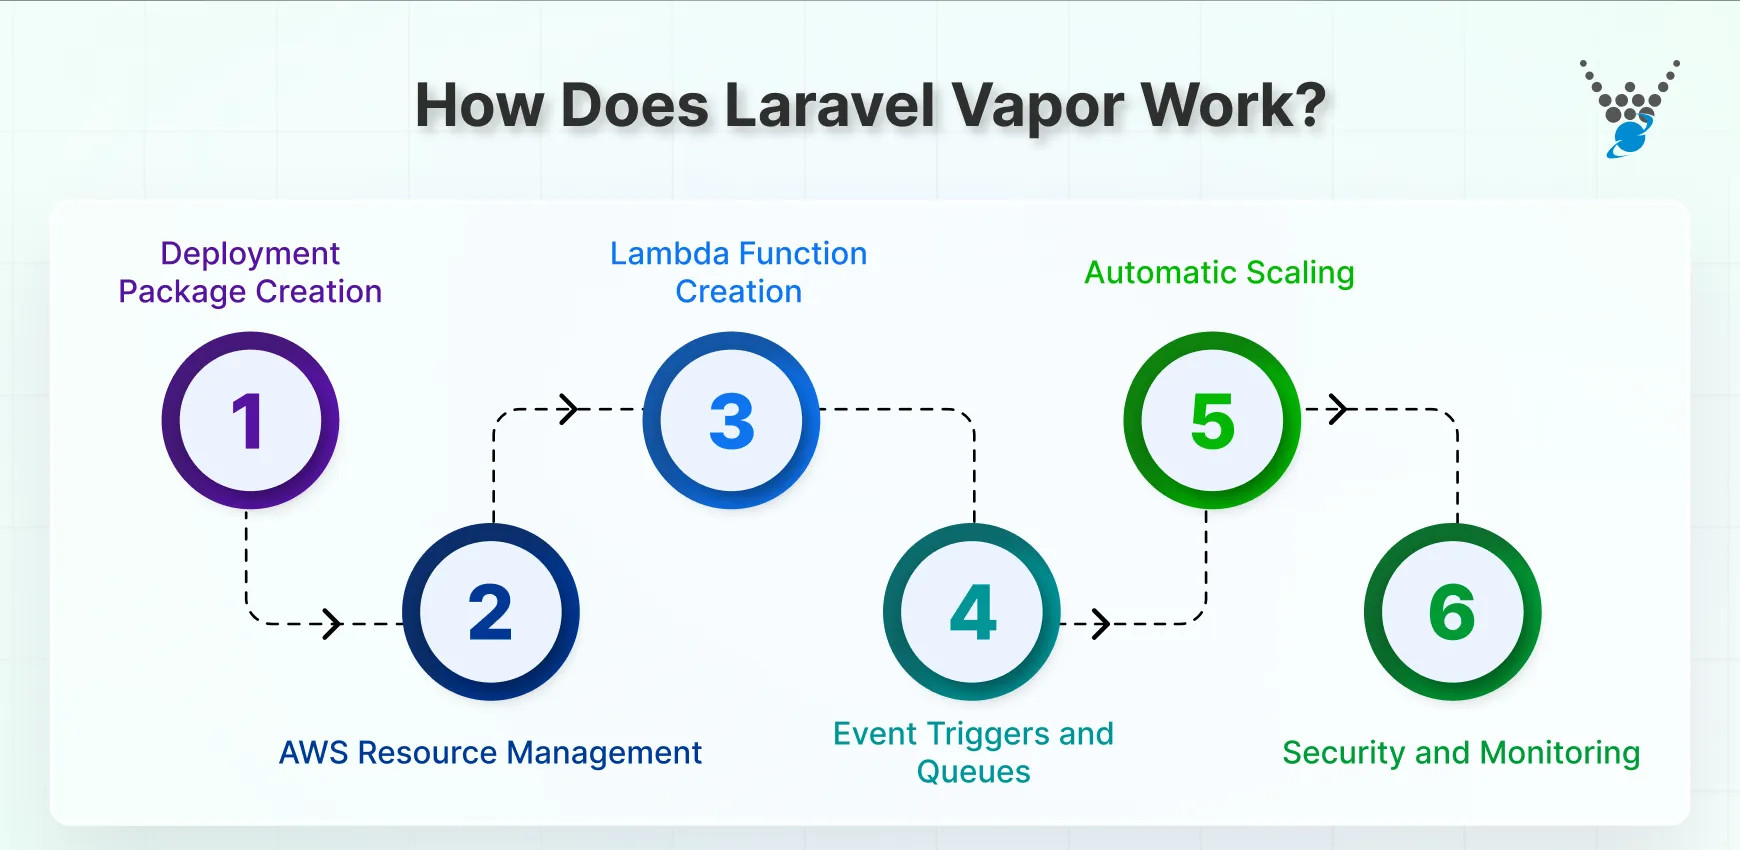
- Deployment Package Creation: During deployment, Vapor compiles your entire Laravel codebase, including dependencies and assets. This creates a deployment package that’s optimized for AWS Lambda.
- AWS Resource Management: Vapor interacts with various AWS services to provision resources needed for your application. This may involve creating databases, cache clusters, and other infrastructure on your behalf.
- Lambda Function Creation: Vapor creates two separate Lambda functions for your application:
- HTTP Lambda: This function handles incoming HTTP requests from users accessing your website. You can configure memory allocation, timeout values, and concurrency limits for this function based on your application’s needs.
- CLI Lambda: This function executes Artisan commands, processes queued jobs, and runs scheduled tasks within your Laravel application. Similar to the HTTP Lambda, you can configure memory and timeout settings for the CLI Lambda.
- Event Triggers and Queues: Vapor integrates with other AWS services to handle asynchronous tasks:
- API Gateway: This service acts as a front-end for your HTTP Lambda, routing incoming web traffic to the appropriate function.
- SQS (Simple Queue Service): Vapor utilizes SQS for queuing background jobs triggered by events in your application. The CLI Lambda is then invoked to process these jobs from the queue.
- CloudWatch Events: Scheduled tasks defined in your Laravel application are managed through CloudWatch Events. This service triggers the CLI Lambda periodically to run the scheduled commands.
- Automatic Scaling: A key advantage of Vapor is its auto-scaling capabilities. Based on real-time traffic, Vapor can automatically scale the resources allocated to your Lambda functions, ensuring optimal performance during traffic spikes.
- Security and Monitoring: Vapor enforces security by managing environment variables and secrets securely. Additionally, it provides comprehensive metrics for your application, database, and cache. So you can monitor resource usage and application health.
The basic aim of Laravel Vapor is to let the developers focus on building and customizing their applications without worrying about server infrastructure. Alternatively, tools like Laravel Forge can be used for automated server management and deployment.
How to Use Laravel Vapor?
Before you start using Laravel Vapor, there are a few prerequisites you need to consider.
- Laravel Site: You’ll need an existing Laravel application to deploy on Vapor. (Create a new Laravel site, if not already.)
- AWS Account: Sign up for a free AWS account to leverage Vapor’s serverless functionalities.
- Laravel Vapor CLI: Install the Laravel Vapor CLI tool using Composer:
composer global require laravel/vapor-cli
After considering the prerequisites, you can begin using Laravel Vapor considering the following process:
Step 1: Create a Vapor Account: Head over to the Vapor official page and sign up for a Vapor account.
Step 2: Link Your AWS Account: During the signup process, you’ll be prompted to link your AWS account to Vapor. This allows Vapor to manage resources on your behalf within AWS.
Step 3: Configure Vapor CLI: Run the vapor login command to connect the Vapor CLI to your Vapor account. You’ll be prompted to enter your credentials.
Step 4: Configure Your Laravel Application: Create a vapor.yml configuration file in the root of your Laravel project. This file defines settings for your Vapor environment, such as environment variables, database connections, and custom domains. Refer to the Vapor documentation for detailed configuration options.
Step 5: Deploy Your Application: Once the configuration is complete, run the vapor deploy command. This will compile your Laravel application, provision resources on AWS, and deploy your application to Vapor.
Step 6: Manage Your Application: The Vapor dashboard provides a user-friendly interface to manage your deployed application. You can access logs, monitor metrics, manage databases, and perform other tasks directly from the Vapor dashboard.
If you need help with this installation and usage of Vapor, consult with our Laravel development company. We can help with this integration quite effectively.
What Makes Laravel Vapor So Useful?
Laravel Vapor is a cloud-based deployment platform built specifically for Laravel applications. It runs on AWS, eliminating the need to manually manage servers. Below are some practical ways Vapor can level up your Laravel projects.
Smooth Traffic Handling
When your app experiences a surge in visitors, traditional hosting can struggle, resulting in slow loading times, crashes, and timeout errors, which can be frustrating for users. Vapor avoids all that by using AWS’s serverless infrastructure.
- Your app automatically scales to handle more users
- No downtime even during traffic spikes
- Faster performance because requests are routed through AWS’s global network
So whether you have 10 visitors or 10,000 at once, Vapor keeps things running smoothly.
Easy & Secure File Storage with AWS
Uploading files, images, and user data becomes effortless thanks to Vapor’s integration with AWS S3 storage. The benefits include:
- You don’t need a physical server to store files
- Files are stored in the cloud with high security
- Storage scales up as your app grows
- Data is accessible quickly from anywhere in the world
With Vapor, you can focus more on building features and worry less about storage headaches.
Faster Performance with Redis Caching
Speed matters especially for apps that rely on frequent data lookups. Vapor supports Redis caching, allowing you to:
- Store frequently-used data in memory
- Reduce database queries and boost response time
- Make your app feel instantly faster
Vapor also works well with AWS database services, which are great for handling large amounts of data reliably.
Effortless Deployment & Environment Management
Vapor makes deploying your application incredibly simple:
- Deploy to different environments (staging, production, testing) with ease
- Roll back to previous versions if something breaks
- Manage deployment settings from an intuitive dashboard
This keeps your team productive and reduces deployment stress.
What Makes Laravel Vapor So Useful?
Laravel Vapor is a cloud-based deployment platform built specifically for Laravel applications. It runs on AWS, eliminating the need to manage servers manually. Here are some practical ways Vapor can enhance your Laravel projects.
Smooth Traffic Handling
When your app experiences a surge in visitors, traditional hosting can struggle, resulting in slow loading times, crashes, and timeout errors, which can be frustrating for users. Vapor avoids these issues by using AWS’s serverless infrastructure.
- Your app automatically scales to handle more users
- No downtime even during traffic spikes
- Faster performance because requests are routed through AWS’s global network
So whether you have 10 visitors or 10,000 at once, Vapor keeps things running smoothly.
Easy & Secure File Storage with AWS
Uploading files, images, and user data becomes effortless thanks to Vapor’s integration with AWS S3 storage. Benefits include:
- You don’t need a physical server to store files
- Files are stored securely in the cloud with high security
- Storage scales up as your app grows
- Data is accessible quickly from anywhere in the world
With Vapor, you can focus more on building features and worry less about storage headaches.
Faster Performance with Redis Caching
Speed matters especially for apps that rely on frequent data lookups. Vapor supports Redis caching, allowing you to:
- Store frequently-used data in memory
- Reduce database queries and boost response time
- Make your app feel instantly faster
Vapor also works well with AWS database services, which are great for handling large amounts of data reliably.
Effortless Deployment & Environment Management
Vapor makes deploying your application incredibly simple:
- Deploy to different environments (staging, production, testing) with ease
- Roll back to previous versions if something breaks
- Manage deployment settings from an intuitive dashboard
This keeps your team productive and reduces deployment stress.
Let’s Conclude
Laravel Vapor emerges as a compelling solution for deploying and managing Laravel applications. With the power of AWS Lambda, you can get a serverless development experience for a streamlined deployment. It eliminates server management headaches and empowers you to focus on crafting exceptional Laravel websites.
A few of the key features of Laravel Vapor are:
- Auto-scaling
- Zero-downtime deployments
- Secure environment management
- Seamless integration with core Laravel
Do you want to integrate Vapor or other packages with your Laravel website? Then hire dedicated Laravel developers today!
FAQs on Laravel Vapor
Can I use Laravel Vapor with different databases?
Yes, Laravel Vapor supports multiple databases including MySQL, PostgreSQL, and Amazon Aurora, allowing you to choose the best option for your project. It also offers seamless integration with these databases, making it easy to switch between them if needed.
Does Laravel Vapor offer built-in security features?
Yes, Laravel Vapor offers built-in security features such as automatic SSL certificates, encrypted environment variables, and AWS Web Application Firewall. This ensures that your application is protected from common vulnerabilities and attacks.
Is Laravel Vapor suitable for all types of Laravel applications?
Laravel Vapor is best suited for medium to large-scale applications that require scalability and cost-efficiency. However, it can also be used for smaller projects as it offers a pay-per-use pricing structure, allowing developers to only pay for the resources they use.
Can I use Docker with Laravel Vapor for local testing?
Yes, many developers combine Vapor’s serverless features with Laravel development using Docker for efficient local-to-cloud deployment pipelines.