Table of Contents
WordPress has long been a dominant player in the world of content management systems, empowering millions of websites worldwide. Over the years, it has continually evolved to meet the needs of its diverse user base. One of the most significant changes in recent years has been the introduction of the Gutenberg editor. Whether you’re a seasoned WordPress user or a novice just getting started, understanding Gutenberg is key to making the most of your WordPress experience.
Are you new to WordPress or just want to learn more about the Gutenberg editor? This comprehensive tutorial will guide you through everything you need to know about the new WordPress block editor. With this guide, you’ll master the WordPress Gutenberg editor and create stunning content no matter your level of experience.
What is Gutenberg?
Gutenberg, named after Johannes Gutenberg, the inventor of the printing press, renowned for its distraction-free and content-free environment, is now the default editor for WordPress 5.0. Since its release on December 6, 2018, it has been known as the “block editor” or the “WordPress editor.” Built with React, Gutenberg is a client-side interface that enables the construction of media-rich pages and posts via content blocks.
The WordPress block editor in WordPress 6.2 continues to evolve, offering more advanced features, enhanced performance, and a better user experience. WordPress continues to lead the way in modern content creation, offering users a versatile and streamlined approach to building and maintaining websites.
Gutenberg seeks to provide a more intuitive and user-friendly content creation experience, making it accessible to novices while retaining advanced features for advanced users. WordPress’s block editor for creating and managing content, Gutenberg, is becoming more potent and versatile as a result of ongoing updates and enhancements.
It is a significant improvement over the Classic Editor, offering a more intuitive and user-friendly experience for WordPress content editors. This guide will provide an overview of Gutenberg, its key features, and how you can use it to enhance your WordPress website.
Overview and Statistics of Gutenberg

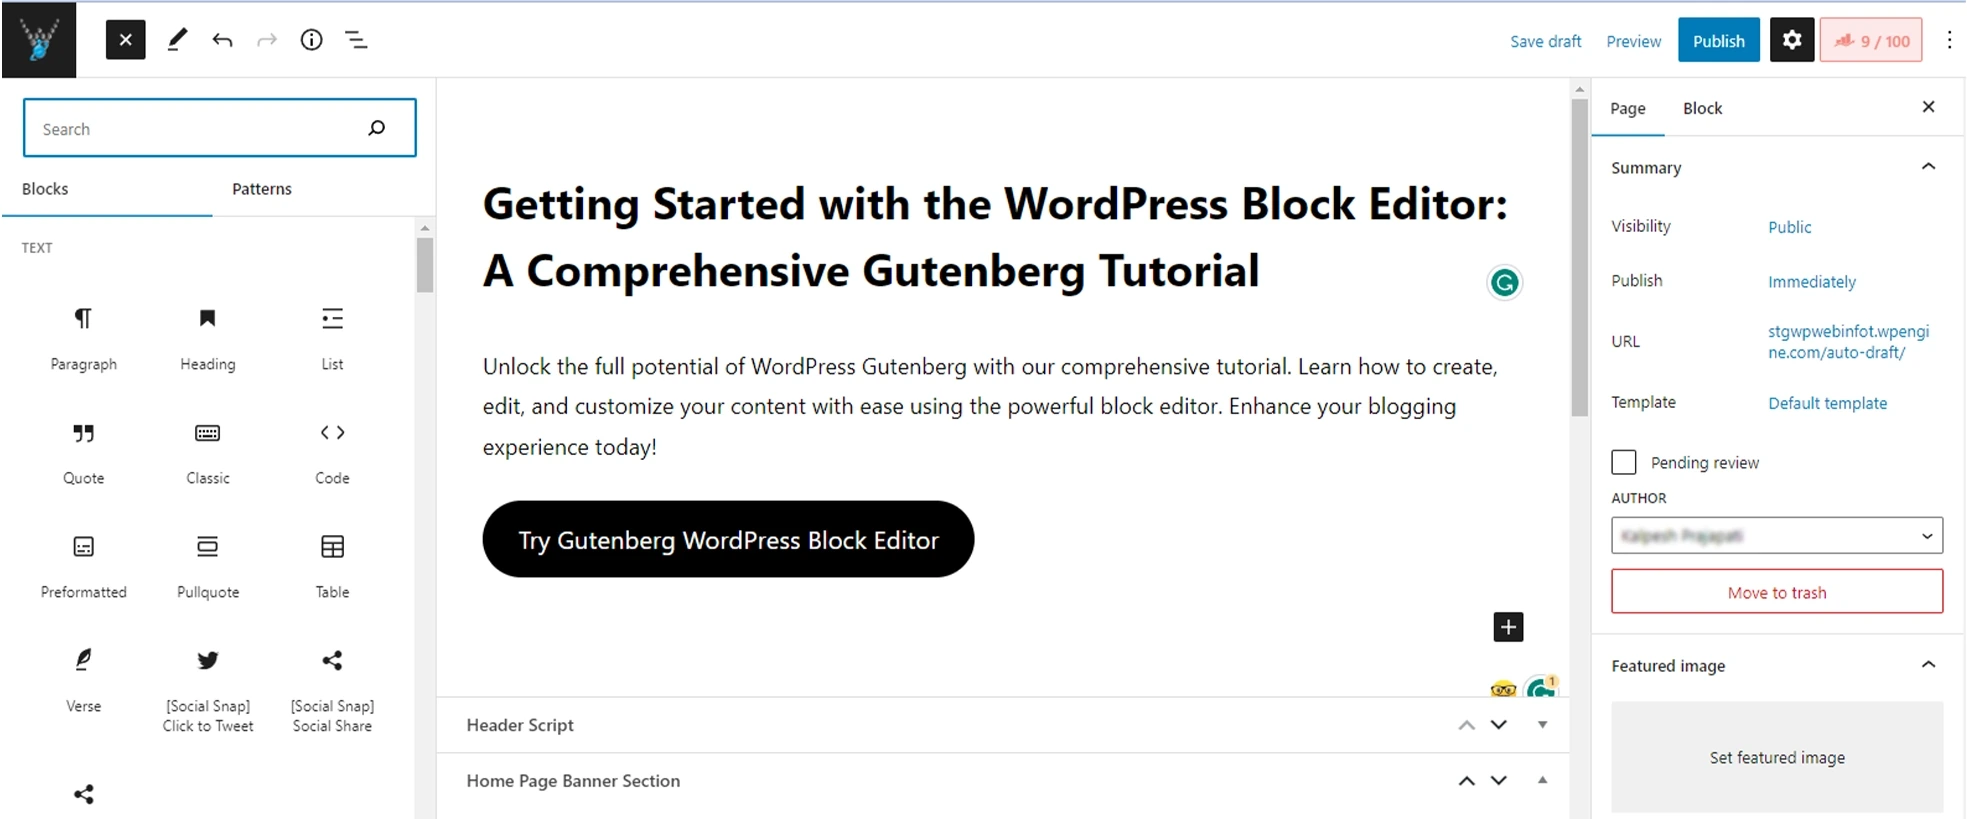
Gutenberg uses a block-based system, where each piece of content, such as paragraphs, headings, images, or videos, is represented by a block. WordPress Gutenberg Blocks can be easily added, edited, rearranged, and customized, making it more intuitive and flexible for users to create and design their posts and pages.
Active Plugin installations: Gutenberg is included in WordPress core, which powers over 43% of all websites on the internet, according to W3Techs. This means that Gutenberg is available to millions of users by default with more than 300k active installations. Gutenberg is also available as a standalone plugin for users who want to test new features before they are added to the core editor.
Blocks and plugins: Since Gutenberg’s release, developers have created a wide range of custom blocks and block collections, expanding the possibilities for content creation. There are hundreds of Gutenberg-specific plugins available in the WordPress plugin repository.
Advantages and Disadvantages of Gutenberg
If you’re a Classic Editor user or new to both editors, you might be wondering whether to use Gutenberg or stick with the Classic Editor. To help you make an informed decision, let’s explore the pros and cons of Gutenberg.
Advantages
- User-friendly interface: Gutenberg’s modern, clean interface is designed to be intuitive and user-friendly, making it easier for both beginners and experienced users to create and design content.
- Block-based editing: The block-based approach simplifies content creation by breaking it down into manageable pieces. This makes it easier to rearrange, customize, and style content without the need for coding knowledge.
- Reusable blocks: Gutenberg allows users to create reusable blocks, which can be saved and used across multiple posts and pages. This helps maintain consistency and streamline the content creation process.
- Block patterns: Pre-designed block patterns allow users to quickly create professional-looking layouts and designs without needing extensive design skills.
- Extensibility: Gutenberg offers a rich API for developers, allowing them to create custom blocks, extend existing blocks, and integrate with third-party services. This opens up new possibilities for content creation and customization.
- Accessibility improvements: Gutenberg aims to improve accessibility by following the Web Content Accessibility Guidelines (WCAG) and incorporating features such as keyboard navigation, screen reader support, and high-contrast mode.
Disadvantages
- Learning curve: For users familiar with the classic editor, Gutenberg may require some time to learn and adapt to the new block-based system.
- Compatibility issues: Some existing themes, plugins, and custom code may not be fully compatible with Gutenberg, which can cause issues or require additional work to resolve.
- Performance concerns: Some users have reported performance issues, especially on longer and more complex pages, as Gutenberg can consume more resources than the classic editor.
- Limited advanced styling options: Although Gutenberg offers more styling options than the classic editor, it may still fall short for users who need advanced design capabilities without using custom code or additional plugins.
- Mixed user reception: Some users have been resistant to the change from the classic editor to Gutenberg, citing the learning curve, compatibility issues, and other concerns.
In conclusion, Gutenberg has its advantages and disadvantages too. It’s essential to weigh these pros and cons to determine if Gutenberg is the right choice for your specific needs.
How to Use the WordPress Gutenberg Block Editor
Block Themes and Template Editing in Gutenberg
In this guide, we will delve into the world of block themes and template editing in Gutenberg. You will learn to unleash your creativity and create stunning websites with ease. Let’s get started!
Block Themes
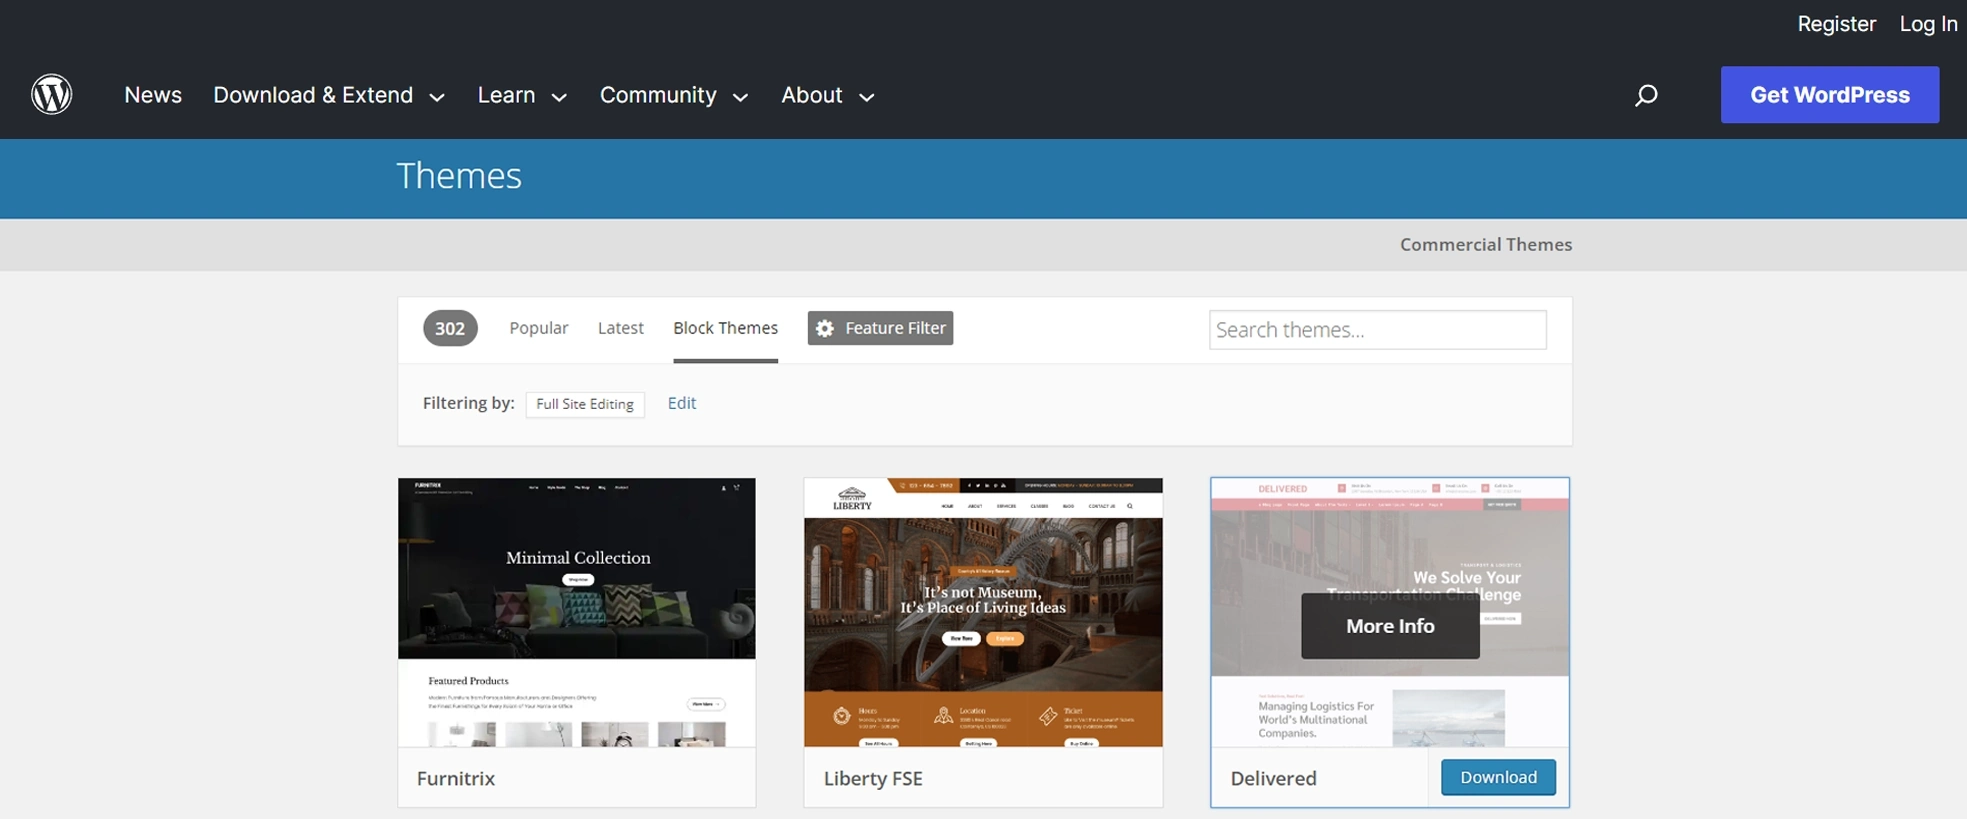
With the introduction of Gutenberg, WordPress has evolved to support block themes, which are designed to take full advantage of the block editor’s features. Block themes are built with the understanding that content creation and design are done primarily through blocks, and they offer seamless integration with the Gutenberg editor.
Block themes provide a modern and responsive design approach, ensuring that your website looks great on all devices. They are built with a focus on performance, accessibility, and clean code, offering an optimized user experience for both visitors and website owners.
You can easily find WordPress block themes by visiting the WordPress.org website.
Template Editing
One of the most significant advancements in Gutenberg is the introduction of template editing. With template editing, you can create, edit, and customize theme templates directly within the block editor. This feature allows you to have more control over your site’s design and layout without needing to dive into code or work with a separate theme editor.
In WordPress 6.2, the template editor is available by default for all block themes. Here’s how to use the template editor in Gutenberg:
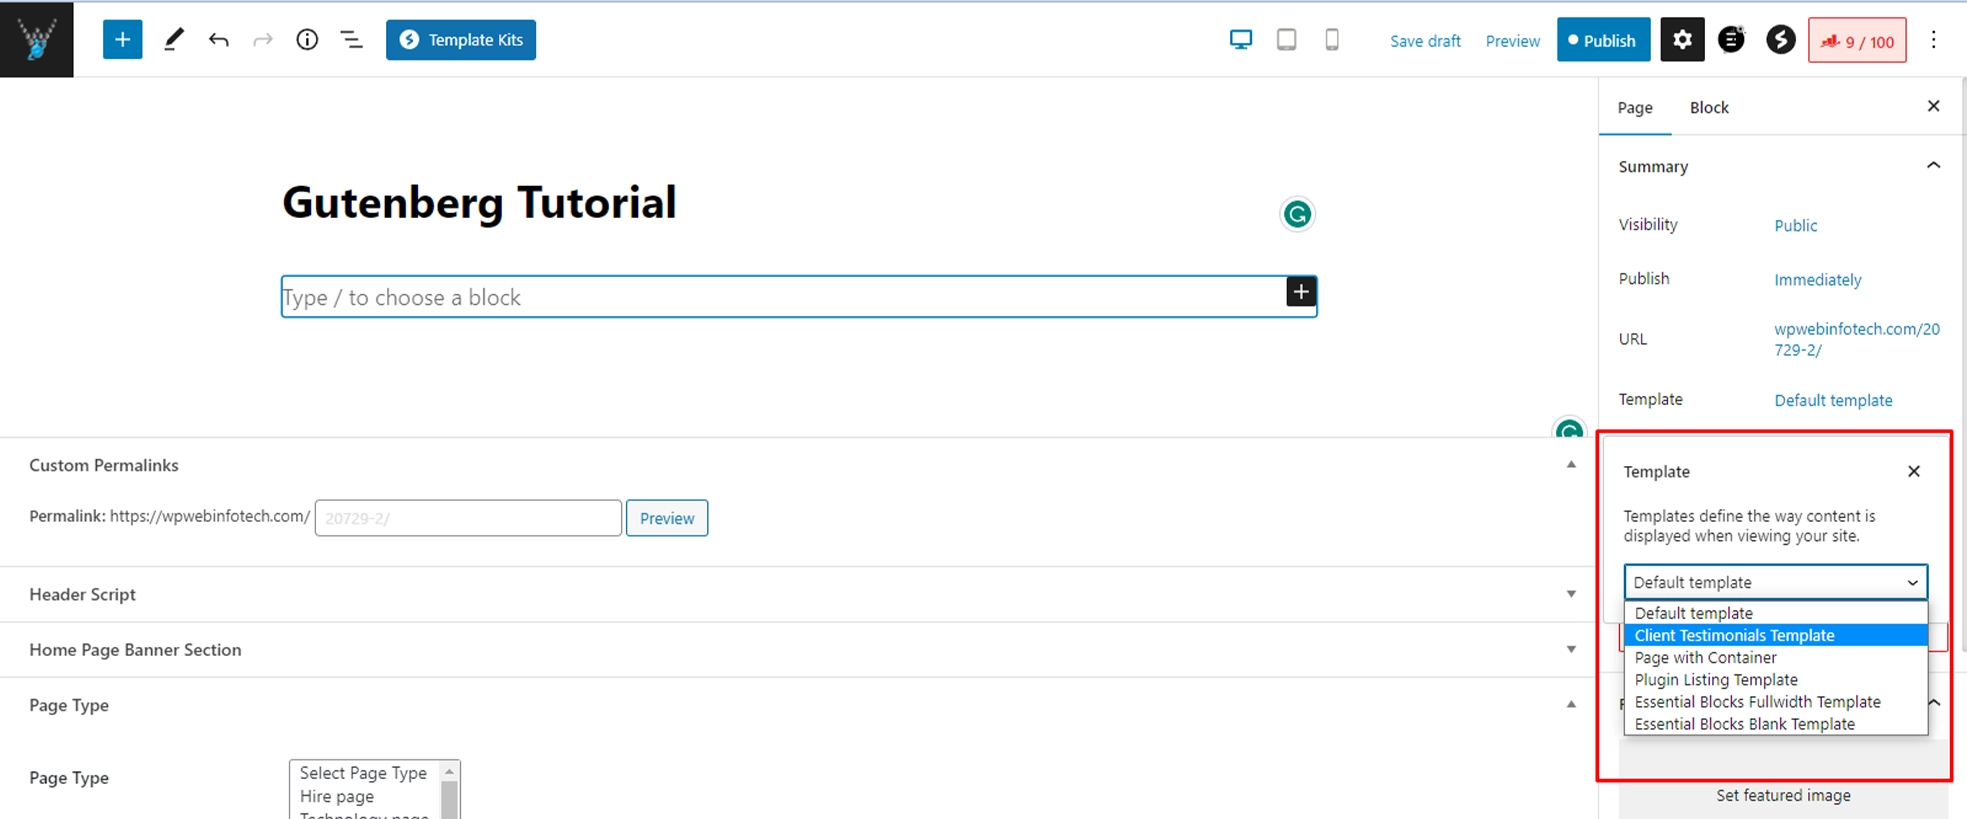
- Navigate to the WordPress admin dashboard and create a new post or page.
- In the editor, click on the “Template” tab in the right sidebar.
- You will now see a list of available templates for your theme. Select the one you’d like to edit or create a new template from scratch.
- Use the block editor to add, remove, or customize blocks within the template.
- When you’re satisfied with your changes, click on “Save” to save the template.
It’s important to note that changes made to templates will affect all pages or posts using that template. This feature helps maintain design consistency across your site while still allowing for customization on individual pages or posts when needed.
How to Create a New Block Post or Page
Creating a new block post or page using Gutenberg, the block-based editor in WordPress, is a straightforward process. Here’s a step-by-step guide to help you get started:
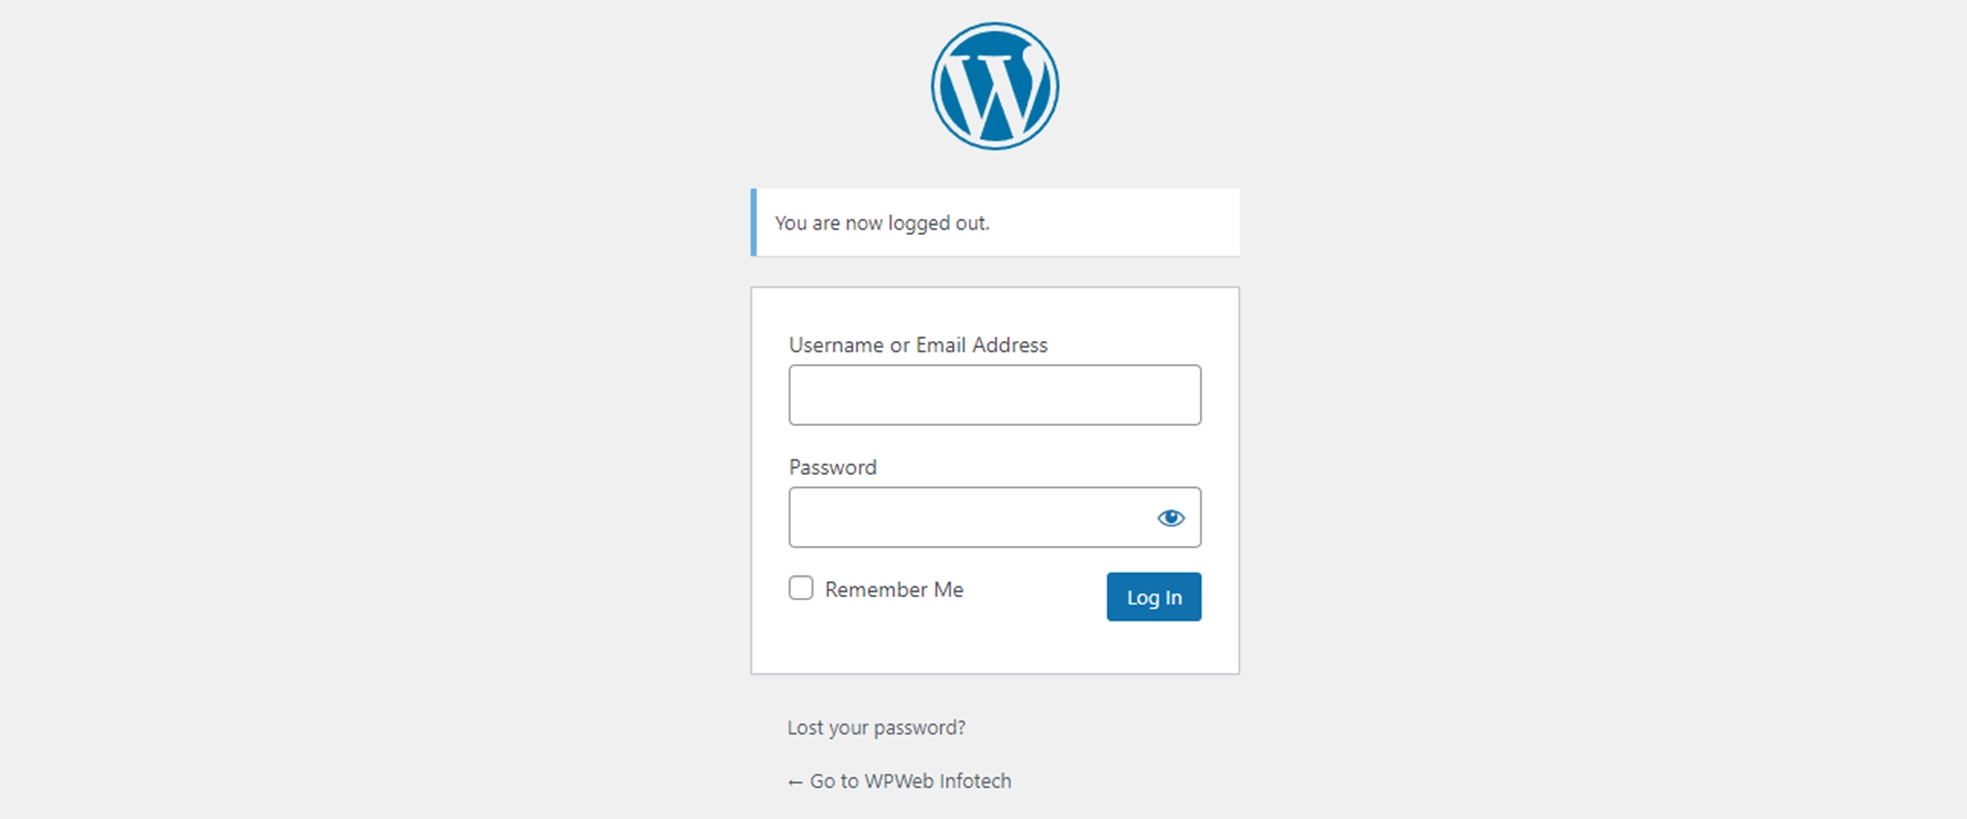
1. Log in to your WordPress admin dashboard.
Visit your WordPress website’s admin area by adding /wp-admin at the end of your site’s URL (e.g., www.example.com/wp-admin). Log in with your username and password.
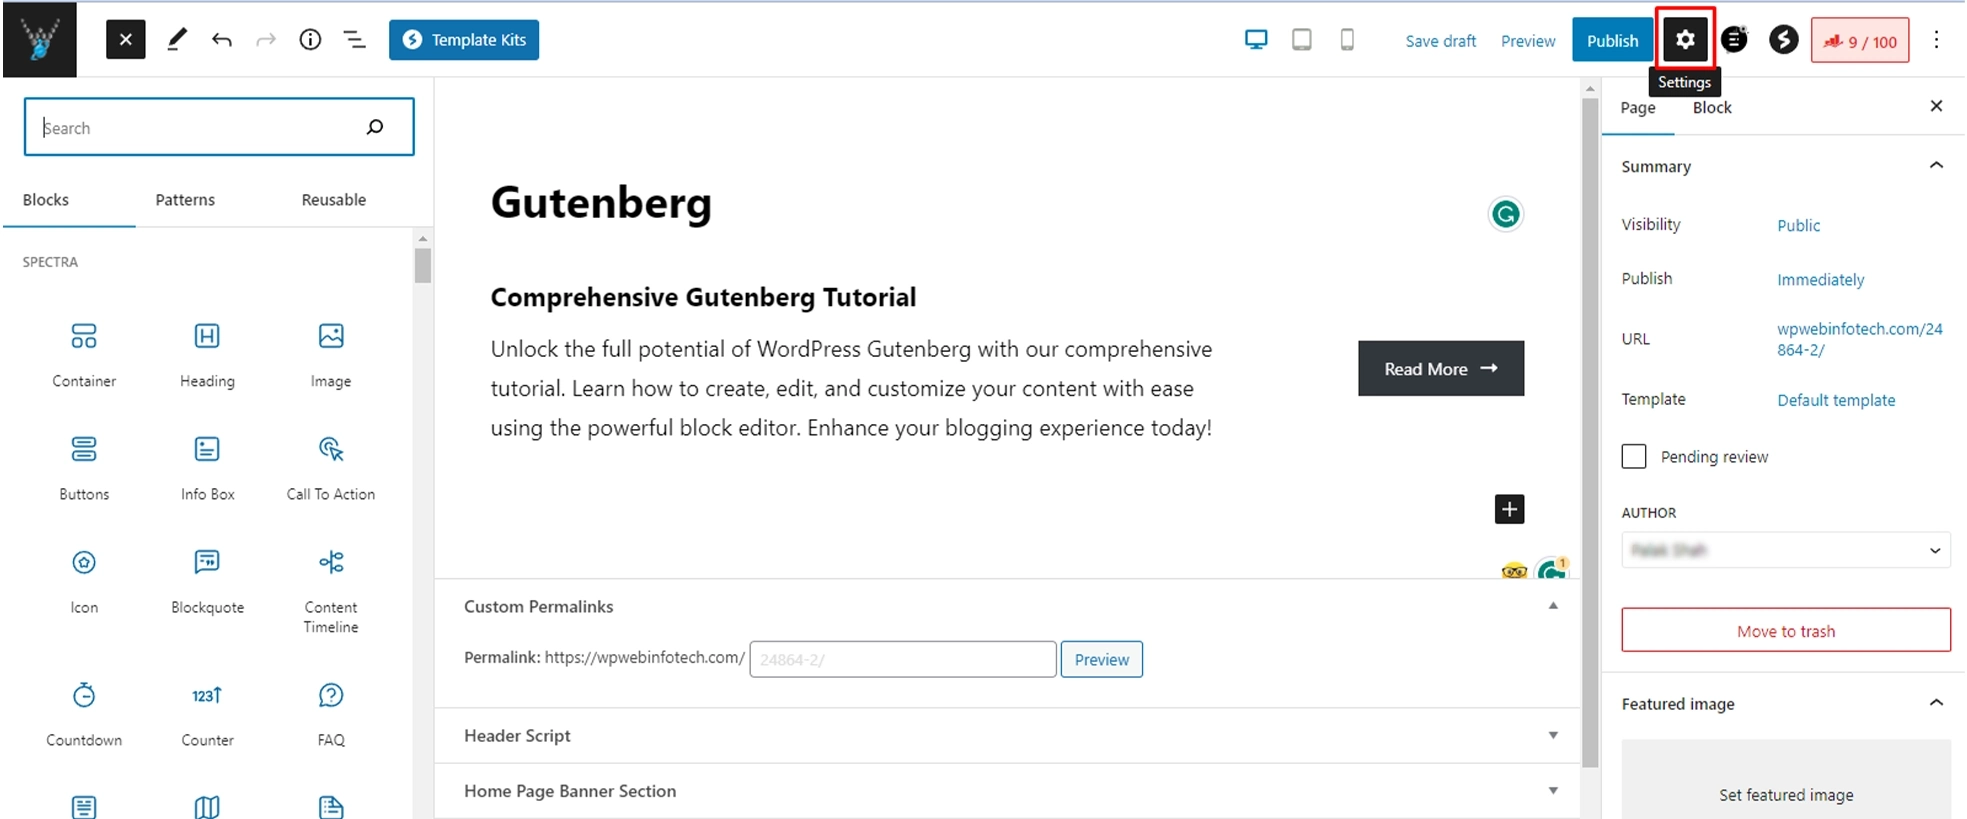
2. Create a new post or page.
Select the Block Inserter+ icon on the top toolbar.

Add blocks to your content.
Click on the “+” icon (Add Block) to add a new block to your content. You’ll find this icon in several locations:
- In the top-left corner of the editor’s toolbar.
- In the content area when you hover between existing blocks.
- At the end of your content area.
Clicking the “+” icon will open a block library where you can search for or browse through various block types, such as Paragraphs, Headings, Images, Videos, and more. Click on the block you want to add, and it will be inserted into your content.
3. Customize your blocks.
After adding a block, you can customize its content and settings.
That’s it! You’ve now created a new block post or page using the Gutenberg editor in WordPress. You can continue to edit, update, or manage your content as needed.
How to Customize Blocks
Customizing blocks in the Gutenberg editor is easy and intuitive. Here’s a step-by-step guide on how to customize various aspects of your blocks.
Here’s how to do it:
1. Select a block
Click on the block you want to customize in the editor. This will reveal a block-specific toolbar above the block and additional settings in the right sidebar under the “Block” tab.
2. Use the block toolbar
The block toolbar provides quick access to common customization options such as alignment, bold, italic, and more, depending on the block type. Hover over the icons in the toolbar to see what each one does, and click on an icon to apply the associated action or setting to the block.
3. Access block settings in the sidebar
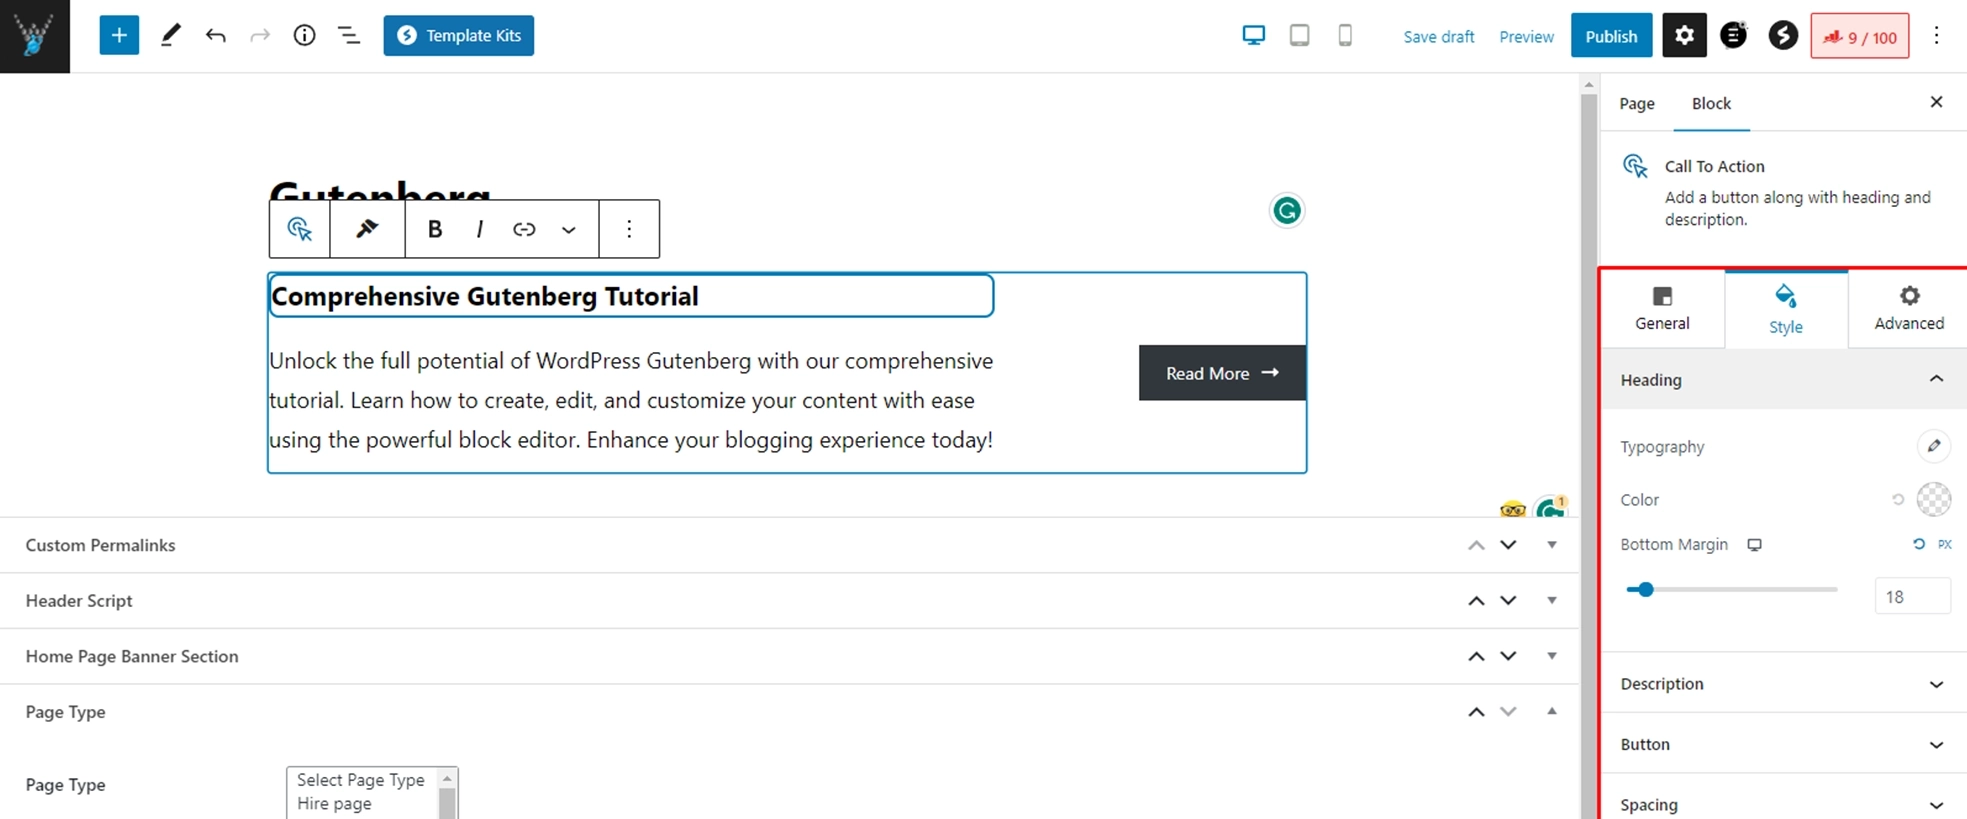
In this example, we’ll select the Call To Action block.

When you have successfully added the Call To Action, the block’s configuration options will show up. Alternatively, you can also trigger the Sidebar panel by clicking on the Settings option positioned in the upper-right corner of the editor.
On the Block settings, you can style the button using Typography, color, or Margin. You can also adjust the Width Settings, which range from 25% to 100%.
Customizing a Paragraph block in Gutenberg
1. Add a Paragraph block
Click the “+” icon in the editor, search for “Paragraph,” and click on the “Paragraph” block to insert it into your content.
You can later upload a font to WordPress, edit the text, change text alignment, adjust the font size, change the text background color, and apply additional CSS classes, too.
How to Add Headings and Text
The next step when building a site page is adding headings and text. Headings define the content’s importance levels and how ideas are interconnected.
Follow these instructions to add headings and text:
1. Select the + icon in the top toolbar. Alternatively, choose the + icon inside the content interface.
2. The list of available WordPress Gutenberg blocks will appear. Click Heading.

Creating Columns and Layouts
The block editor comes with handy tools to manage and organize your content layouts.
You can select multiple blocks by clicking on them while pressing the SHIFT key on your keyboard.
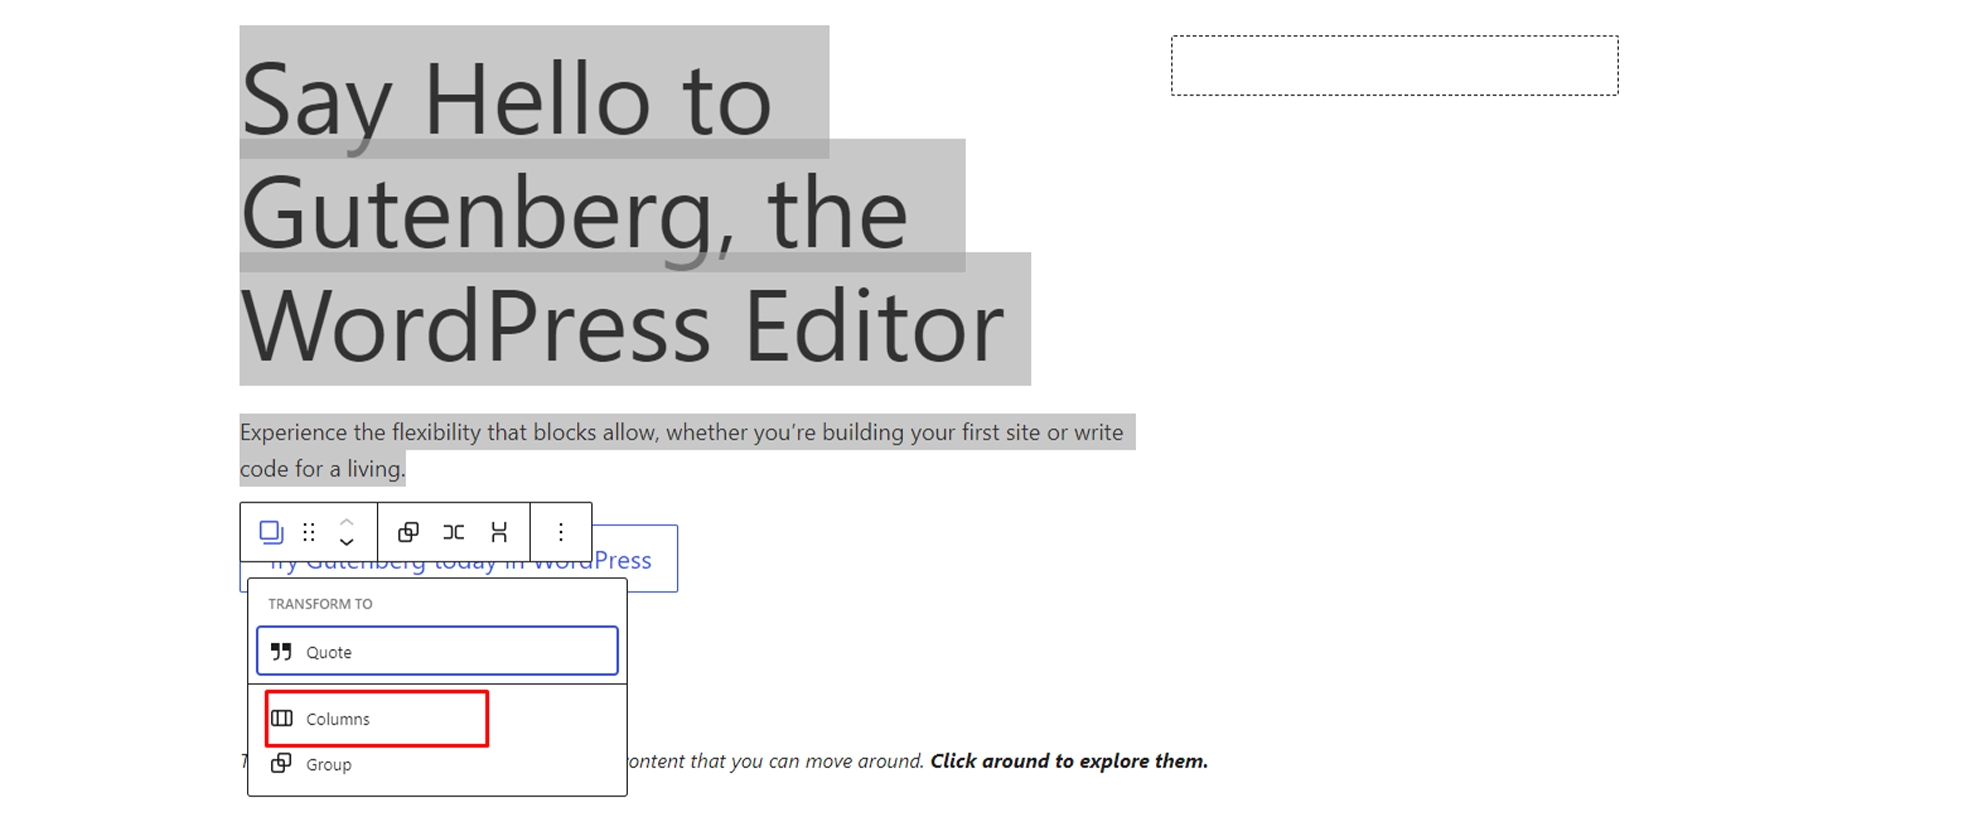
After that, click on the block type button in the toolbar to transform the selected blocks into Groups or Columns.
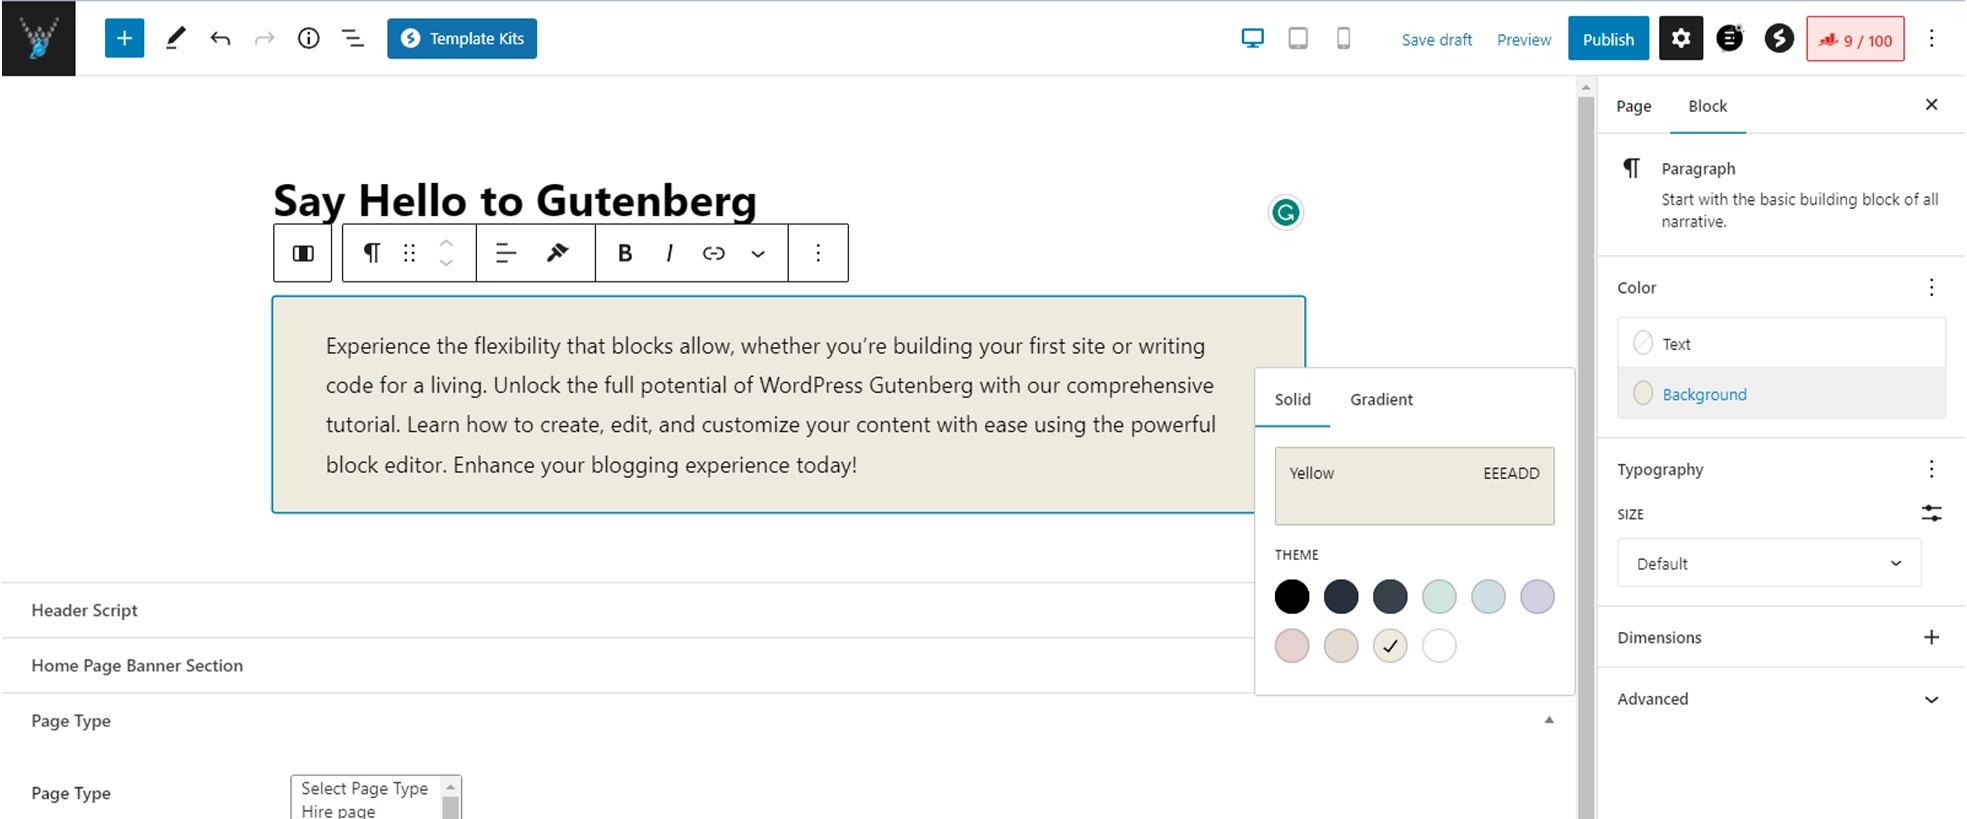
You can then apply styles to the entire group block such as changing their alignment or spacing.
The block editor also allows you to add an empty Group or Columns block. After that, you can fill them with other blocks.

You can then fill in each column with any type of block to create beautiful layouts.
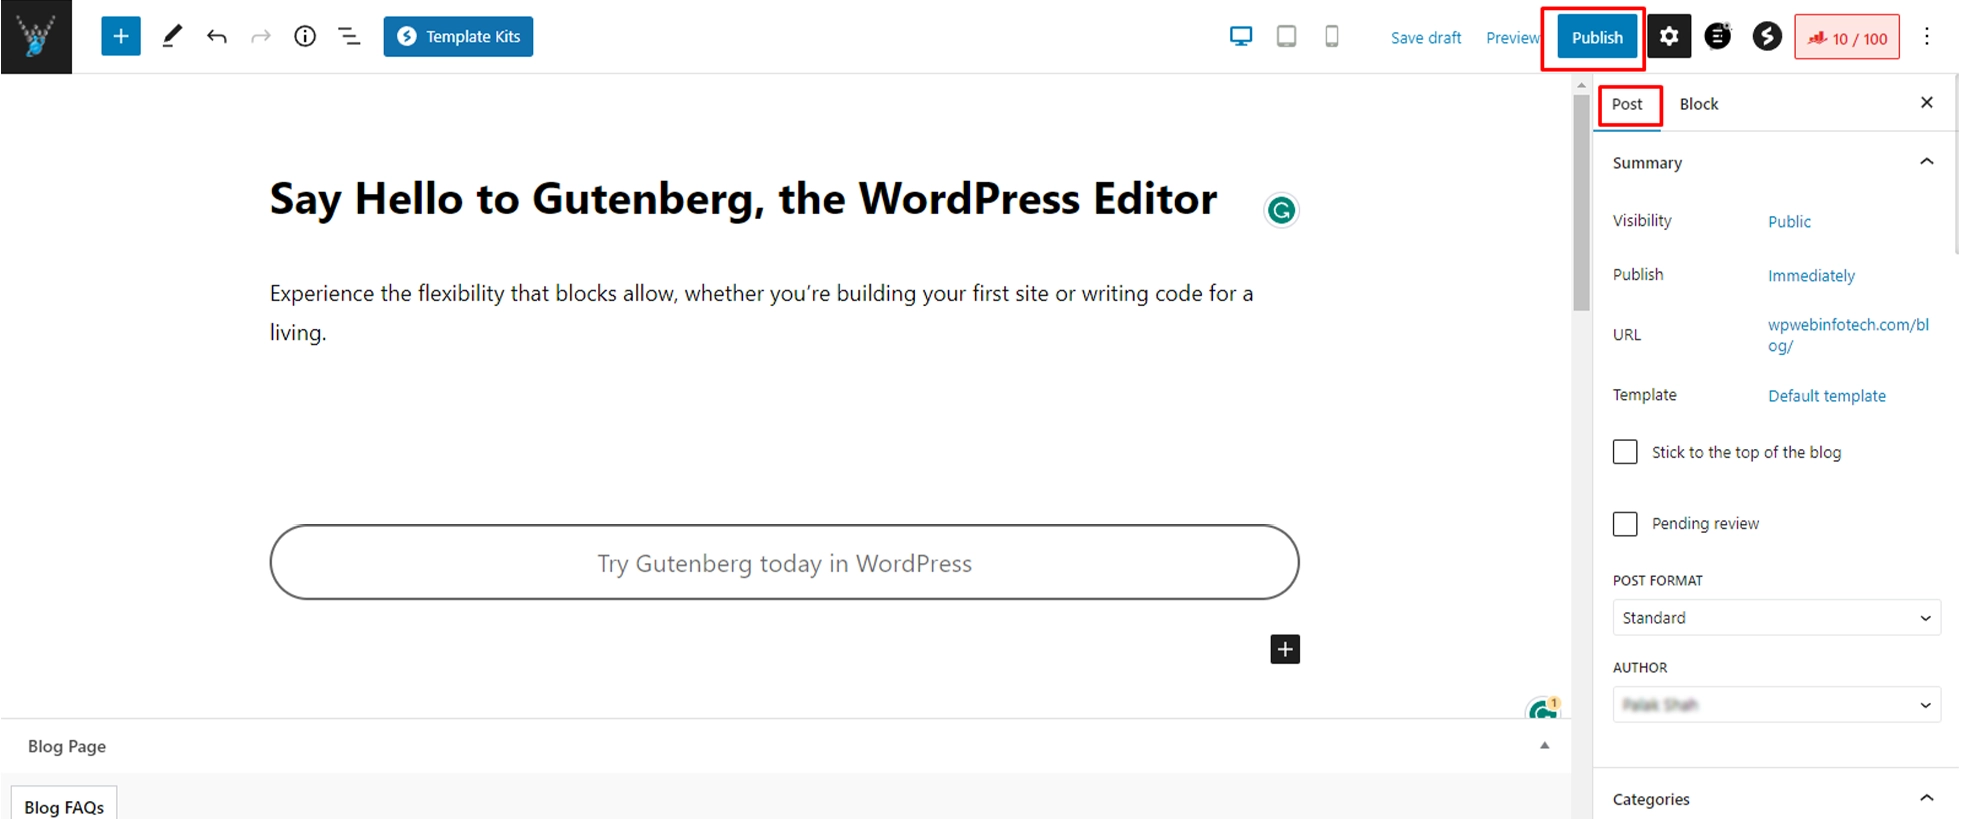
Publishing and Post settings in Gutenberg
Each WordPress post contains a lot of metadata. This includes information like publishing dates, categories and tags, featured images, and more.
All these options are neatly placed in the right column on the editor screen.
How to Add Images and Media
The new wp block editor provides two ways to add images and media files to your site – via the Block Inserter or the + icon inside the content interface.
Here’s how to add images and media using the first option:
1. Click the Block Inserter button on the top toolbar.
2. The list of available blocks will appear. We’ll choose the image block.
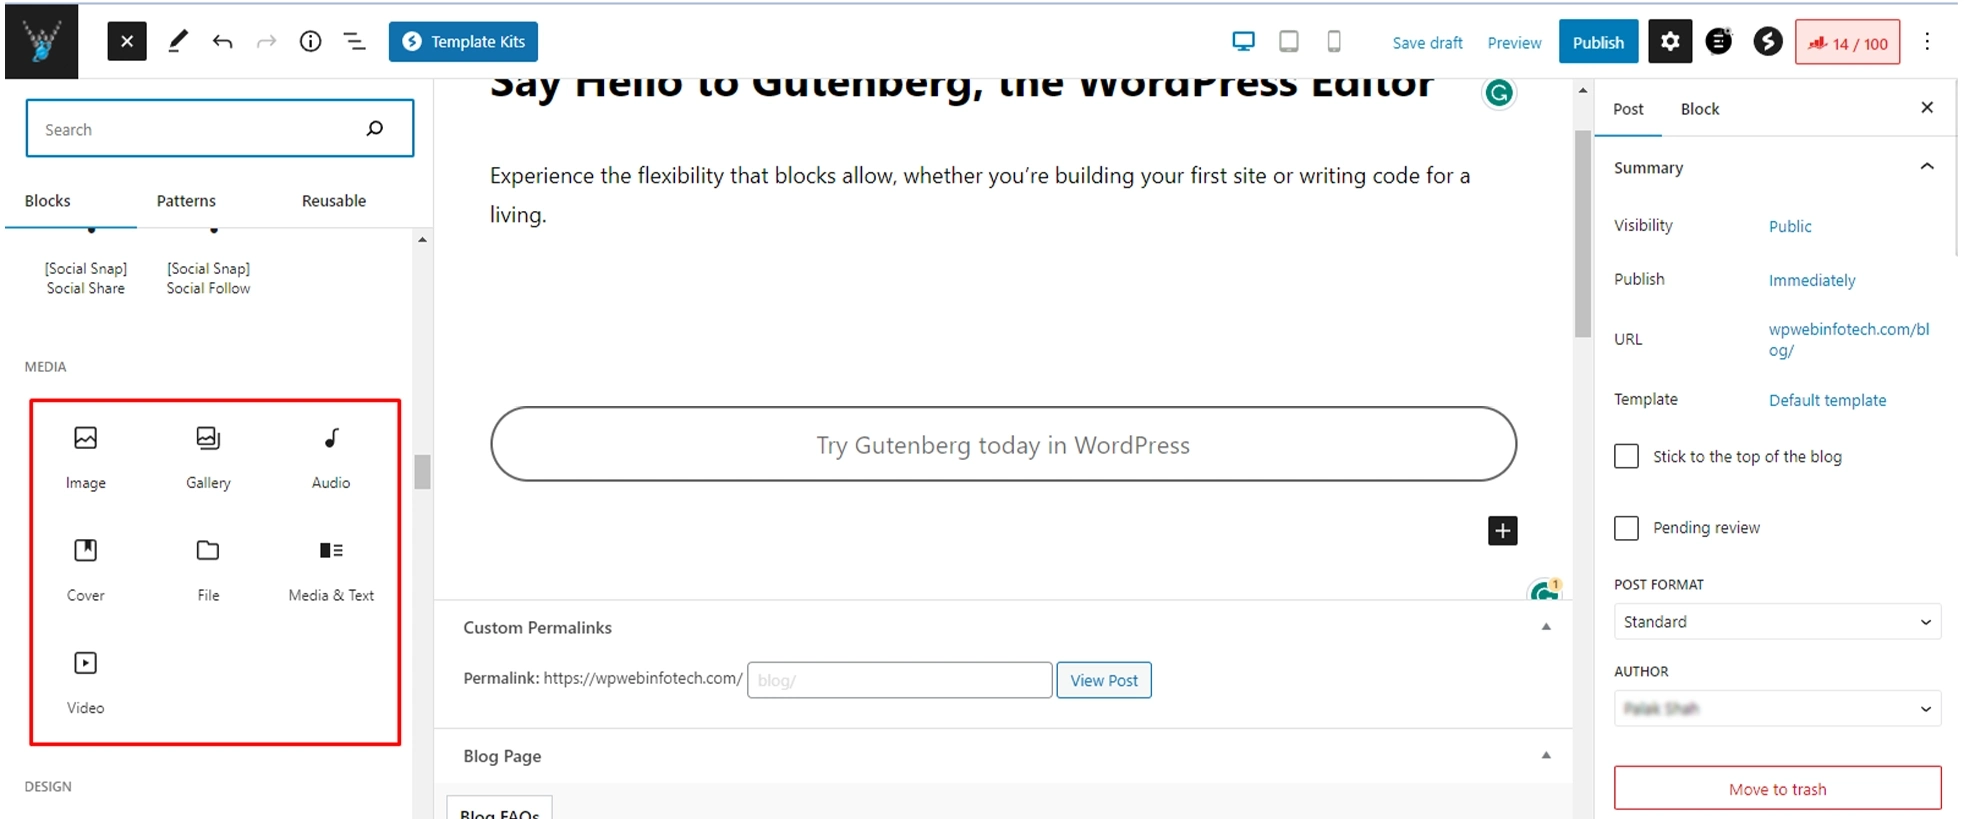
3. The three uploading options will appear – upload, media library, and insert from URL.

4. Choosing the Upload option, for example, you’ll have to select an image file and click Open. Alternatively, drag and drop multiple image files at once.
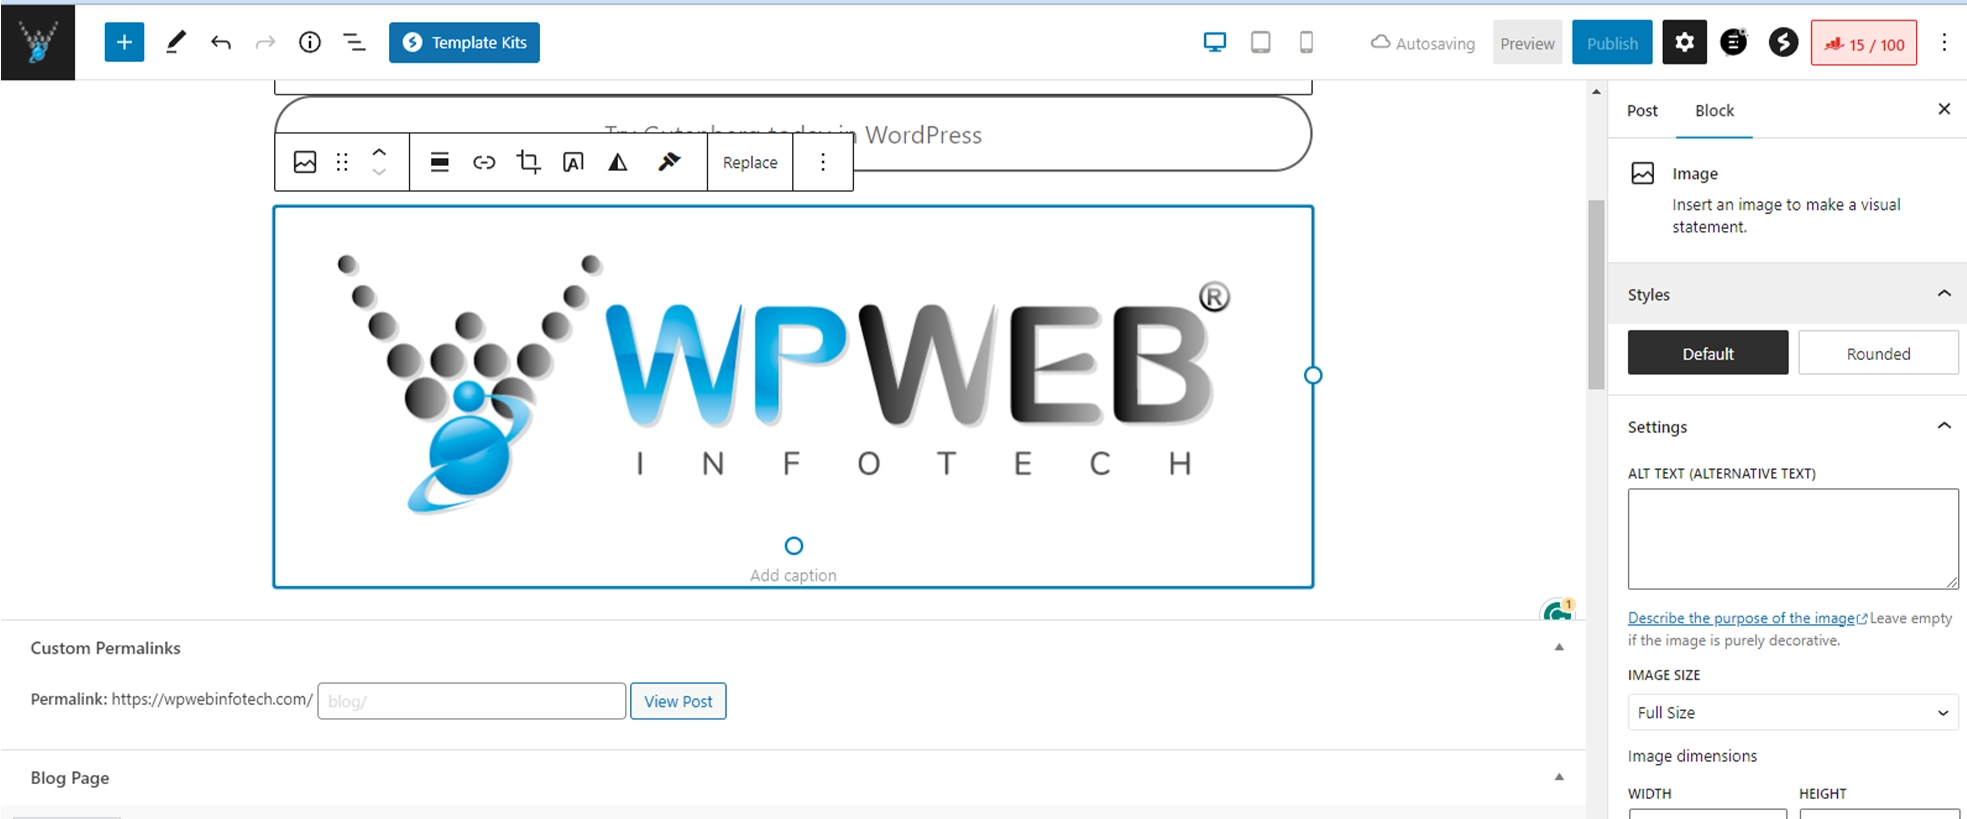
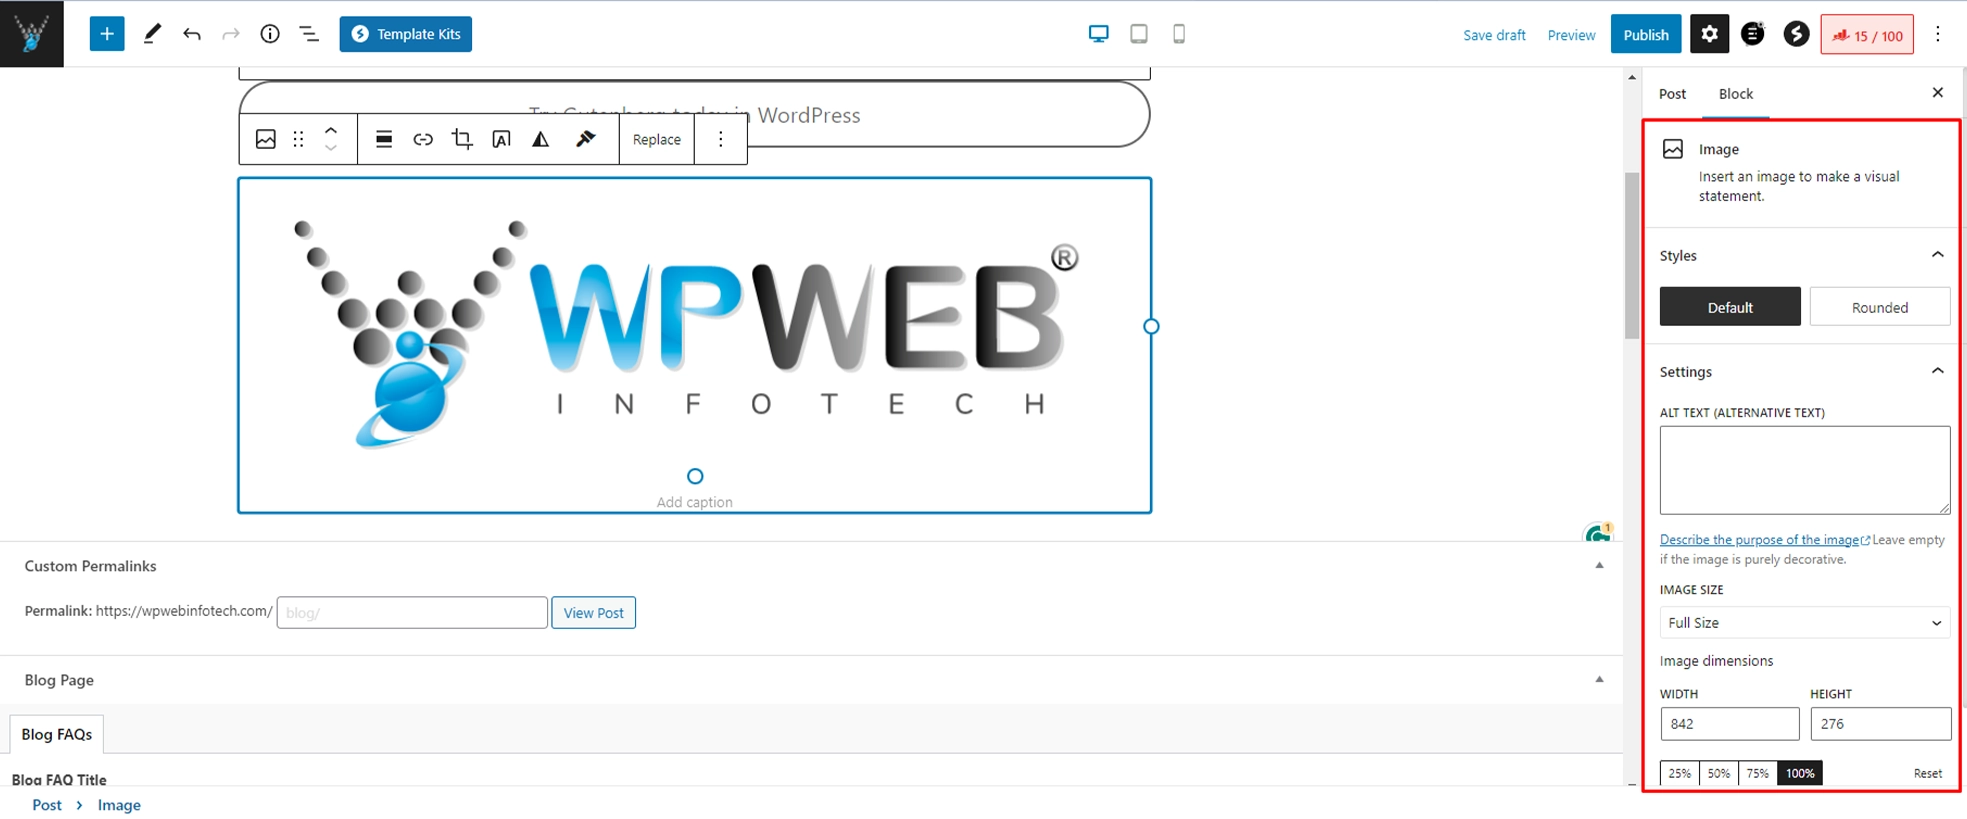
5. Adjust the image by using the Settings Sidebar panel on the right side of the Gutenberg block editor.
How to Arrange Blocks
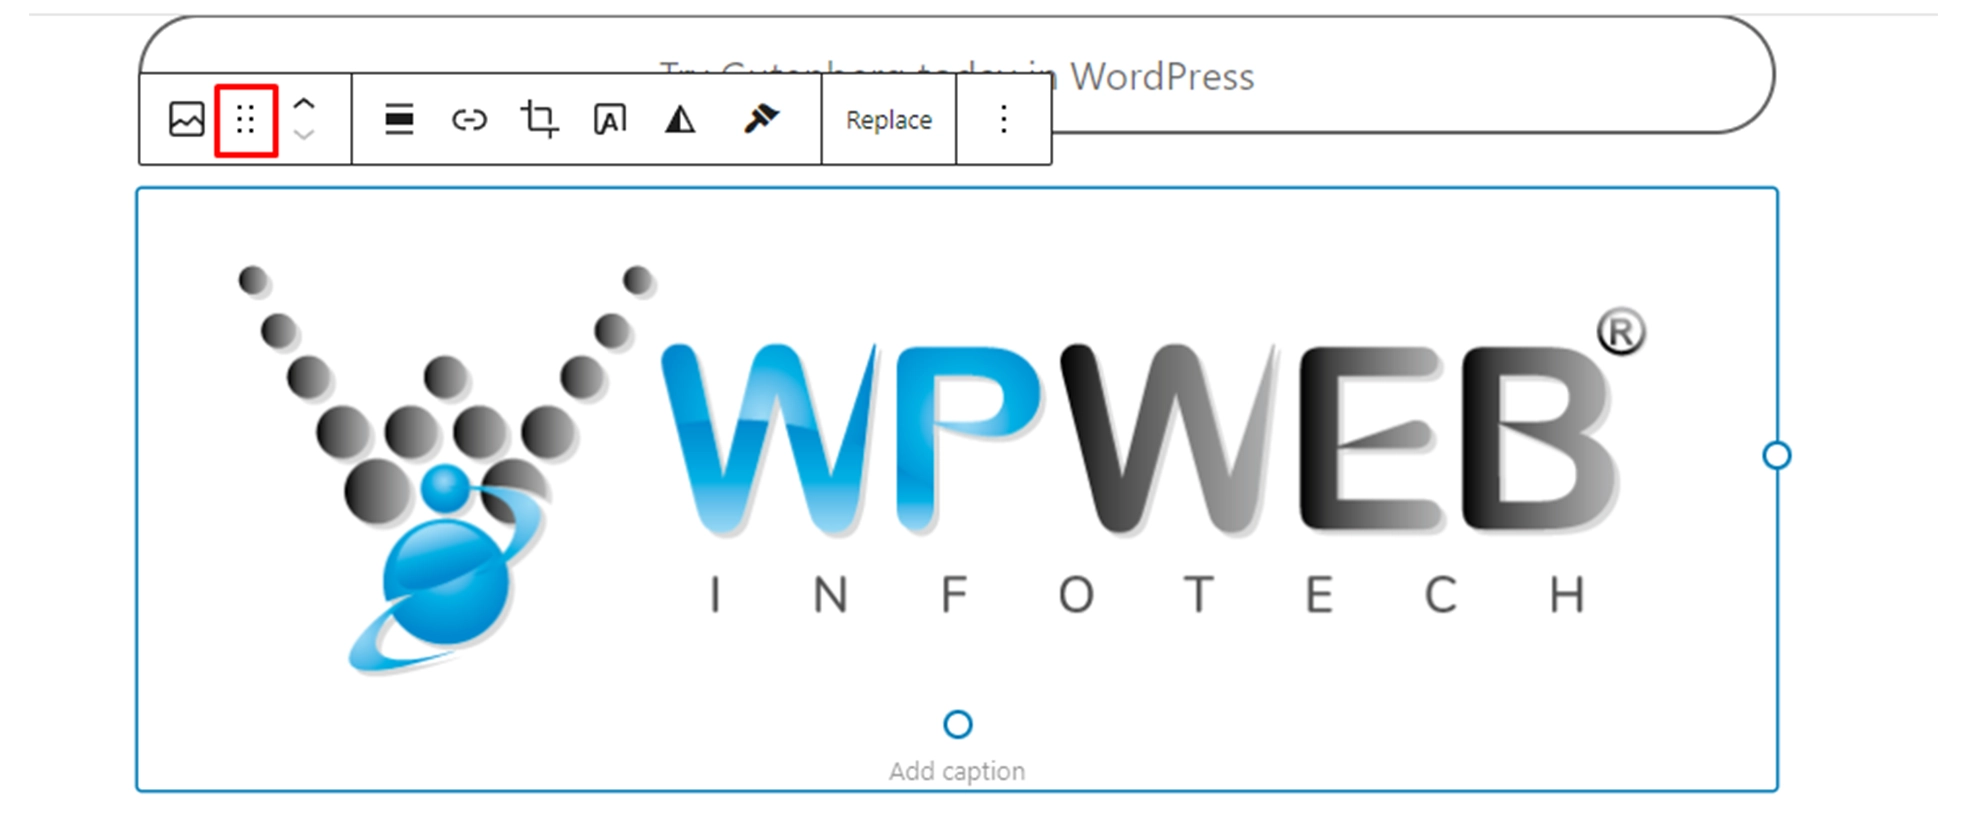
Gutenberg provides two ways to rearrange blocks using the floating toolbar. Using the six dots icon, you can select multiple blocks and drag and drop them anywhere.
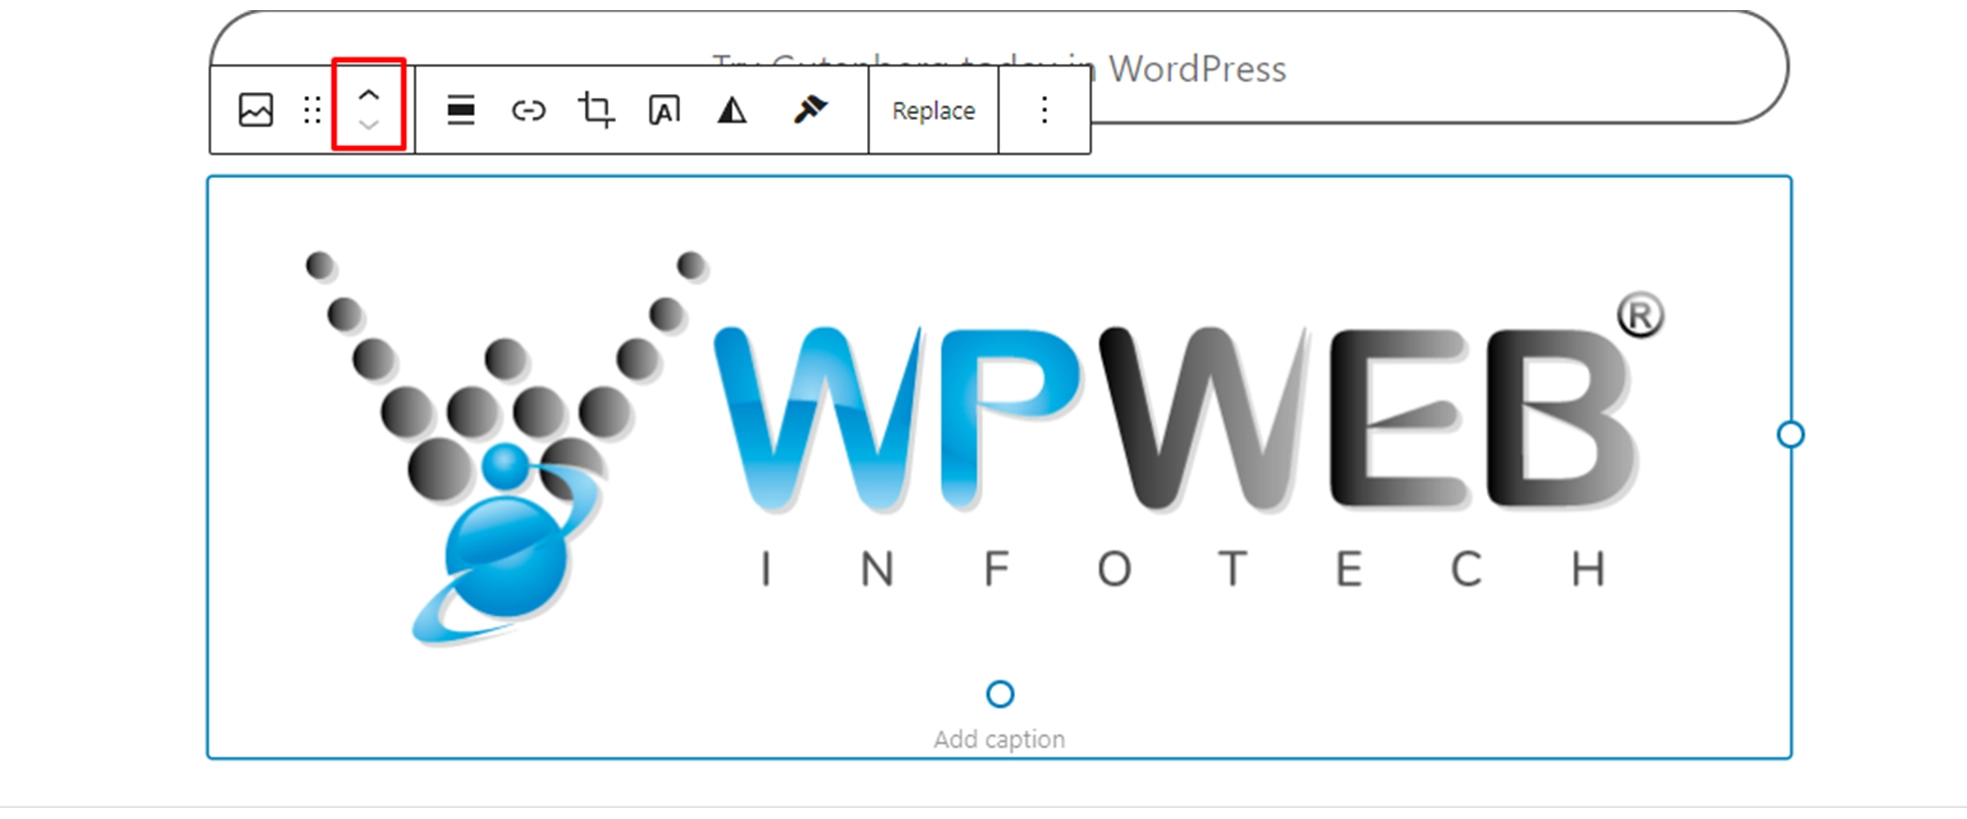
On the other hand, the up and down arrows allow you to move a block up or down.
How to Embed Media
When it comes to embedding content from other platforms, the WordPress block editor includes a separate section for embedding media files and provides many sources to choose from.
Here’s how to do it:
1. Click the + icon on the top toolbar.
2. Scroll down to find the Embeds section.
3. Select the media you want to add. In this example, we’ll embed a Pinterest URL into our content.
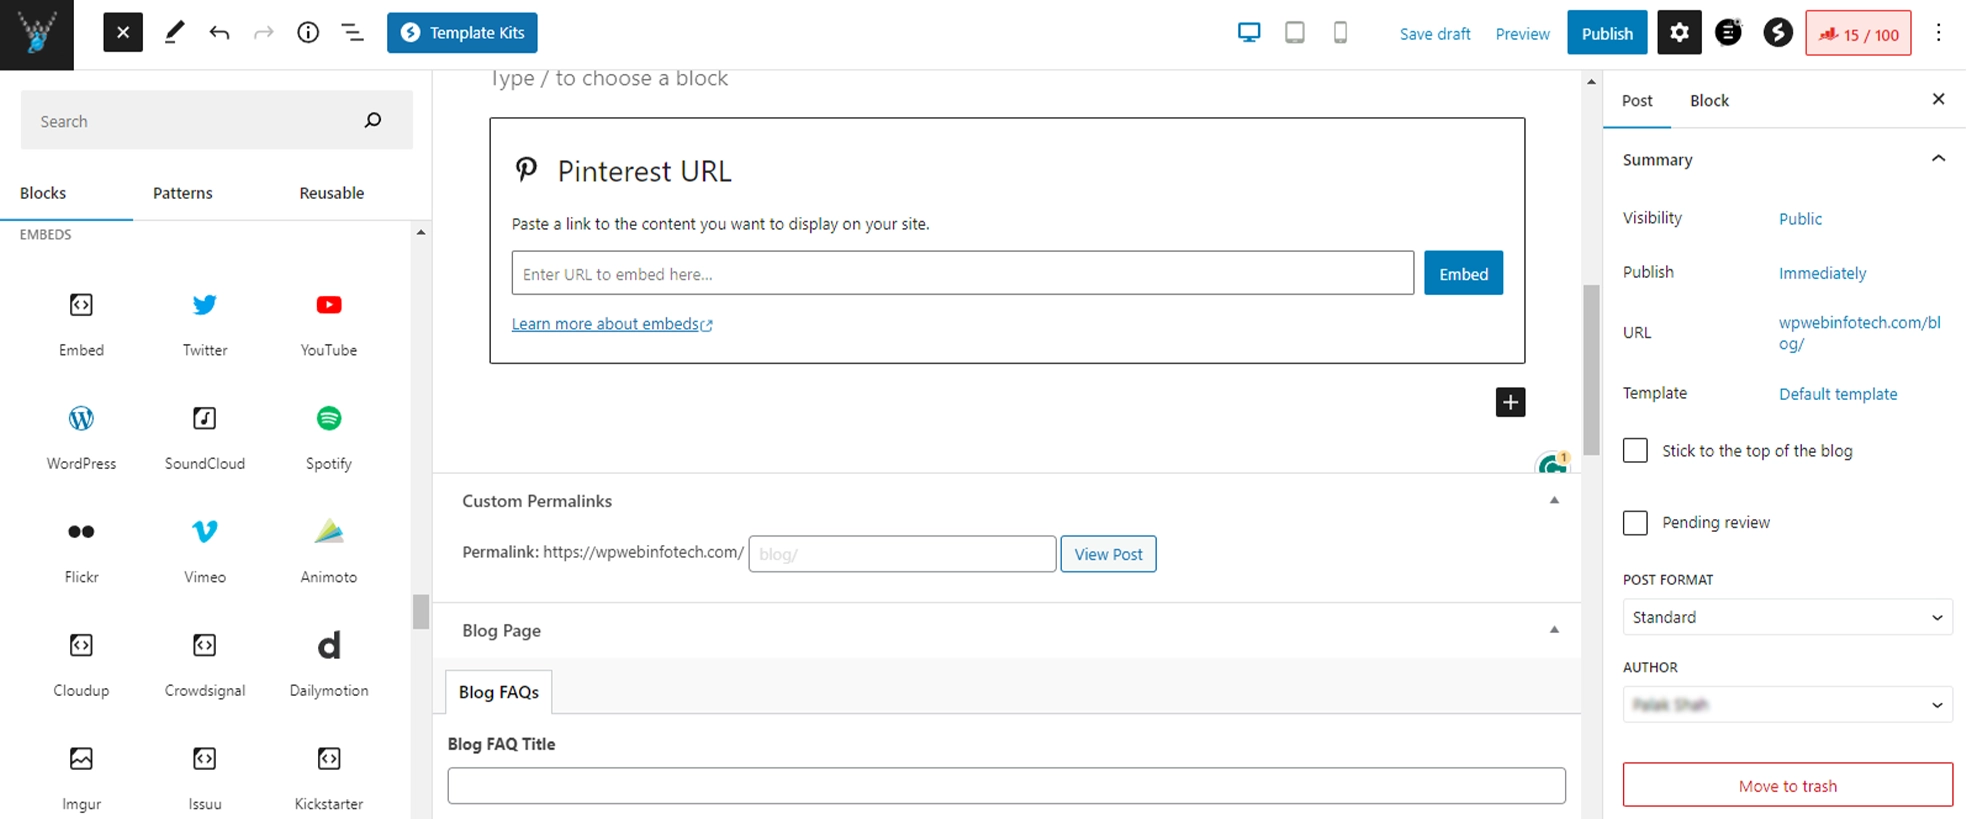
4. The URL will be displayed on your post or page.
How to Create Reusable Blocks and Block Patterns
Creating reusable blocks in the WordPress Gutenberg editor is a great way to save time and maintain consistency across your site. Reusable blocks allow you to save a specific block or group of blocks for later use in other posts or pages.
Here’s how to create reusable blocks in the Gutenberg editor:
- Create or select the block(s) you want to save as a reusable block.
- To create a new block, click on the “+” icon to add a new block and select the desired block type (e.g., Paragraph, Image, or Heading).
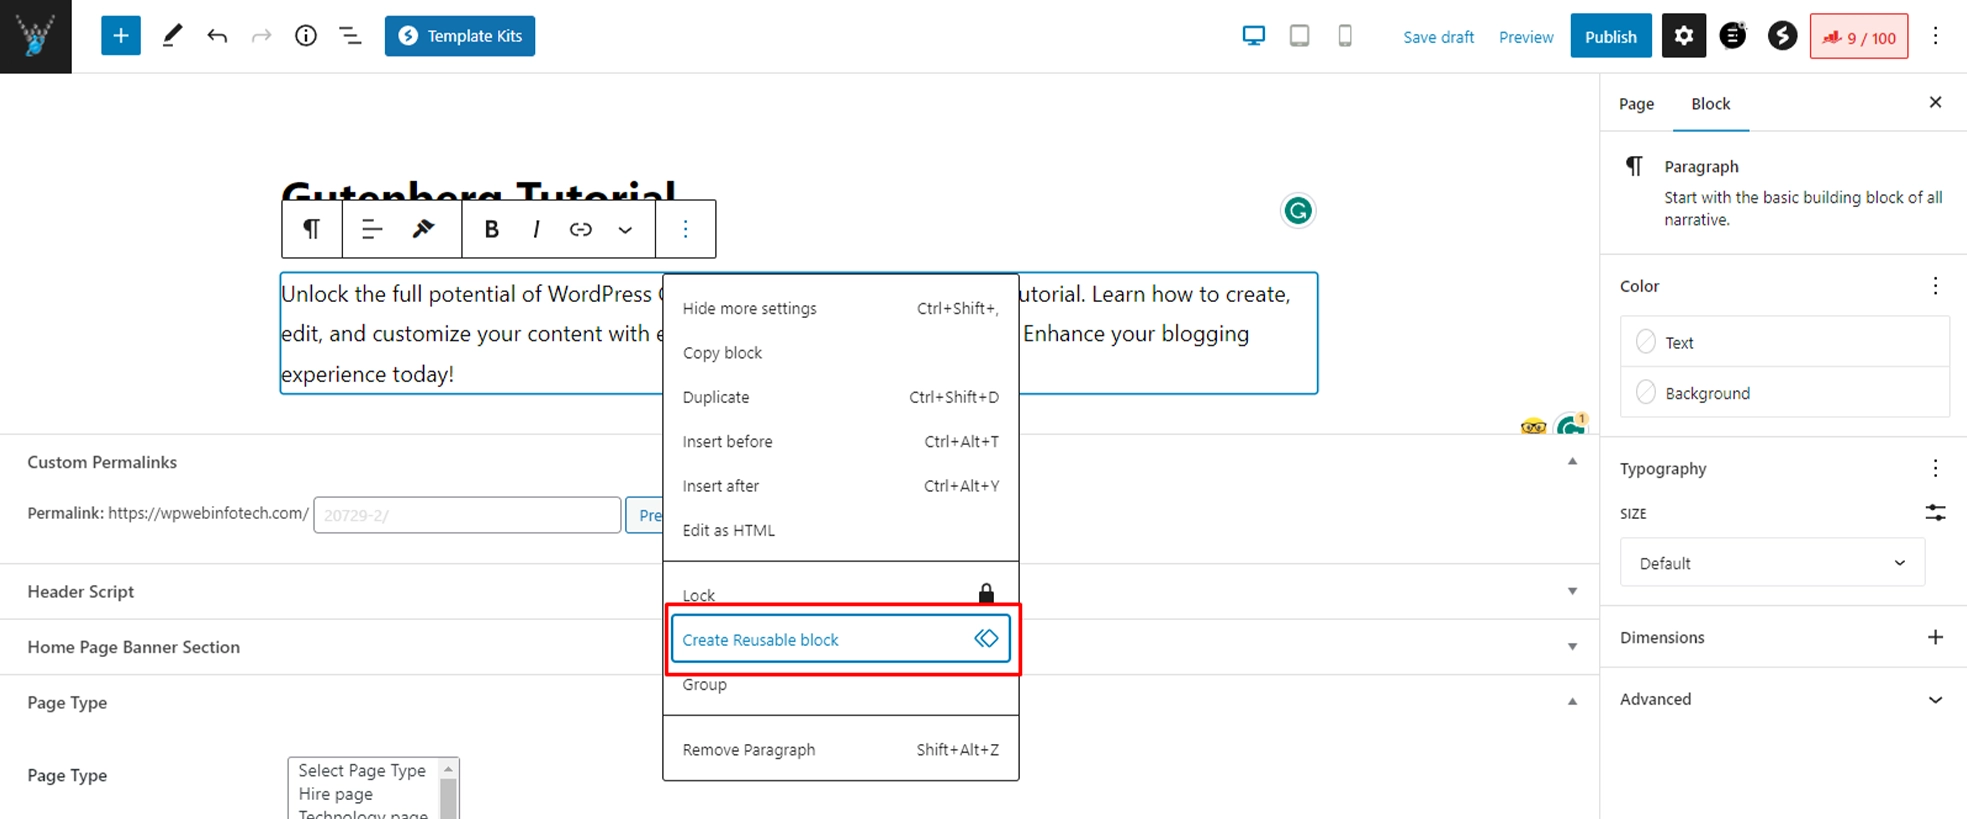
- With the block(s) selected, click on the three vertical dots (More Options) in the block toolbar, which is typically located at the top-right corner of the selected block.
- From the dropdown menu, choose “Add to Reusable Blocks.” and Name your reusable block.

- To use the reusable block in a new post or page, click the “+” icon to add a new block, and then search for “Reusable” in the block library. You’ll see a list of all your reusable blocks.
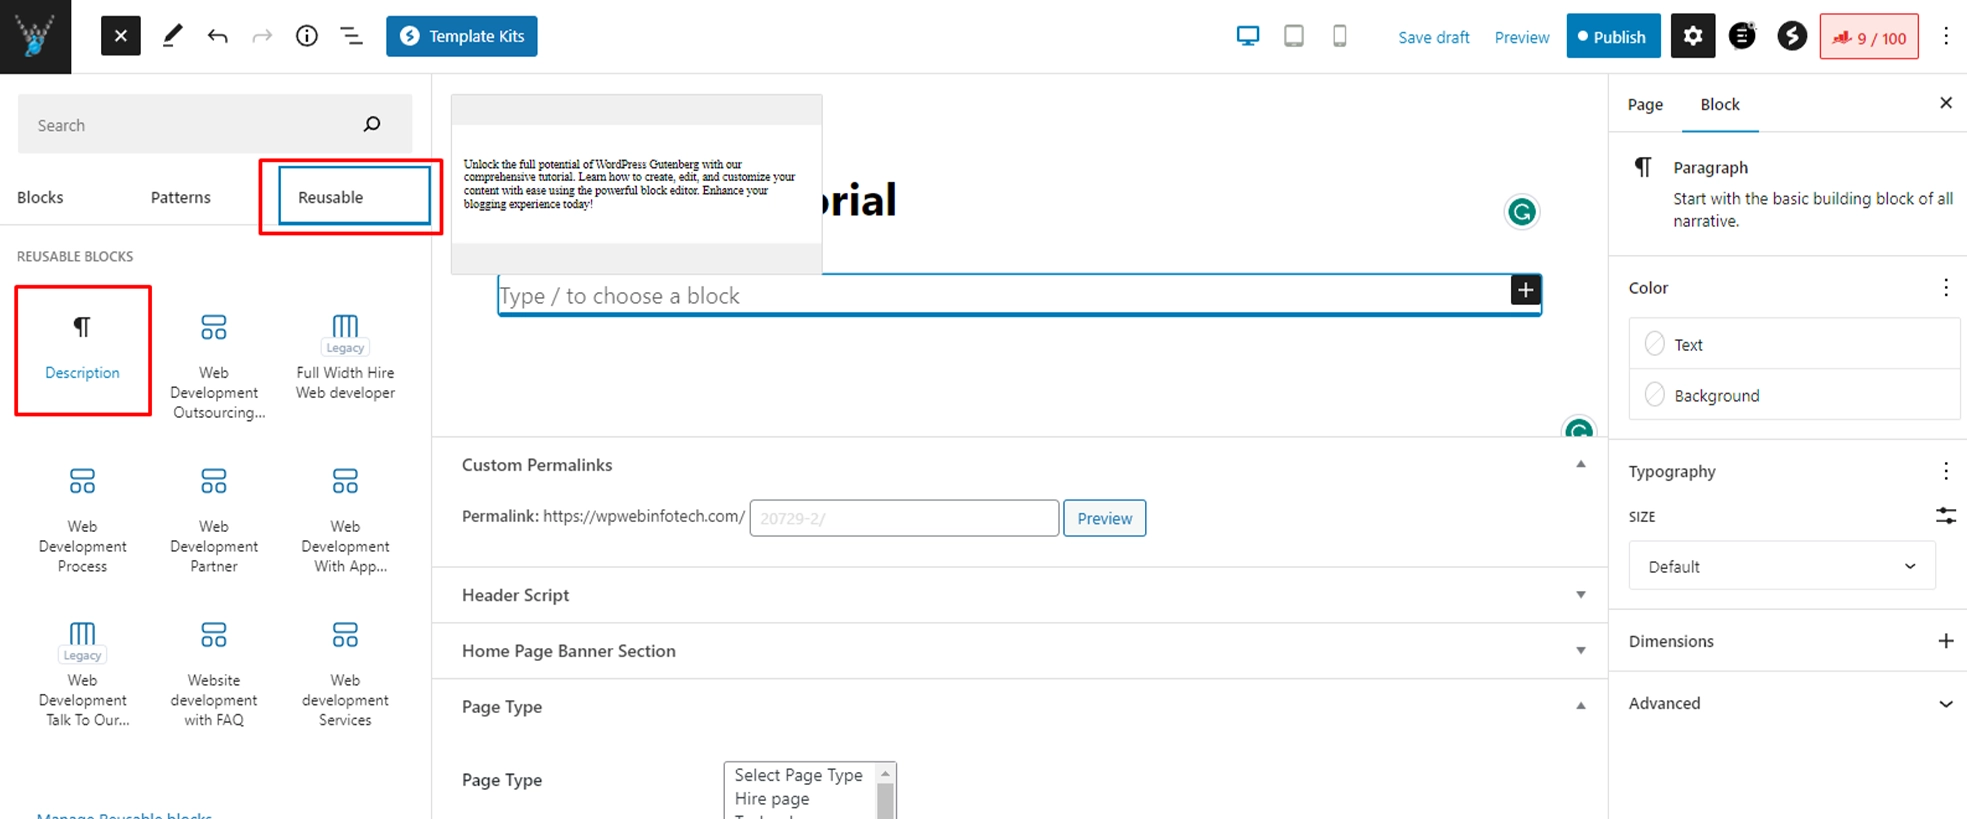
- Click on the desired reusable block to insert it into your content. The block will now appear in your post or page as a regular block.
Remember, reusable blocks are an excellent tool for maintaining a consistent design and simplifying your content creation process in WordPress.
How to Use Gutenberg Keyboard Shortcuts
Gutenberg keyboard shortcuts are a great way to increase your productivity and make your content creation process in WordPress faster and more efficient. Here’s a list of some common and helpful keyboard shortcuts for the Gutenberg editor:
Here is the list of Gutenberg block editor keyboard shortcuts and their functions in tabular form:
| Keyboard Shortcuts | Functions |
| Shift + Alt + H | Displays all the keyboard shortcuts. |
| Ctrl + Shift + Alt + M | Switches between the visual editor and the code editor. |
| Ctrl + Shift + Alt + F | Toggles the fullscreen mode. |
| Ctrl + Shift + , | Shows or hides the Settings Sidebar panel. |
| Ctrl + S | Saves changes. |
| Shift + Alt + O | Opens the Block List View. |
| Ctrl + Z | Undo the last changes. |
| Ctrl + Shift + Z | Redo the last undo. |
| Ctrl + A | Selects all text while typing. Press it again to select all blocks. |
| Esc | Clears a selection. |
| Ctrl + Shift + D | Duplicates the selected blocks. |
| Shift + Alt + Z | Removes the selected blocks. |
| Ctrl + Alt + T | Inserts a new block before the selected blocks. |
| Ctrl + Alt + Y | Inserts a new block after the selected blocks. |
| Del or Backspace | Deletes the selected texts. |
| Ctrl + Shift + Alt + T | Moves the selected blocks up. |
| Ctrl + Shift + Alt + Y | Moves the selected blocks down. |
| / | Changes the block type after adding a paragraph. |
| Ctrl + B | Bolds the selected text. |
| Ctrl + I | Italicizes the selected text. |
| Ctrl + K | Converts the selected text into a link. |
| Ctrl + Shift + K | Removes a link. |
| [[ | Inserts a link to a post or page. |
| Ctrl + U | Underlines the selected text. |
| Ctrl + ` or Shift + Alt + N | Navigates to the next part of the editor. |
| Ctrl + Shift + ` or Shift + Alt + P | Navigates to the previous part of the editor. |
| Alt + F10 | Navigates to the nearest toolbar. |
The above table lists the most commonly used keyboard shortcuts in Gutenberg. These shortcuts should cover the majority of your editing needs, allowing you to work more efficiently and effectively within the WordPress block editor, especially if you also use WordPress custom fields for advanced editing of content structures.
How to Use the Block List View
The Block List View in Gutenberg is a helpful feature that allows you to see an outline of your content and quickly navigate between blocks, especially in long or complex posts and pages. It shows a list of all the blocks in your content, along with their hierarchical structure. This makes it easier to locate and select specific blocks, such as nested blocks within columns or groups.
Here’s how to use the Block List View in the Gutenberg editor:
1. Open the Block List View
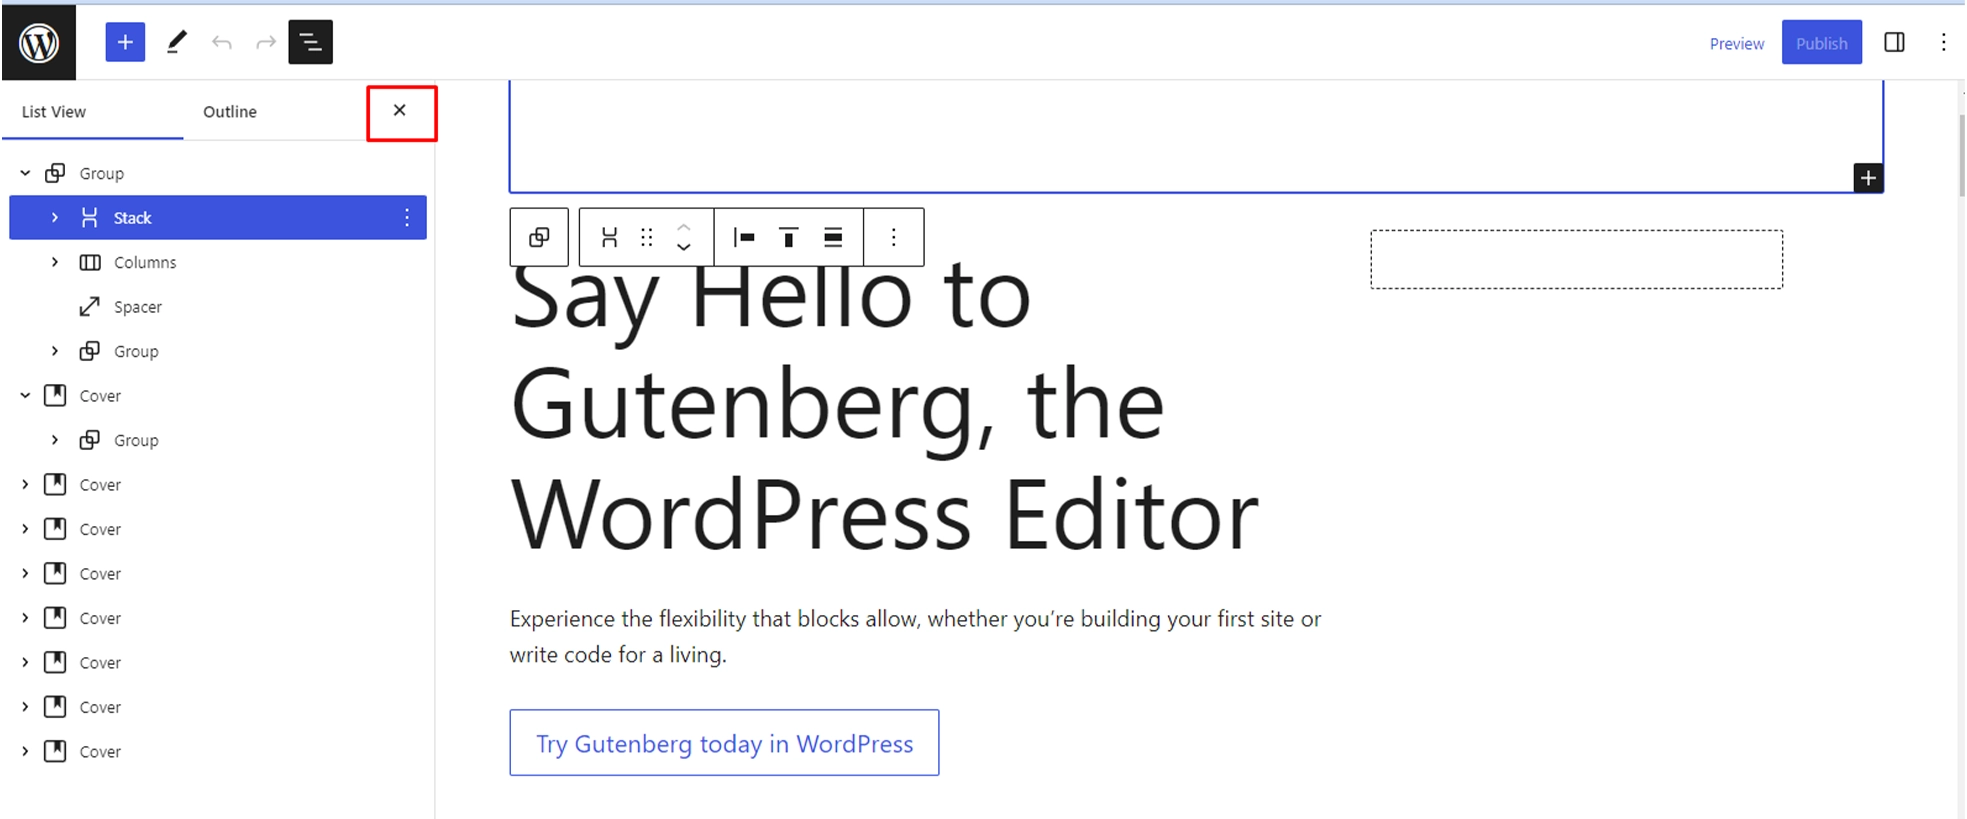
In the top-left corner of the Gutenberg editor, you’ll see an icon that looks like a bulleted list (or an outline). Click on this icon to open the Block List View.

2. Navigate the Block List View
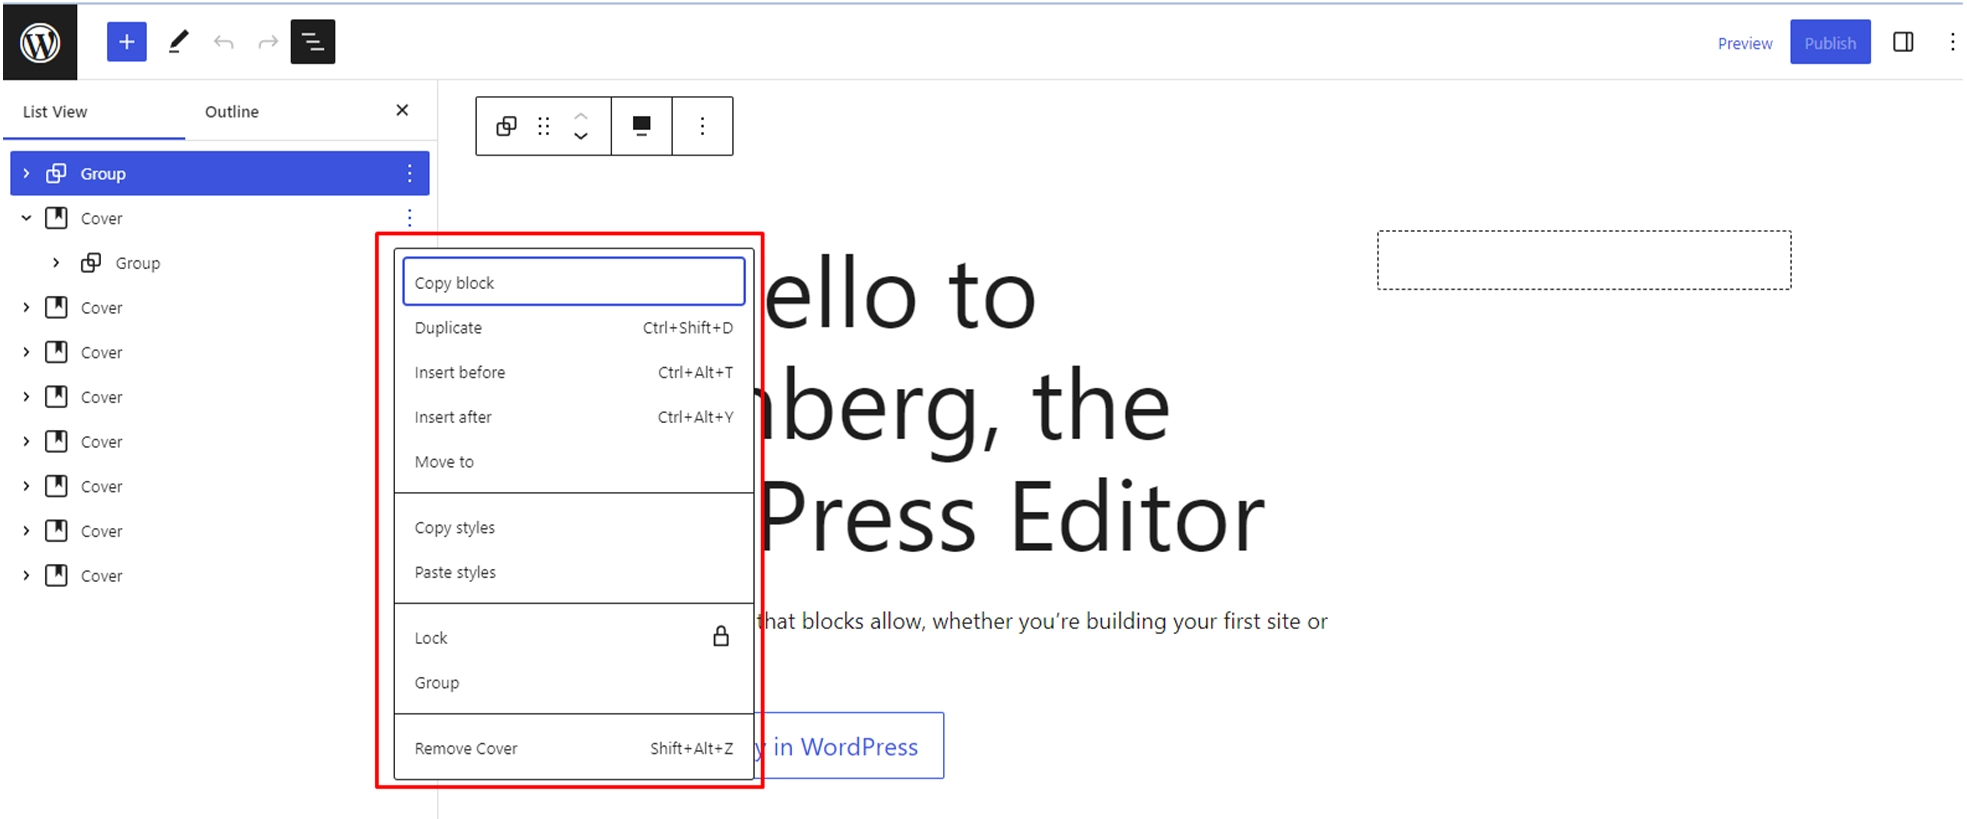
The Block List View displays your content as a list, with each block represented by its block type icon and its content summary (e.g., a heading, paragraph, or image).
Nested blocks are shown indented under their parent blocks.
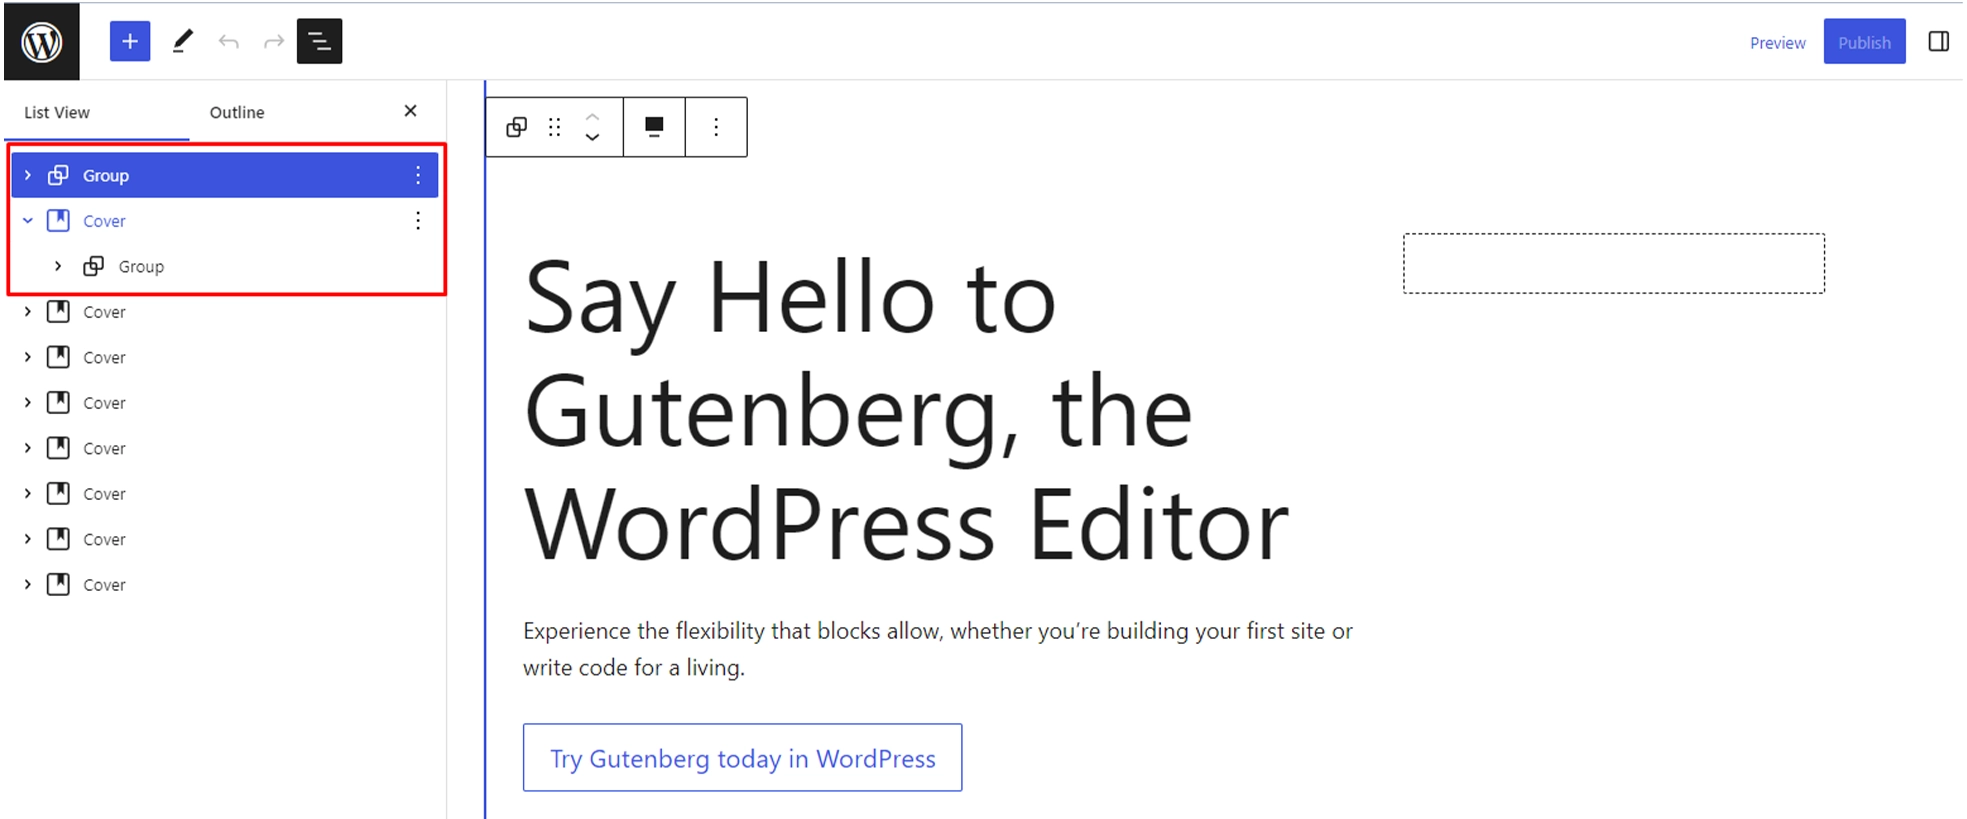
Click on any block in the list to select it in the editor. This will also scroll the editor to the selected block, making it easier to locate specific blocks within your content.
When you hover over a block in the list, you’ll see a set of options appear to the right of the block summary. These options allow you to perform various actions on the block, such as moving it up or down, duplicating it, or deleting it.
3. Close the Block List View
To close the Block List View and return to the editor, click the “X” icon in the top-right corner of the Block List View panel or click anywhere outside the panel.
The Block List View is particularly useful when working with complex page layouts, nested blocks, and long-form content. It can help you maintain a clear overview of your content structure and make it easier to navigate and manage your blocks.
Extending Gutenberg with Block Plugins
Several plugins are available to add new blocks and extend the functionality of Gutenberg. These plugins introduce new block types that you can use to create more complex and customized content layouts. Here’s a brief overview:
- Introduction to Block Plugins – Block plugins are packages that add new blocks to Gutenberg. These blocks can be anything from custom layouts, and widgets, to specialized content elements such as forms, tables, or testimonials. They give you more control and flexibility over your content, allowing you to create unique and dynamic web pages.
- Installing Block Plugins – Installing a block plugin is as simple as installing any other WordPress plugin. Simply navigate to the ‘Plugins’ section of your WordPress dashboard, click on ‘Add New’, search for the block plugin you want to install, and then click ‘Install Now’. Once installed, don’t forget to activate the plugin.
- Using Block Plugins – Once you have installed and activated a block plugin, you will find the new blocks it provides in your Gutenberg editor. When you add a new block, you will see these new options alongside the default WordPress Gutenberg blocks. You can then select and use these blocks just like any other.
- Examples of Block Plugins – There are many block plugins available that offer a wide range of features. Examples include Advanced Custom Fields (ACF), which allows you to create custom fields for your blocks; Stackable, which provides a range of new design blocks; and RankMath which adds SEO features to your blocks.
By extending Gutenberg with block plugins, you can significantly enhance the capabilities of the WordPress editor, allowing you to create more engaging and visually appealing content for your website.
Conclusion
In conclusion, Gutenberg represents a significant transition in the way WordPress content is created and edited. It has profoundly transformed the website-building experience as the modern WordPress block editor by providing a more intuitive, flexible, and user-friendly interface.
Whether it’s incorporating multimedia, creating customized layouts, or adding complex features, the block system of Gutenberg makes everything more accessible for both novice and advanced users. In addition, the block editor is intended to be extended with block plugins, allowing for virtually boundless additional customization and functionality options.
But some people still think it is tricky and complicated to work on. As a dedicated WordPress development agency, we have compiled this comprehensive guide to Gutenberg, including its overview, pros and cons, first-hand experience, and the best tips and tricks for using it effectively.
Gutenberg represents the future of editing in WordPress, bringing more flexibility, customization, and control to users. It demonstrates WordPress’s ongoing dedication to making web design more accessible to everyone, regardless of technical expertise. However, to unlock the editor’s full potential with bespoke blocks and advanced layouts, many businesses look for expert WordPress developers for hire. Get in Touch with our experts to know more about what Gutenberg is and how to add it to WordPress.
Frequently Asked Questions
Can I still use Classic Editor for my website?
Yes, you can use the Classic editor for your WordPress website by installing its plugin from the official library.
But the block or Gutenberg editor is much better than the classic editor in terms of usability and customization opportunities. That’s why the former is now the default editor for WordPress websites.
My older website was created on the classic editor, but now, I have the block editor on my dashboard. What should I do?
Even if you now have the block editor on your dashboard, you’ll be able to open and edit your older websites and pages quite easily. These pages will open in a block with the classic editor, so you can easily make the edits.
Alternatively, you can convert the pages or the whole website into blocks to be opened and edited through the Gutenberg editor. That will make the customizations much easier and also future-proof your website.
A few of the themes and plugins installed on my website are not working properly since I updated to the block editor. What now?
First off, if you remember, the Gutenberg or block editor was under development and testing for a long time. That gave the theme and plugin developers loads of time to bring in the updates so that the users were not affected.
But if you are still encountering issues, try and reach out to the development team of that particular extension and ask them for proper support. Otherwise, you can search for alternatives or go back to the classic editor.
Can the Gutenberg Editor affect the speed and performance of my website?
Although performance isn’t the strong suit of Gutenberg Editor, it shouldn’t significantly slow down your website. But if you have too many complex or custom blocks, there may be a drop in the speed and performance.
But still, you can easily optimize your website for speed and performance, regardless of whether you are using a block or classic editor.
Create with WordPress CMS
Build flexible and scalable websites using WordPress's powerful content management system.


