Quick Summary
Deploying Laravel applications on AWS Elastic Beanstalk streamlines cloud deployment by automating provisioning, scaling, and managing your app infrastructure. In this article, learn how to deploy Laravel AWS Elastic Beanstalk for production-ready web apps, handle permissions, scale with queue workers, and address common deployment issues.
Table of Contents
Having harnessed the robust features of AWS services with the best practices, it’s time to deploy your Laravel app on the cloud. Then for the best scalability, reliability, and cost-effectiveness for your web app, it would be better to go with AWS Elastic Beanstalk.
It simplifies the process by automating server provisioning and configuration. So you can focus on your Laravel application’s core functionality. But how do the experts go about this integration? And what issues do you need to be aware of? That’s what we will cover through this blog.
What is AWS Elastic Beanstalk?
AWS Elastic Beanstalk is a fully managed service that simplifies deploying, scaling, and managing web applications on AWS infrastructure. Developers can deploy their site, and it will automatically handle resource allocation, load balancing and monitoring.
Elastic Beanstalk takes your application code and automatically provisions services like EC2 (virtual servers) and S3 (storage). It can configure them to work together and keep everything running smoothly.
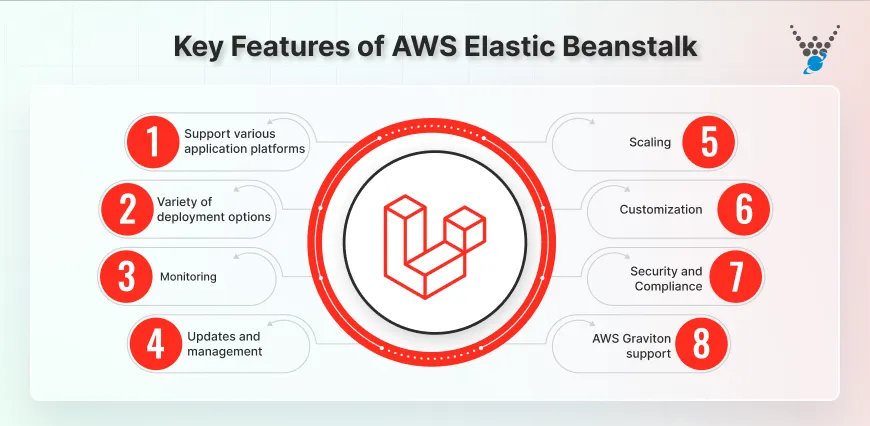
Key Features of AWS Elastic Beanstalk
AWS Elastic Beanstalk offers a wide range of features designed to simplify the deployment and management of applications. Here are some of its key features:

- Support various application platforms: Elastic Beanstalk supports a broad range of programming languages and frameworks. This allows developers to choose the web technology without worrying about compatibility issues with the deployment platform.
- Variety of deployment options: You can deploy apps to Elastic Beanstalk in several ways. You can upload your code directly, use a zip file, or use Laravel with Docker. This flexibility caters to different development workflows and preferences.
- Monitoring: Elastic Beanstalk provides built-in application health monitoring. It collects key metrics on resource utilization, performance, and error rates. This information helps you identify potential issues so that you can fix them. Additionally, it integrates with Amazon CloudWatch for deeper insights.
- Updates and management: You can deploy new versions of your application and easily roll back to previous versions, too. It also provides a centralized console for managing your deployed applications. That includes environment configuration, health monitoring, and logs.
- Scaling: It allows you to define rules for automatically scaling your application based on CPU utilization or request volume. This ensures your application has the resources it needs to handle high traffic spikes ensuring Laravel site performance.
- Customization: To deploy Laravel apps on AWS Elastic Beanstalk, which provides a managed service, it also offers some customization options. You can configure environment variables, specify security, and define configurations for your application.
- Security and Compliance: It can be helpful in adhering to various compliance requirements. It offers features like security group management and access control for securing your web application environment. Plus, the platform runs on AWS infrastructure, which is built with compliance considerations.
- AWS Graviton support: Elastic Beanstalk supports deploying applications on AWS Graviton instances. These instances are powered by custom Arm processors designed to offer improved price-performance than standard instances.
These features make AWS Elastic Beanstalk a robust and flexible platform for deploying and managing applications in the cloud.
How to Deploy Laravel Apps with AWS Elastic Beanstalk?
To deploy Laravel apps on AWS Elastic Beanstalk, you can follow the below stepwise guide. The process of deploying includes setting up an environment and configuring it to connect to an Amazon Relational Database Service (Amazon RDS) database instance.
Prerequisites
Before beginning the deployment process, make sure all required tools and configurations are properly set up in your Laravel application. To ensure a smooth launch, understand the essential steps involved to deploy Laravel app efficiently and maintain a stable production environment.
- AWS Account Setup: Create or use an existing AWS account to access Elastic Beanstalk.
- Install AWS CLI: Install the AWS Command Line Interface (CLI) on your local machine from the AWS CLI page.
- Install EB CLI: Install the Elastic Beanstalk Command Line Interface (EB CLI) by following the EB CLI page.
- Install Composer: Ensure Composer is installed globally on your machine. You can install Composer from getcomposer.org.
By installing these requirements, you will have all the necessary tools to proceed with deploying your Laravel application. So, let’s begin deploying Laravel apps to AWS Elastic Beanstalk.
Step 1: Set Up an Elastic Beanstalk Environment
Set up an Elastic Beanstalk environment where your Laravel application will run. You can do this by creating a dedicated space on AWS for your web app.
1. Initialize Elastic Beanstalk: Navigate to your Laravel project directory using a terminal and initialize Elastic Beanstalk by running:
eb init
Follow the prompts to select your AWS region and platform (PHP) and create a new Elastic Beanstalk application.
2. Create Environment: Create an environment with:
eb create environment-name
Replace environment-name with your desired environment name and follow the prompts to configure instance types, scaling options, etc.
In this step we have set up an Elastic Beanstalk environment ready to deploy your Laravel application.
Step 2: Install and Create a Website
Skip this step if you already have a Laravel and a Laravel application. If you don’t have them, then:
1. Install Laravel: Create a new Laravel project by running:
composer create-project --prefer-dist laravel/laravel myapp
Replace myapp with your preferred project name.
2. Create Website: Access your Laravel project directory and generate a basic website to verify functionality:
php artisan serve
Visit http://localhost:8000 in your browser to see the Laravel welcome page.
Here, we’ve Laravel installed and running locally on our machine.
Step 3: Deploy Your Application
Prepare and upload your Laravel application code to Elastic Beanstalk.
1. Create a Zip Archive: Use a tool like zip or tar to create a compressed archive (e.g., .zip file) of your Laravel application directory.
2. Navigate to Elastic Beanstalk Application: Go back to the Elastic Beanstalk application you created in the console.
3. Upload and Deploy: Click on the “Upload and Deploy” button.
4. Choose Zip Archive: Select the zip archive containing your Laravel application code that you created earlier.
5. Version Label: You can optionally provide a version label for this deployment. This helps track different versions of your application deployed on Elastic Beanstalk.
6. Click Deploy: Click the Deploy button to initiate the deployment process. Elastic Beanstalk will upload your code, configure the environment, and start your Laravel application.
By uploading the archive to Elastic Beanstalk, we initiated the deployment process. Elastic Beanstalk will handle setting up the environment and launching your application. Alternatively, you can explore Laravel Forge, another efficient deployment tool for managing Laravel server environments.
Step 4: Add a Database to Your Environment
Configure and connect a database to your Laravel application running on Elastic Beanstalk.
- Create RDS Instance: Create a MySQL or PostgreSQL RDS instance using AWS Management Console or EB CLI.
- Configure .env File: Update your Laravel application .env file with database connection details provided by RDS.
- Test Database Connection: Run Laravel migrations or access the database through Laravel to ensure connectivity and functionality.
Now, we’ve database services on our Laravel application connected to the deployment environment. This ensures your application can access and manage data effectively.
Deploying Laravel on AWS Elastic Beanstalk can be complex. If you want a seamless deployment process, consider partnering with a expert Laravel development company to handle the setup, optimization, and scaling for you.
Common Issues Laravel Deployment on AWS Elastic Beanstalk
Deploying Laravel applications to AWS Elastic Beanstalk can be a smooth process, but sometimes you may encounter issues. Here are some common problems you might face and how to fix them:
Environment Configuration Errors
Incorrect environment variables or settings cause application errors or misconfiguration.
Fix: Double-check and update environment variables in the Elastic Beanstalk console or via EB CLI. Ensure .env file settings match the deployed environment.
Correct environment variables ensure proper application functionality and configuration consistency.
Composer Dependencies Not Installed
Composer dependencies are missing or not updated on the Elastic Beanstalk instance.
Fix: SSH into the instance (eb ssh) and run composer install or composer update to install/update dependencies manually. Verify dependencies and ensure they match local development.
Ensures Laravel dependencies are installed to run web applications without missing packages or errors.
Permission Issues
File or directory permissions prevent Laravel from writing to storage or cache directories.
Fix: Set appropriate permissions for Laravel directories on the Elastic Beanstalk instance using chmod commands (e.g., chmod -R 755 storage). Adjust permissions based on security best practices.
It will resolve issues related to Laravel file storage operations, ensuring you can write logs, cache files, and session data.
Database Connection Errors
Laravel cannot connect to the database due to incorrect credentials or network configuration.
Fix: Verify database credentials in the .env file match those of the instance or database configuration in Elastic Beanstalk. Adjust security settings to allow incoming database connections.
This restores database connectivity, enabling database transactions in Laravel without errors.
Caching Issues
Application updates are not reflected immediately after deployment. Caching mechanisms in Laravel applications can cause this.
Fix: Clear the cache within your Laravel application using the command: php artisan cache:clear. You can also consider setting the cache configuration (e.g., cache driver). This might involve modifying your application’s configuration files.
Clearing the cache by adjusting cache configuration ensures application updates are reflected quickly after deployment. This prevents outdated cache data from causing unexpected behavior.
Let’s Conclude
AWS Elastic Beanstalk simplifies the process of managing your infrastructure so you can focus on the development process. By leveraging it, you can have custom server configurations for enhanced performance and security.
The process of setting up is simple. All you need to do is create an environment to manage development and deploy your application. The additional steps involve adding a database and managing and monitoring it.
AWS Elastic Beanstalk offers great scalability, but fine-tuning Laravel for speed and efficiency requires expertise. Hire Laravel developers who specialize in AWS deployments to optimize your app’s performance, reduce latency, and cut costs.
FAQs on Deploying Laravel Apps to AWS Elastic Beanstalk
Can I use Docker to deploy my Laravel application on Elastic Beanstalk?
Yes, Elastic Beanstalk supports Docker containers. Create a Dockerfile for your Laravel app, and define the environment in a Dockerrun.aws.json file. Then, deploy it using Elastic Beanstalk’s Docker platform.
Can I use a custom domain with my Laravel application on Elastic Beanstalk?
Yes, you can configure a custom domain by setting up a record in your DNS provider to point it to your Elastic Beanstalk environment’s URL. Use AWS Route 53 for seamless integration.
What is Laravel Vapor, and how is it different from AWS Elastic Beanstalk?
Laravel Vapor is a serverless deployment platform for Laravel powered by AWS Lambda. Unlike Elastic Beanstalk, which provisions full EC2 instances, Vapor manages your Laravel app on serverless infrastructure, offering automatic scaling, zero maintenance, and pay-as-you-go pricing.
Can I run multiple Laravel versions on one Beanstalk environment?
Technically possible, but not recommended. Each environment should run a single, stable Laravel version to prevent conflicts.
What is the cost of Elastic Beanstalk for a Laravel site?
The pricing depends on instance type, storage, bandwidth, and RDS (if used). AWS EB itself is free; you pay for underlying resources.
How to deploy Laravel with Vite on Beanstalk?
Bundle assets with Vite locally, then deploy compiled files as part of your zipped source code.
Deploy Laravel on AWS Elastic Beanstalk
Learn how to deploy your Laravel app on AWS Elastic Beanstalk in a simple and effective way.


