Quick Summary
Unlock the full potential of Laravel’s email system with this practical guide. Learn step-by-step how to set up mail drivers, craft Mailable classes, design Blade templates, and troubleshoot common errors. Explore top tools like Mailtrap, SendGrid, Mailgun, Mandrill, and Mailchimp, and discover expert tips for queues, deliverability, and monitoring. Perfect for beginners and pros aiming for reliable, efficient email workflows.
Table of Contents
Sending emails is a key part of almost every web application today. It can be a welcome message, a password reset, or a newsletter; emails keep users engaged and informed. If you’re building applications with Laravel, one of the most popular PHP frameworks, you’ll be glad to know that sending emails is pretty straightforward.
In this guide, we’ll discuss everything you need to know to send emails in Laravel. From basic setup to advanced techniques, you’ll learn how to craft messages, manage templates, and ensure your emails reach the inbox. So, let’s dive in!
Why Use Laravel to Send Emails?
Laravel makes sending emails efficient, organized, and scalable. Some of the reasons to use Laravel to send emails include:
- Multiple Mail Drivers: Laravel supports a wide range of drivers out of the box, including SMTP, Sendmail, Amazon SES, Mailgun, and SparkPost. This gives you the flexibility to choose the service that best fits your project.
- Clean and Expressive API: The framework offers a straightforward API for sending emails. You can focus on your message’s content and layout instead of struggling with complex email protocols.
- Mailable Classes for Structured Logic: Laravel’s Mailable classes let you define email-specific logic in a clear and maintainable way. This keeps your code organized and separates email behavior from other parts of your application.
- Queueing Support: With built-in queue integration, you can send emails in the background. This improves performance and ensures high-volume email sending won’t slow down your app.
- Testing Utilities: Laravel provides tools to test email functionality easily. You can check content, recipients, and delivery behavior without sending actual emails, making development safer and more reliable.
- Event and Localization Integration: Emails in Laravel work seamlessly with the event system, allowing you to trigger messages based on user actions, much like how Laravel Events and Listeners automate processes for better application flow. You can also localize emails to match the user’s preferred language, enhancing personalization.
- Content Focused: By removing the burden of managing protocols, server configurations, and driver setups, Laravel lets you concentrate on what really matters: creating clear, compelling, and functional emails.
In short, Laravel combines flexibility, clarity, and advanced tools, giving developers complete control over email workflows while keeping implementation efficient and straightforward.
Setting up the Prerequisites
Before you can send emails in Laravel, there are a few essential steps to get your project ready.
- First, ensure Laravel is installed on your system. If you haven’t done this yet, run the following command:
composer global require laravel/installer
- Once Laravel is ready, the next step is to configure your email settings. Laravel uses a file called config/mail.php for this. Here, you’ll choose your email driver. Laravel supports several options, such as SMTP, Mailgun, and Sendmail. Pick the one that fits your needs and update the settings accordingly. For SMTP, for example, you’ll need to provide the host, port, username, and password.
- Next, set the default “from” address. This ensures every email you send has a consistent sender identity. You can do this directly in the form array inside mail.php.
- Laravel also relies on environment variables for sensitive information. Open or create the .env file in the root of your project and add the necessary credentials for your chosen email driver. This keeps your configuration secure and easy to update.
- Finally, prepare the email content. Laravel uses view files located in resources/views for email templates, similar to how you design user communication templates when you create contact form using Laravel. You can create new views or modify existing ones to match your design. Then, generate a Mailable class using Artisan:
php artisan make:mail MyEmail
With these steps completed, your Laravel application is ready to send emails. You now have a configured driver, environment variables in place, and templates ready to go.
How to Troubleshoot Errors in Sending Email in Laravel?
Even with a solid setup, email issues can arise in Laravel. But most problems can be quickly identified and resolved with a systematic approach.
| Issue | Potential Causes | Optimized Solutions |
|---|---|---|
| Emails Not Being Delivered | Misconfigured mail drivers, spam filters, domain blacklisting, or poor sender reputation | Verify driver configuration, check DNS settings (SPF, DKIM, DMARC), monitor sender reputation, and test delivery using a small set of recipients. |
| Incorrect Email Configuration | Wrong SMTP credentials, missing parameters, incompatible drivers | Review and correct configuration settings in config/mail.php and .env. Ensure the chosen driver (SMTP, Sendmail, SES, etc.) matches your email provider’s requirements. |
| Authentication & Authorization Problems | Invalid credentials, firewall restrictions, improper encryption methods | Verify username/password or API keys, check firewall and port access, and ensure correct encryption (TLS/SSL). Test using php artisan tinker to confirm successful authentication. |
| Mailable Class or Email Content Issues | Syntax errors, incorrect Blade templates, MIME type problems, attachments not handled properly | Debug mailable classes using a code editor or Artisan. Validate Blade templates, attachments, and formatting. Ensure emails render consistently across clients. |
| Email Spam or Blacklisting | Emails flagged as spam, domain blacklisting, and low sender reputation | Improve deliverability with SPF, DKIM, and DMARC records. Monitor blocklists regularly. Use tools to check domain reputation and adjust content to avoid spam triggers. |
| Slow Email Delivery | Network latency, server overload, and inefficient queue management | Optimize queue configurations, use background processing, consider dedicated email delivery services, and monitor server performance to reduce delays. |
Best Tools to Send Mail in Laravel 10
Laravel supports multiple tools for sending emails, each with its own strengths. Choosing the right one depends on your project’s needs, whether it’s testing, transactional emails, or campaigns. Here’s a practical guide to the most reliable options and how to integrate them quickly.
Mailtrap: Ideal for Testing
Mailtrap is perfect for safe email testing. It captures emails before they reach real inboxes, letting you review them without spamming users.
Integration Steps:
- Sign up on Mailtrap.
- Add credentials to your .env file:
MAIL_MAILER=smtp
MAIL_HOST=smtp.mailtrap.io
MAIL_PORT=2525
MAIL_USERNAME=your_username
MAIL_PASSWORD=your_password
MAIL_FROM_ADDRESS=from@example.com
MAIL_FROM_NAME=Example
- Create a Mailable class:
php artisan make:mail TestMail
- Define your email content in resources/views/mails/test.blade.php.
- Send a test email via a route or controller:
Route::get('/send-mail', function () {
    Mail::to('user@example.com')->send(new TestMail());
    return 'Mail sent!';
});
💡Pro Tip: Use Mailtrap’s inbox to preview emails on different clients to catch formatting issues early.
SendGrid: Reliable for Production
SendGrid is a popular choice for sending transactional emails at scale. It offers high deliverability and easy integration.
Integration Steps:
- Sign up on SendGrid and get your API key.
- Update .env:
MAIL_MAILER=smtp
MAIL_HOST=smtp.sendgrid.net
MAIL_PORT=587
MAIL_USERNAME=sendgrid_username
MAIL_PASSWORD=sendgrid_password
MAIL_ENCRYPTION=tls
MAIL_FROM_ADDRESS=from@example.com
MAIL_FROM_NAME="Your Name"
- Create a Mailable class and a Blade view for the email.
- Send emails through routes or controllers as usual.
💡Pro Tip: Combine SendGrid with Laravel queues to send emails in the background, improving performance for high-volume applications.
Mailgun: Best for Automated and High-Volume Emails
Mailgun is designed for sending large volumes of emails and offers detailed analytics, making it an excellent companion for a Laravel Notification System that handles real-time alerts and updates.
Integration Steps:
- Create a Mailgun account.
- Add credentials to config/services.php:
'mailgun' => [
    'domain' => env('MAILGUN_DOMAIN'),
    'secret' => env('MAILGUN_SECRET'),

],
- Update .env with your Mailgun keys and domain.
- Send emails using Mail::raw or a Mailable class.
💡Pro Tip: Track email opens and clicks using Mailgun analytics to optimize your campaigns.
Mandrill: For Transactional Emails
Mandrill works well for transactional emails, especially if you already use Mailchimp.
Integration Steps:
- Install Guzzle if not already installed:
composer require guzzlehttp/guzzle
- Add Mandrill API key to config/services.php:
'mandrill' => [
    'secret' => env('MANDRILL_KEY'),
],
- Send emails with Mail::send using a Blade template.
💡Pro Tip: Combine Mandrill with Laravel’s queued jobs for smooth background sending.
Mailchimp: Ideal for Email Campaigns and Newsletters
Mailchimp is perfect for newsletters and audience engagement.
Integration Steps:
- Sign up on Mailchimp and create a List.
- Add your API key to .env:
MAILCHIMP_API_KEY=your_api_key
- Install the Laravel package:
composer require skovmand/mailchimp-laravel
- Configure config/mailchimp.php and set up routes and controllers to subscribe users or send campaigns.
- Create Blade views for campaign templates.
💡Pro Tip: Use Mailchimp’s segmentation features to send personalized campaigns based on user behavior.
By following this guide, you can pick the right tool for your needs, avoid common pitfalls, and create an efficient, scalable email system in Laravel.
This section comes next:
Checking the Laravel Mail Logs
Sometimes emails don’t reach their destination. When that happens, Laravel’s mail logs can help you pinpoint the issue quickly.
All email activity is recorded in:
storage/logs/laravel.log
Here you can track sent emails, review errors, and spot configuration or delivery problems. This makes troubleshooting faster and more precise.
How to Use Mail Logs Effectively?
- Identify Failed Emails: Look for exceptions or error messages related to SMTP, authentication, or delivery failures.
- Check Timestamps: Compare the log time with your email sending attempts to correlate issues.
- Review Headers and Recipients: Logs often include sender, recipient, and subject. This helps verify if emails were correctly addressed.
- Debug Blade Templates: If email content isn’t rendering properly, logs can show template errors or missing variables.
Combine Laravel logs with a real-time monitoring tool like Laravel Telescope or a simple log watcher — a technique similar to Laravel delete record using Ajax, where updates occur dynamically without reloading the page. This gives instant visibility of email activity, so you can catch issues the moment they occur.
By actively monitoring your mail logs, you can fix problems before users notice, ensure higher deliverability, and maintain a professional, reliable email system in your application.
How to Send Email in Laravel?
Empowering user interaction through email communication is a key plus of any Laravel application. This section dives into the step-by-step process of sending emails, ensuring your messages reach intended recipients. However, leveraging Laravel’s functionalities to their full potential can be a complex task.
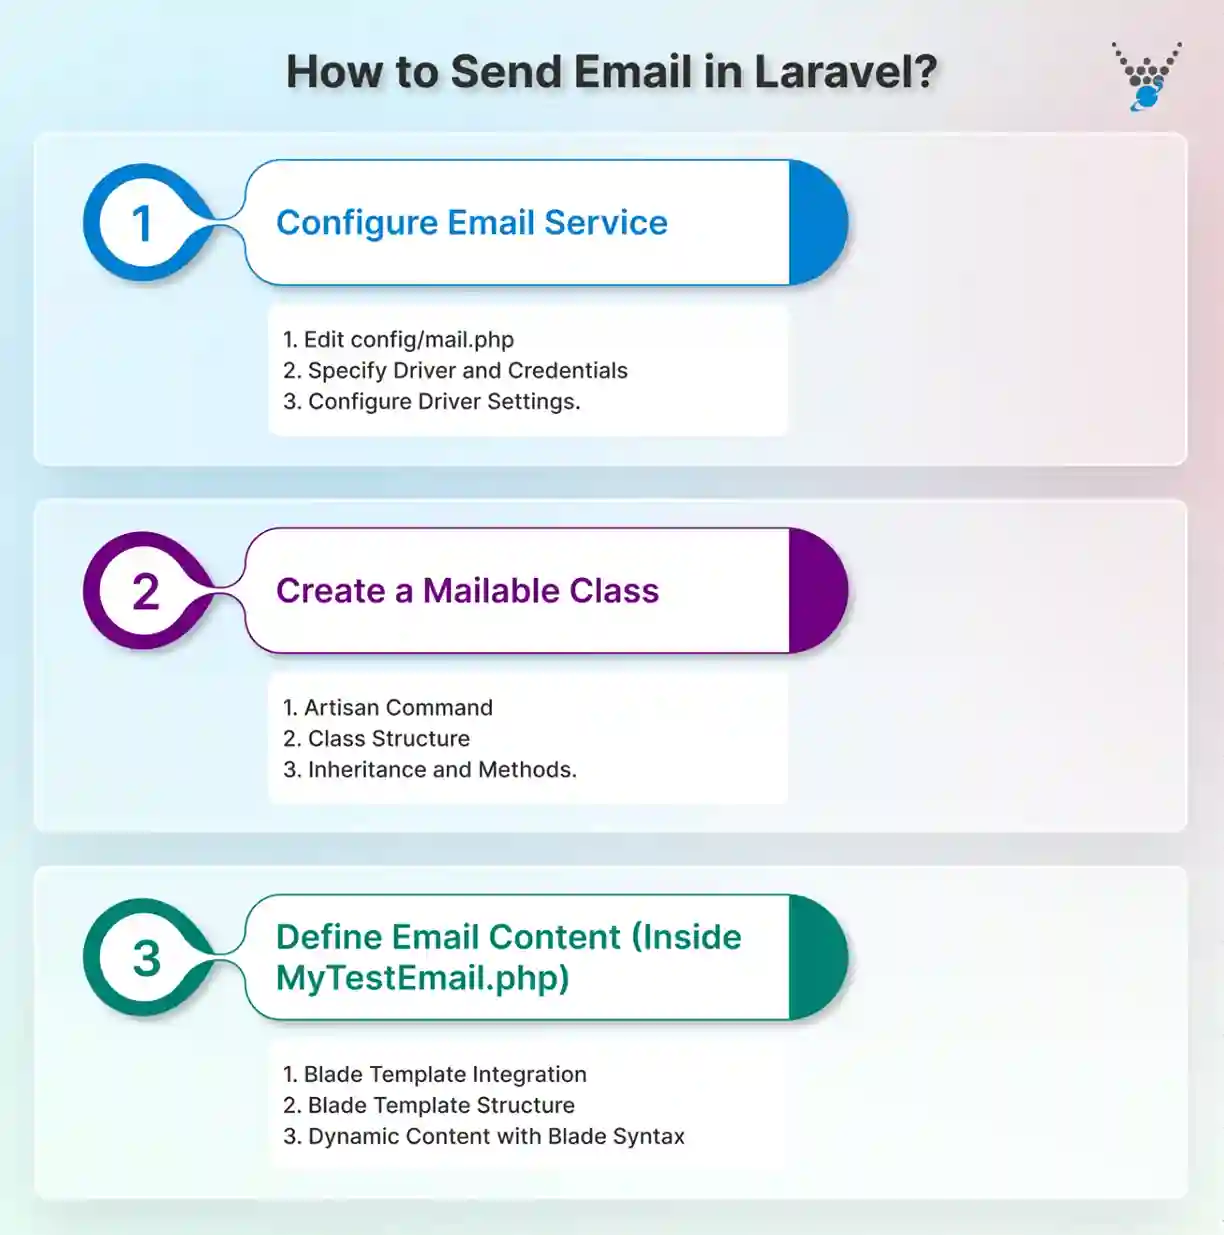
Step 1: Configure Email Service
Before preparing your emails, it’s vital to configure your preferred email delivery method within Laravel. This step ensures your emails reach their intended recipients. Here’s a breakdown of the configuration process:
1. Edit config/mail.php. This file holds the core configuration for your Laravel email functionality. Open it in your preferred text editor.
2. Specify Driver and Credentials. Locate the driver option within the file. Here, you’ll specify the email delivery method you intend to use. Common choices include SMTP for a dedicated email server or Mailgun for a cloud-based service. You can also use sendmail for a local mail server setup (depending on your hosting environment).
3. Configure Driver Settings. Following the chosen driver, locate its corresponding settings within the configuration file. For instance, using the smtp driver necessitates providing basic details. This includes SMTP server address, port, username, password, and encryption protocol. Refer to your email service provider’s documentation for accurate credentials and configuration specifics.
Example Configuration (Using smtp Driver):
'driver' => env('MAIL_DRIVER', 'smtp'),
'host' => env('MAIL_HOST'),
'port' => env('MAIL_PORT'),
'encryption' => env('MAIL_ENCRYPTION', 'tls'),
'username' => env('MAIL_USERNAME'),
'password' => env('MAIL_PASSWORD'),
Replace placeholders like env(‘MAIL_HOST’) with your actual email service provider credentials stored securely within your project’s .env environment file.
With a configured email service, you’ve laid the base for sending emails from your Laravel application. The following steps will guide you through creating mailable classes, defining email content, and initiating the sending process itself.
Step 2: Create a Mailable Class
Laravel’s mailable classes are the backbone of its email functionality. They encapsulate the logic for building your email structure, including subject lines, content, and attachments. Here’s how to create a mailable class:
1. Artisan Command. Use Laravel’s Artisan CLI tool to generate a new mailable class. In your terminal, navigate to your Laravel project’s root directory and execute the following command. Remember to replace MyTestEmail with your desired class name:
php artisan make:mail MyTestEmail
2. Class Structure. This command generates a new class file (e.g., app/Mail/MyTestEmail.php) containing the core structure of your mailable class. Laravel’s mailable classes extend the base Mailable class. It also offers various methods for defining email content and attachments.
3. Inheritance and Methods. The generated class inherits traits like Queueable and SerializesModels. You can use additional methods provided by the Mailable class. There are multiple tasks you get covered by it, such as defining email content and specifying the sender’s email address.
Example MyTestEmail.php Structure:
<?php
namespace App\Mail;
use Illuminate\Bus\Queueable;
use Illuminate\Mail\Mailable;
use Illuminate\Queue\SerializesModels;
class MyTestEmail extends Mailable
{
    use Queueable, SerializesModels;
    // ... methods to define email content and attachments ...
    public function build()
    {
        return $this->view('emails.myTestEmail')
                    ->subject('This is a Test Email');
    }
}
Using a mailable class, you can create a reusable template for your email content. This promotes code maintainability and simplifies future email development within your Laravel application.
Step 3: Define Email Content (Inside MyTestEmail.php)
Having established your mailable class, it’s time to craft the actual content of your email. Laravel leverages Blade templating to provide a powerful and flexible approach to defining email structure and content.
1. Blade Template Integration. Within the build method of your mailable class (e.g., MyTestEmail.php), use the view method to specify the Blade template that holds your email’s HTML content. The argument passed to the view method should correspond to the relative path of your Blade template file.
2. Blade Template Structure. Laravel stores Blade templates for emails within the resources/views/emails directory. The build method in your mailable class references this template file (e.g., view(‘emails.myTestEmail‘)) to integrate its content.
3. Dynamic Content with Blade Syntax. Blade templates offer a familiar syntax similar to HTML but with additional directives for injecting dynamic content. You can leverage Blade directives like @if, @foreach, and {{ variable }} to personalize email content based on data passed to your mailable class.
public function build()
{
    return $this->view('emails.myTestEmail')
                ->subject('This is a Test Email');
}
The corresponding Blade template file (emails/myTestEmail.blade.php) will be created alongside your mailable class. This will be covered in the next step.
Defining email content within Blade templates enables you to achieve a clear separation between presentation and logic. This makes your code more maintainable and easier to modify.
Step 4: Create the Blade Template (emails/myTestEmail.blade.php)
Following the definition of your mailable class, crafting the visual structure and content of your email comes into play. Here’s where Blade templates shine:
1. Template File Generation. When you generate a mailable class using the Artisan command (e.g., php artisan make:mail MyTestEmail), a corresponding Blade template file is automatically created with a mailable class. This file resides in the resources/views/emails directory (e.g., resources/views/emails/myTestEmail.blade.php).
2. Basic HTML Structure. The Blade template file serves as the foundation for your email’s HTML content. You can use standard HTML tags to define the overall layout, including headers, body content, and footers.
3. Dynamic Content with Blade Directives. While the template uses HTML syntax, Blade empowers you to inject dynamic content using directives. Laravel provides directives like @if for conditional statements, @foreach for loops, and {{ variable }} for inserting data passed to your mailable class.
Example Blade Template Structure (emails/myTestEmail.blade.php):
<!DOCTYPE html>
<html lang="en">
<head>
    <meta charset="UTF-8">
    <meta name="viewport" content="width=device-width, initial-scale=1.0">
    <title>Test Email</title>
</head>
<body>
    <h1>This is a Test Email</h1>
    <p>This is the body content of the email.</p>
    </body>
</html>
This is a basic example, and you can customize the Blade template to achieve your desired email layout. Also, you can insert content using Blade directives based on the data passed to your mailable class.
With Blade templates, you establish a reusable way to define your email’s visual presentation. This ensures consistency and maintainability across your application’s emails.
Step 5: Send the Email
With your mailable class and Blade template in place, it’s time to orchestrate the actual sending of the email. Laravel’s Mail provides a convenient way to trigger the email delivery process.
1. Laravel Mail Facade. Laravel provides the Mail facade, a convenient way to interact with email functionalities. Use the Mail::to method to specify the recipient(s) of your email. This can be a single email address or an array containing multiple recipients.
2. Specify Mailable Class. Following the recipient definition, use the send method on the Mail facade. Within the send method, pass an instance of your mailable class (e.g., MyTestEmail::class). This instructs Laravel to leverage the defined logic within your mailable class to build and send the email.
3. Optional Parameters. The send method offers additional parameters for customization. You may choose to include a closure to adjust the message object before sending or add extra data to be utilized in your Blade template.
Mail::to('recipient@example.com')->send(new MyTestEmail());
Considering the use of the Mail facade and mailable class, you can send emails within your Laravel application or extend this functionality through external systems when you create and test an API in Laravel. Remember to replace ‘recipient@example.com’ with the actual email address you intend to send the message to. This concludes the core steps involved in sending emails through Laravel.
So, want to get the best of this procedure for your web application? Then partner up with a Laravel development company.
How to Troubleshoot Errors in Sending Email in Laravel?
Encountering issues while sending emails within your Laravel application can be frustrating. Fortunately, by checking common pitfalls, you can often pinpoint the culprit and get your emails flowing again. Here’s a breakdown of potential error categories:
1. Configuration Errors
- Alert. Incorrect email service configuration within the config/mail.php file is a frequent source of errors. Double-check that you’ve specified the correct driver and provided accurate credentials.
- Solution. Ensure you’ve consulted your email service provider’s documentation for precise configuration details. Verify that the credentials match the associated with your email account or API key. Additionally, check your Laravel application’s error logs for any specific configuration-related messages.
2. Mailable Class Errors
- Alert. Issues within your mailable class (e.g., MyTestEmail.php) can also lead to sending failures. Ensure there are no syntax errors or typos within the class definition and methods.
- Solution. Use your code editor’s debugging tools or php artisan tinker to step through and inspect the generated email content. Verify that Blade template references are correct and any data manipulation is functioning as intended.
3. Sending Errors
- Alert. Errors during the actual sending process can occur due to various reasons. These might include temporary network issues or exceeding email-sending quotas. The error can also be on the receipts side due to invalid domains or full mailboxes.
- Solution. Implement error handling mechanisms within your Laravel application to capture sending exceptions. These exceptions can provide clues about the nature of the error. Additionally, consider retrying logic or notifying administrators of potential delivery issues.
The knowledge of framework and email best practices can ensure smooth email delivery. Thus, it results in a positive user experience within your application.
Final Summary
This guide has equipped you with the knowledge and steps to establish robust email functionalities within your Laravel application. From configuring your email service and designing reusable mailable classes to defining email content with Blade templates and initiating the sending process, you now possess the skills to leverage Laravel’s email capabilities effectively.
Remember, troubleshooting and implementing best practices are crucial aspects of a successful email workflow. By following the provided tips for handling common errors and exploring advanced techniques like bulk email sending and email tracking, you can ensure your emails reach their intended recipients and deliver a positive user experience.
Need help building scalable email workflows? Let our hire Laravel developer service streamline your email-sending process, enhance deliverability, and implement reliable tracking systems.
FAQs About Sending Emails in Laravel
What are the best practices for email validation in Laravel?
Laravel offers built-in validation rules for email addresses. Use the email rule within your validation rules to ensure proper email format. You can also use third-party libraries for more advanced email validation, such as verifying MX records to confirm a valid domain.
How do I send bulk emails efficiently in Laravel?
For sending large volumes of emails, consider leveraging Laravel’s queue system. This allows you to queue email-sending jobs and process them asynchronously in the background. It improves performance and prevents timeouts.
Can I track email delivery and open rates in Laravel?
While Laravel itself doesn’t provide built-in email tracking functionalities, various third-party services like Mailgun or SparkPost integrate with Laravel to track email delivery and user engagement metrics.
How do I create an email template in Laravel?
Create a Blade view file in resources/views/emails/. For example, resources/views/emails/welcome.blade.php. Then, design your email content using HTML and Blade syntax. You can pass dynamic data from your Mailable class using the with() method.