Table of Contents
Ajax makes deleting records in Laravel much more seamless by eliminating the need for page reloads. It offers users a smooth, real-time experience when deleting records in Laravel. Instead of waiting for the entire page to refresh, a simple click triggers the deletion instantly. That enhances the efficiency and responsiveness of Laravel websites.
In this blog, we’ll walk you through basic learning of basics and how you can set up Ajax with Laravel. We’ll also dive into how to implement Ajax and why it’s ideal for deleting records in Laravel. So, with that said, let’s begin!
What is Ajax and Why Use it for Deleting Records in Laravel?
Ajax stands for Asynchronous JavaScript and XML. It’s a technique that allows websites to communicate with a server without reloading the entire page. This means that parts of a webpage can be updated dynamically, providing a more interactive and responsive user experience.
Using Ajax for deleting records in Laravel offers several benefits like improved performance and responsiveness. Similarly, Laravel Events and Listeners allow you to handle background tasks efficiently, ensuring smooth communication between different parts of your application.
- Improved User Experience: No page reloads, immediate feedback.
- Enhanced Performance: Reduced server load and faster response times.
- Better Interactivity: Dynamic updates, conditional actions.
The benefits of using Ajax to delete records in Laravel include enhancing user experience, reducing server load, and providing real-time feedback.
Prerequisites
Before you begin using Ajax to delete records in Laravel, ensure that you have the following:
- PHP: Version 7.3 or higher is recommended.
- Composer: Dependency manager for PHP.
- Laravel: A basic understanding of the Laravel framework and how it operates.
- Node.js and npm: These are for handling frontend assets (if you’re using tools like Laravel Mix).
Once you have fulfilled the above requirements, you can begin to delete records using Ajax in Laravel. This process of sending and receiving data asynchronously works similarly when you create contact form using Laravel to handle real-time user submissions without reloading the page. But if you don’t have the setup ready, jump over to the next section to do it.
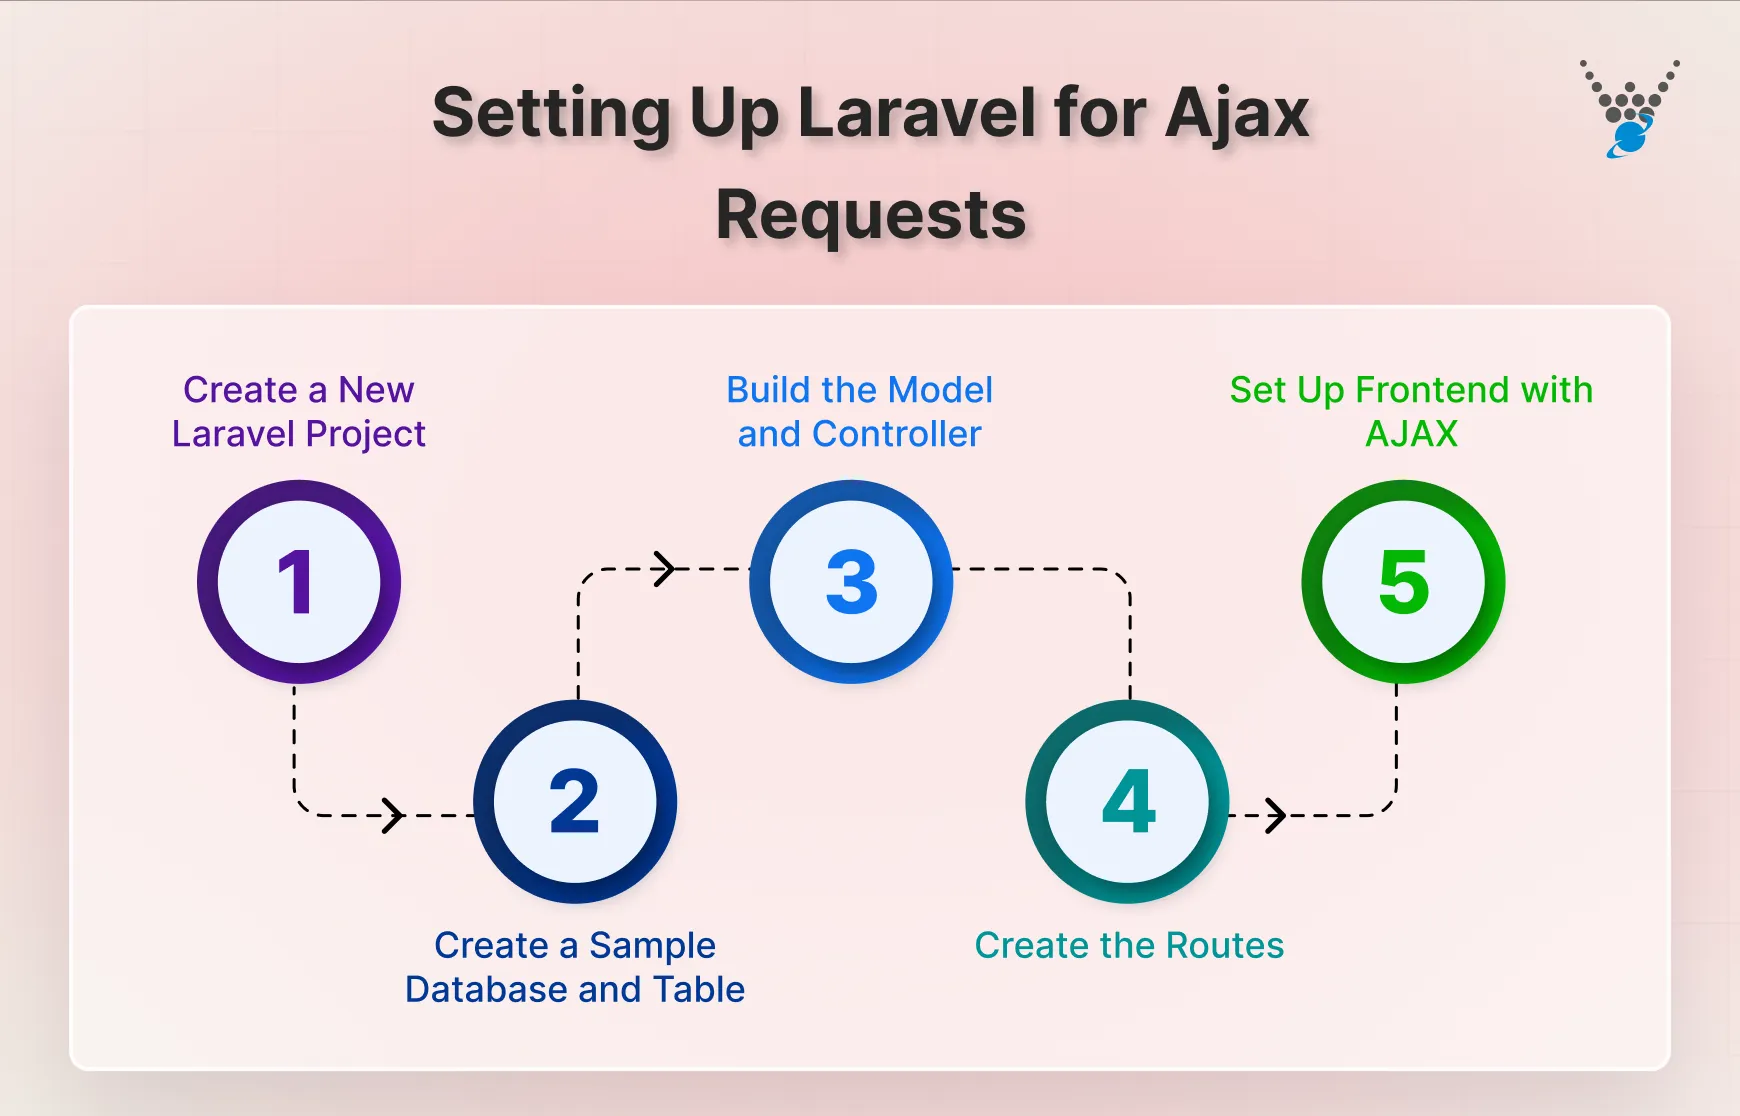
Setting Up Laravel for Ajax Requests
Setting up Laravel for AJAX requests involves several steps, including configuring your environment and creating a sample database and table. Here’s a stepwise process to get you started:

Step 1: Create a New Laravel Project
If you don’t have a Laravel project use the following Composer command to create a new Laravel project:
composer create-project --prefer-dist laravel/laravel ajax-delete-example
This will create a new directory named ajax-delete-example with a new Laravel installation. Now navigate to your project directory using the cd command:
cd ajax-delete-example
To set up your environment copy the example environment file:
cp .env.example .env
Now generate the application key using the command:
php artisan key:generate
Open the .env file and update the database configuration settings:
DB_CONNECTION=mysql
DB_HOST=127.0.0.1
DB_PORT=3306
DB_DATABASE=your_database_name
DB_USERNAME=your_username
DB_PASSWORD=your_password
This command sets the APP_KEY in your .env file, which is crucial for various encrypted functionalities.
Step 2: Create a Sample Database and Table
Create a new database in your preferred database management system (e.g., MySQL, PostgreSQL). After that, run the following Artisan command to create a migration file:
php artisan make:migration create_items_table --create=items
This command will generate a migration file in the database/migrations directory. Now, open the generated migration file and define the columns you need. Here’s an example:
public function up()
{
    Schema::create('items', function (Blueprint $table) {
        $table->id();
        $table->string('name');
        $table->timestamps();
    });
}
To create the table, run the following Laravel migration command:
php artisan migrate
Step 3: Build the Model and Controller
To create a model for the items table run the following command:
php artisan make:model Item
Now create a controller to handle AJAX requests. Here is the code you can use:
php artisan make:controller ItemController
After that, open the ItemController.php file and define methods for listing items and deleting an item:
public function index()
{
    $items = Item::all();
    return response()->json($items);
}
public function destroy($id)
{
    $item = Item::findOrFail($id);
    $item->delete();
    return response()->json(['success' => 'Item deleted successfully.']);
}
Step 4: Create the Routes
To define the route open the routes/web.php file and run the following command:
Route::get('/items', [ItemController::class, 'index']);
Route::delete('/items/{id}', [ItemController::class, 'destroy']);
Step 5: Set Up Frontend with AJAX
Add jQuery to your Laravel Blade view or layout file. You can include it via CDN:
<script src="https://ajax.googleapis.com/ajax/libs/jquery/3.5.1/jquery.min.js"></script>
In your Blade templates, set up a simple HTML structure to display the items and provide a delete button:
<div id="item-list">
    <!-- Item list will be populated here -->
</div>
<script>
    $(document).ready(function() {
        // Fetch and display items
        $.get('/items', function(items) {
            items.forEach(function(item) {
                $('#item-list').append(`
                    <div>
                        ${item.name}
                        <button class="delete" data-id="${item.id}">Delete</button>
                    </div>
                `);
            });
        });
        // Handle delete button click
        $(document).on('click', '.delete', function() {
            const id = $(this).data('id');
            $.ajax({
                url: `/items/${id}`,
                type: 'DELETE',
                success: function(response) {
                    alert(response.success);
                    location.reload(); // Reload to update the item list
                }
            });
        });
    });
</script>
With these steps, we’ve set up a basic Laravel site capable of handling AJAX requests to delete records. You can also extend this setup to trigger user alerts or confirmations by integrating a Laravel Notification System for better engagement. You can now add further functionalities, such as confirmation prompts or displaying success messages in a user-friendly manner. Now let’s jump to how to use Ajax for deleting records in the next section.
Laravel Delete Record Using Ajax Request
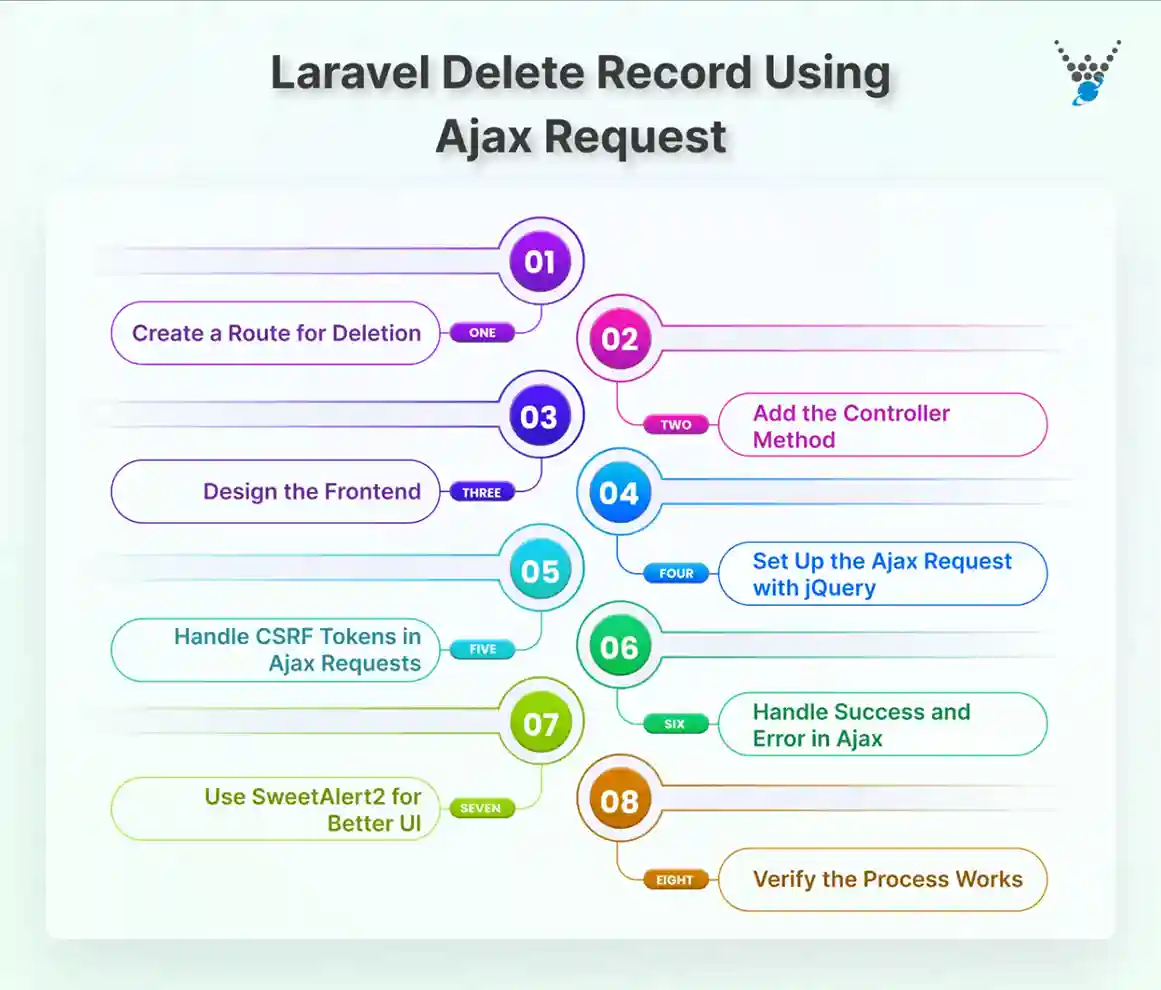
Now that you’ve set up Laravel to handle Ajax requests, it’s time to implement the Ajax functionality for deleting records from the frontend. Here is a stepwise process of creating the frontend and integrating it with Laravel’s backend using Ajax to delete records.

Step1: Create a Route for Deletion
Define a route in web.php for the delete request. Here is an example:
Route::delete('/category/{id}', [CategoryController::class, 'destroy'])->name('category.destroy');
Explanation: This route listens for DELETE requests and calls the destroy method in CategoryController.
Note: Use {id} as a parameter to specify which record to delete.
Step 2: Add the Controller Method
In CategoryController, add the destroy method to handle the deletion. Here is how you can add the controller method:
public function destroy($id) {
    $category = Category::find($id);
    if ($category) {
        $category->delete();
        return response()->json(['success' => 'Record deleted successfully!']);
    }
    return response()->json(['error' => 'Record not found!'], 404);
}
Explanation:
- find($id): Retrieves the record using its ID.
- delete(): Removes the record from the database.
Step 3: Design the Frontend (Blade Template)
Add a delete button in your Blade view (index.blade.php):
<table id="categoryTable">
    @foreach ($categories as $category)
        <tr>
            <td>{{ $category->name }}</td>
            <td>
                <button class="delete-btn" data-id="{{ $category->id }}">Delete</button>
           </td>
        </tr>
    @endforeach
</table>
You can add jQuery and SweetAlert2 for confirmation pop-ups.
Explanation: Each button has a data-id attribute containing the record’s ID. This allows Ajax to identify which record to delete.
Step 4: Set Up the Ajax Request with jQuery
Handle the click event and send an Ajax request to the server. Here is the code:
$(document).on('click', '.delete-btn', function () {
    let id = $(this).data('id');  // Get the record ID
    swal({
        title: "Are you sure?",
        text: "This record will be deleted!",
        icon: "warning",
        buttons: true,
        dangerMode: true,
    }).then((willDelete) => {
        if (willDelete) {
            $.ajax({
               url: `/category/${id}`,  // Target the delete route
                type: 'DELETE',
                data: { "_token": "{{ csrf_token() }}" },  // CSRF token for security
                success: function (response) {
                   swal("Deleted!", response.success, "success");
                    $('#categoryTable').DataTable().ajax.reload();  // Refresh the table
                },
                error: function (error) {
                    swal("Error!", error.responseJSON.error, "error");
                }
            });
        }
    });
});
Explanation:
- CSRF Token: Prevents cross-site request forgery.
- SweetAlert2 Confirmation: Prompts the user to confirm deletion.
- Ajax Call: Sends a DELETE request to the server with the record’s ID.
- Table Reload: Refreshes the data table to reflect the change without page reload.
Step 5: Handle CSRF Tokens in Ajax Requests
Since Laravel requires CSRF tokens for form submissions, include it in the Ajax request header. Add this to your Blade template inside <head> or the script section:
$.ajaxSetup({
    headers: {
        'X-CSRF-TOKEN': $('meta[name="csrf-token"]').attr('content')
    }
});
After that, make sure to define the token in your HTML:
<meta name="csrf-token" content="{{ csrf_token() }}">
This injects the token into your HTML, making it accessible to scripts.
Step 6: Handle Success and Error in Ajax
On successful deletion, show a confirmation message and either reload the page or remove the deleted record from the view. You can handle errors by displaying an appropriate message. Here is an example code:
success: function (response) {
    alert(response.success);
    location.reload();  // Alternatively, remove the record from the DOM
},
error: function (xhr) {
    alert('Error: ' + xhr.responseJSON.message);  // Display error message
}
Explanation:
- The success function handles the success response from the server, such as showing a success alert and reloading the page or removing the deleted record. In scenarios where deletion needs to trigger a confirmation message, you could use sending emails in Laravel to notify users automatically.
- The error function captures any server-side error (e.g., record not found or unauthorized action) and displays an appropriate message.
Step 7: Use SweetAlert2 for Better UI (Optional)
You can replace the confirm() method with SweetAlert2 for a better user experience. Here is the code:
Swal.fire({
    title: 'Are you sure?',
    text: "You won't be able to revert this!",
    icon: 'warning',
    showCancelButton: true,
    confirmButtonColor: '#3085d6',
    cancelButtonColor: '#d33',
    confirmButtonText: 'Yes, delete it!'
}).then((result) => {
    if (result.isConfirmed) {
        // Call the Ajax request here
    }
});
Step 8: Verify the Process Works
Test the complete workflow by:
- Test the complete workflow by clicking the delete button and confirming the SweetAlert2 pop-up. You can further enhance the setup to communicate with external systems or mobile apps when you create and test an API in Laravel.
- Observing whether the targeted record is deleted or not.
- Ensuring the data table refreshes correctly.
If you get an error like 419 which can often happen when the CSRF token is missing, therefore double-check the token setup. Additionally ensure that the route and controller method exist and match the Ajax request you are making. To build a site using effective tools and best practices connect with professional Laravel development company.
Wrapping Up
Implementing Ajax to delete records in Laravel significantly enhances user experience by providing smooth, real-time interactions. Understanding what Ajax is and learning how to set it up with Laravel is the first step if you are not familiar with Ajax.
Once you have the basic setup of Ajax, you can begin with its implementation to delete records. Professional Laravel developers for hire can help you navigate the various steps of the process, such as adding routes, setting up controllers, and creating the front-end design required to use Ajax in Laravel efficiently.
If you are looking to build a website with robust functionality and dynamic design, contact us.
FAQs About Laravel Delete Using Ajax Requests
Does Ajax have a delete method?
No, Ajax itself doesn’t have a specific “delete” method. However, you can make a DELETE request using jQuery’s $.ajax() method by specifying the type or method as DELETE.
How to delete data using Ajax in Laravel?
In Laravel, to delete data using Ajax, you create a button or link that triggers an Ajax request to a specific route with the DELETE method. The backend processes the request and deletes the corresponding record.
How to get data from Ajax requests in Laravel?
To get data from an Ajax request in Laravel, you use the $request object. For example, you can access sent data using $request->input(‘key’) or $request->all() to retrieve all request data.
Build Powerful Laravel Applications
Learn how to leverage Laravel's powerful features for efficient and scalable web development.


