Quick Summary
APIs return status codes to show if a request worked, but numbers alone aren’t enough. This guide teaches how to handle API responses in Laravel with clear, human-readable messages. You’ll learn to manage errors, missing data, and successful requests, making your API easy to understand, reliable, and simple to debug. Clear responses help developers and users know exactly what’s happening with every request.
Table of Contents
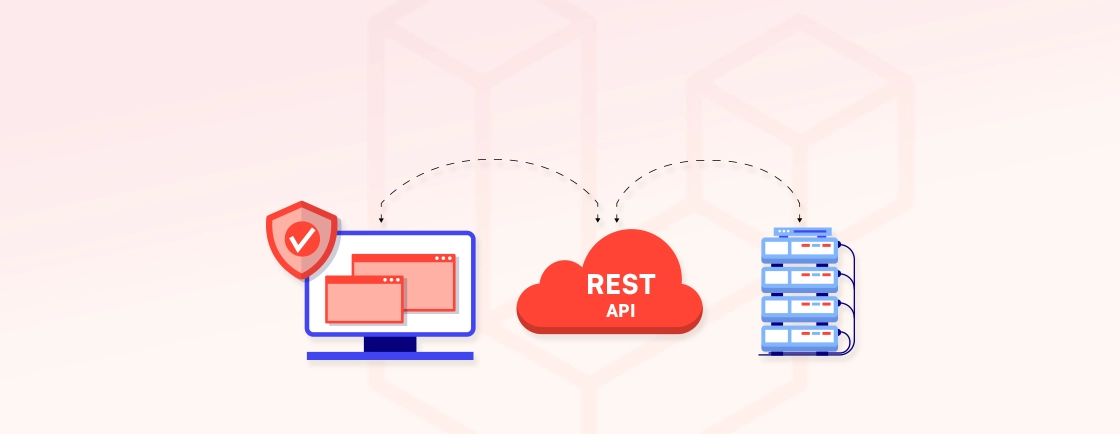
APIs are the backbone of modern web applications. Yet, many developers struggle with building them efficiently and testing them reliably. They get stuck trying to connect your application to other services or worry that your API might break under real-world use.
But Laravel makes it straightforward to create robust APIs and ensures they perform as expected. With the right approach, you can design endpoints that are secure, fast, and easy to maintain.
In this blog, we’ll guide you step by step through creating an API in Laravel, setting up routes, controllers, and models, and testing your endpoints to guarantee they work flawlessly. So, let’s dive in!
Why Use Laravel for API Development?
Laravel is known for its elegant syntax, developer-friendly features, and robust ecosystem. From building interactive features like create contact form using Laravel to managing complex applications, it offers everything from MVC architecture to the queue system. They make Laravel API development faster and more effective. Its features also help you write cleaner and more maintainable code to automate repetitive tasks.
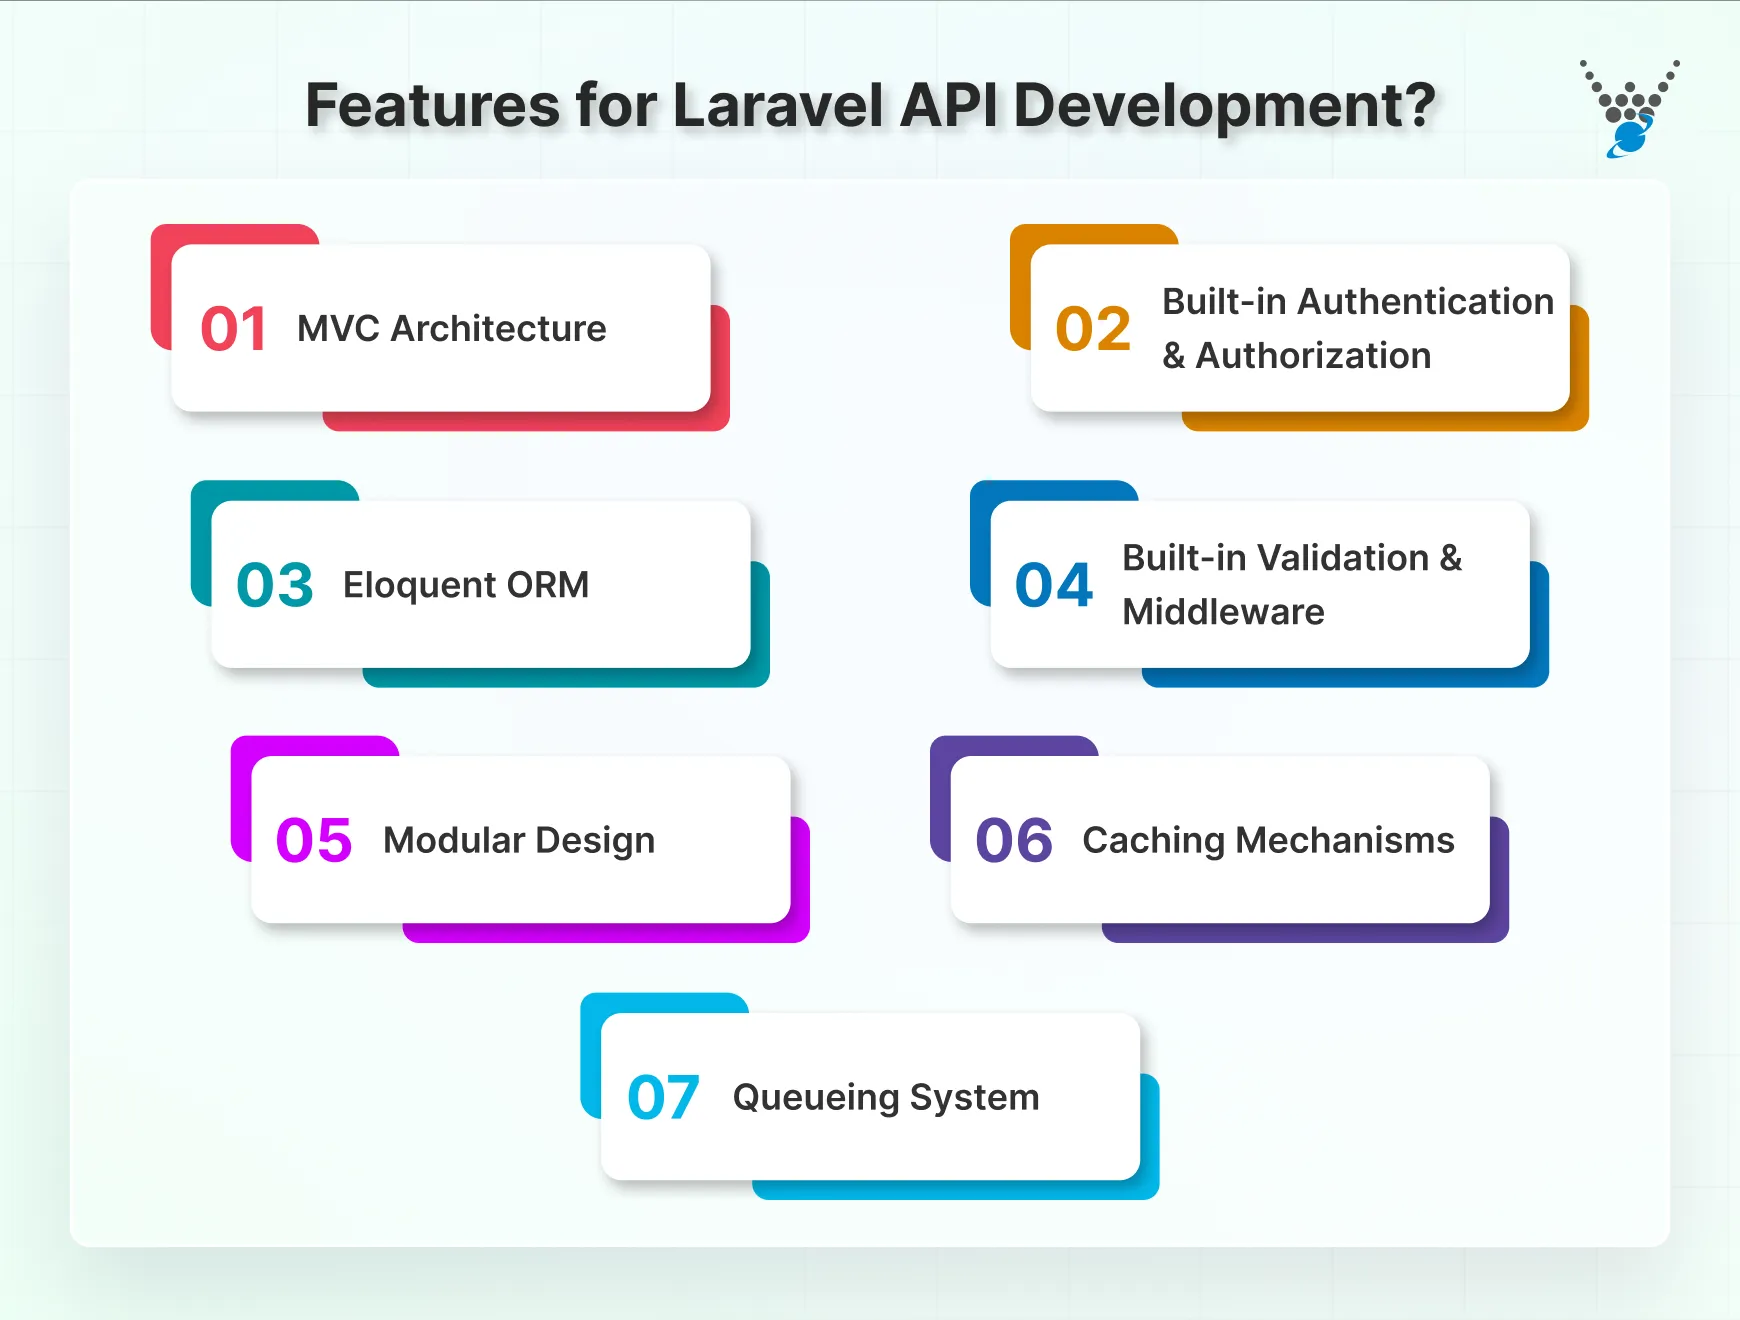
- MVC Architecture: Laravel uses MVC architecture to maintain clear code. This increases code organization and reusability for building and maintaining APIs efficiently.
- Built-in Authentication & Authorization: It offers robust built-in functionalities of Laravel authentication and authorization (with Laravel Policies and Gates) to secure your API. Implementing these features from scratch saves you time.
- Eloquent ORM: The Object-Relational Mapper (ORM), also known as the Laravel Eloquent technique, simplifies interacting with databases. It can handle complex database queries easily, allowing you to focus on API logic.
- Built-in Validation & Middleware: It has built-in Laravel middleware and data validation for authentication checks before the request reaches your API. This ensures data integrity and enforces security measures.
- Modular Design: Laravel’s modular design makes it easy to scale your API as your needs grow. You can add new features and functionalities without affecting existing code.
- Caching Mechanisms: Laravel caching mechanisms help to improve API performance by storing frequently accessed data. This reduces database load and improves response times.
- Queueing System: Laravel queue system efficiently handles asynchronous tasks. It works closely with Laravel Events and Listeners, especially when APIs trigger background actions or send notifications.
How to Create an API in Laravel?
Creating an API in Laravel is a straightforward process with the right tool and proper guidance. Here we have provided you with a complete guide, in a way you can create a API yourself. Let’s begin with the prerequisite.
Prerequisite
Before diving into creating an API in Laravel, you’ll need a few things in place:
- PHP Development Environment: You’ll need PHP installed on your machine and a web server like Apache or Nginx. Additionally, have Composer installed to manage essential Laravel dependencies.
- Basic Laravel Knowledge: Understanding Laravel’s core concepts, such as MVC architecture, routing, and controllers, will be helpful.
Step 1: Install Laravel
Once the prerequisite is completed, the first step is to create a new Laravel project. For that, you can run the following command in your terminal:
composer create-project --prefer-dist laravel/laravel api-example
This command will create a new Laravel project named api-example.
Step 2: Set Up Database and Models
Configure your database settings in the .env file. Create a model in Laravel and a migration for your API. Run the following command to perform Laravel migration for creating a Posts table:
php artisan make:model Post -m
Now, define the schema for your Posts table in the migration file created in the database/migrations directory. For example:
public function up()
{
    Schema::create('posts', function (Blueprint $table) {
        $table->id();
        $table->string('title');
        $table->text('body');
        $table->timestamps();
    });
}
Next, run the migration to create the Posts table in your database by following the command:
php artisan migrate
It will set up your database configuration and create a Post model with a migration file to define the Post table schema.
Step 3: Create API Routes
To create API routes, open the routes/api.php file and define your API routes. For example:
use App\Http\Controllers\PostController;
Route::get('/posts', [PostController::class, 'index']);
Route::post('/posts/{id}', [PostController::class, 'show']);
Route::get('/posts', [PostController::class, 'store']);
Route::put('/posts/{id}', [PostController::class, 'update']);
Route::delete('/posts/{id}', [PostController::class, 'destroy']);
With this step, we have created routes for various CRUD operations on the post model.
Step 4: Create Controllers and Methods
To create a controller for your API, you can run the following command:
php artisan make:controller PostController
Once the controller is created, we apply the methods for your API endpoints in the PostController. For example:
public function index()
{
    return Post::all();
}
public function store(Request $request)
{
    return Post::create($request->all());
}
public function show($id)
{
    return Post::findOrFail($id);
}
public function update(Request $request, $id)
{
    $post = Post::findOrFail($id);
    $post->update($request->all());
    return $post;
}
public function destroy($id)
{
    $post = Post::findOrFail($id);
    $post->delete();
   return response()->json(['message' => 'Post deleted successfully']);
}
With this, we have created controller methods to handle Laravel CRUD operations for the Post model.
Step 5: Add Authentication to API
To add authentication for your API, you require Laravel Passport. You can even extend this functionality for transactional communication, such as sending emails in Laravel, ensuring secure and verified user interactions.
composer require laravel/passport
php artisan migrate
php artisan passport:install
After you have installed Laravel Passport, add the HasApiTokens trait to your User model and update your AuthServiceProvider to use Passport routes. Then, you need to protect your API routes by adding the auth:api middleware to them. Now, your API will have authentication applied.
With the above process, you can successfully create an API with authentication. However, if your requirements are more complex, you can consult with our Laravel development company. We will help create an API that fits your website needs.
Now, let’s find out how to test the API you created.
How to Test an API in Laravel?
Testing an API in Laravel is crucial to ensure that your endpoints function correctly. Here’s a detailed guide on how to test an API in Laravel, including writing unit tests and using tools like Postman.
Method 1: Using Postman for Manual Testing
Step 1: Install Postman
Download Postman and install it on your device. It is a powerful tool for manually testing APIs.
Step 2: Create a Collection
Create a new collection in Postman to organize your API requests. This will organize requests into collections, helping you manage and test API efficiently.
Step 3: Create Requests
To test your API at various endpoints, you need to send various GET, POST, PUT, and DELETE requests as follows:
- GET Request to Fetch All Posts
URL: http://your-laravel-app.test/api/posts
- GET Request to Fetch a Single Post
URL: http://your-laravel-app.test/api/posts/{id}
- POST Request to Create a Post
URL: http://your-laravel-app.test/api/posts
Body (raw JSON):
{
  "title": "New Post",
  "body": "This is the body of the new post."
}
- PUT Request to Update a Post
URL: http://your-laravel-app.test/api/posts/{id}
Body (raw JSON):
{
  "title": "Updated Post Title",
  "body": "Updated post body content."
}
- DELETE Request to Delete a Post
URL: http://your-laravel-app.test/api/posts/{id}
These steps involved creating and organizing various HTTP requests to test different API endpoints in Postman. Now, send each request and verify the responses. Ensure the status codes and response data are as expected.
With this, you can manually test your API endpoints and validate their functionality. If you lack expertise in testing, you can contact professional QA testing services to ensure functionality and security.
Method 2: Using PHPUnit for Automated Testing
You can also use the PHPUnit, one of the best PHP testing frameworks for running automated tests.
Step 1: Set Up Testing Environment
Ensure your .env file has a separate database configuration for testing. Typically, you might have a .env.testing file for this purpose.
DB_CONNECTION=mysql
DB_HOST=127.0.0.1
DB_PORT=3306
DB_DATABASE=testing_database
DB_USERNAME=root
DB_PASSWORD=root
By setting up a separate database for testing, you can conduct tests without interfering with your development data.
Step 2: Create a Test Case
Use Artisan to generate a test case, and to do so, run the following command:
php artisan make:test PostApiTest
Running this command will create a new test case file named PostApiTest.
Step 3: Write Tests
Open the newly created test file located in tests/Feature/PostApiTest.php. Write test methods to test various API endpoints. For example:
<?php
namespace Tests\Feature;
use Illuminate\Foundation\Testing\RefreshDatabase;
use Tests\TestCase;
use App\Models\Post;
class PostApiTest extends TestCase
{
    use RefreshDatabase;
    /** @test */
    public function it_can_fetch_all_posts()
    {
        Post::factory()->count(5)->create();
        $response = $this->getJson('/api/posts');
        $response->assertStatus(200)
                 ->assertJsonCount(5);
    }
    /** @test */
    public function it_can_fetch_a_single_post()
    {
        $post = Post::factory()->create();
        $response = $this->getJson("/api/posts/{$post->id}");
        $response->assertStatus(200)
                 ->assertJson([
                     'id' => $post->id,
                     'title' => $post->title,
                     'body' => $post->body,
                 ]);
    }
    /** @test */
    public function it_can_create_a_post()
    {
        $postData = [
            'title' => 'New Post',
            'body' => 'This is the body of the new post.',
        ];
        $response = $this->postJson('/api/posts', $postData);
        $response->assertStatus(201)
                 ->assertJson($postData);
        $this->assertDatabaseHas('posts', $postData);
    }
    /** @test */
    public function it_can_update_a_post()
    {
        $post = Post::factory()->create();
        $updatedData = [
            'title' => 'Updated Post Title',
            'body' => 'Updated post body content.',
        ];
        $response = $this->putJson("/api/posts/{$post->id}", $updatedData);
        $response->assertStatus(200)
                 ->assertJson($updatedData);
        $this->assertDatabaseHas('posts', $updatedData);
    }
    /** @test */
    public function it_can_delete_a_post()
    {
        $post = Post::factory()->create();
        $response = $this->deleteJson("/api/posts/{$post->id}");
        $response->assertStatus(204);
        $this->assertDatabaseMissing('posts', ['id' => $post->id]);
    }
}
Using the above code, you can test your API operations like fetching, creating, updating, and deleting posts — similar to how data management is handled with Laravel delete record using Ajax request.
Step 4: Run Tests
Once the operations are tested, execute your tests using PHPUnit by following the command:
php artisan test
It will execute all the test cases written in Step 3 and display the results.
These methods can automate the testing process, saving time so you can focus more on creating APIs. However, you may need more expertise to test your API.
If you followed any of the above methods, you could have successfully tested your Laravel API. Here, using Postman allows you to manually test the API while using PHPUnit automates the testing process.
How to Handle API Errors?
When your app talks to a server, the server always replies with a status code. This code tells you whether your request worked or not. For example, 200 means success, while 404 means the server couldn’t find what you asked for.
But a number alone isn’t enough, humans need clear messages too. That’s why APIs usually send a short message along with the code. In Laravel, you can handle this using if statements, try-catch blocks, or custom responses.
Here’s an example showing how to respond if a resource isn’t found:
if (!$product) {
    return response([
        'message' => ['Sorry, this product does not exist.']
    ], 404);
}
return response([
    'message' => 'Product found successfully!',
    'data' => $product
], 200);
What’s happening here:
- If the product is missing, the API sends a 404 code with a simple message.
- If the product is found, it sends a 200 code with a success message and the product details.
Using clear messages with status codes makes your API easy to understand and easy to debug.
Best Practices for Laravel API Development
Creating an API is not enough; you also need to follow best practices to ensure efficiency and security. Here are some best practices to follow when developing a Laravel API.
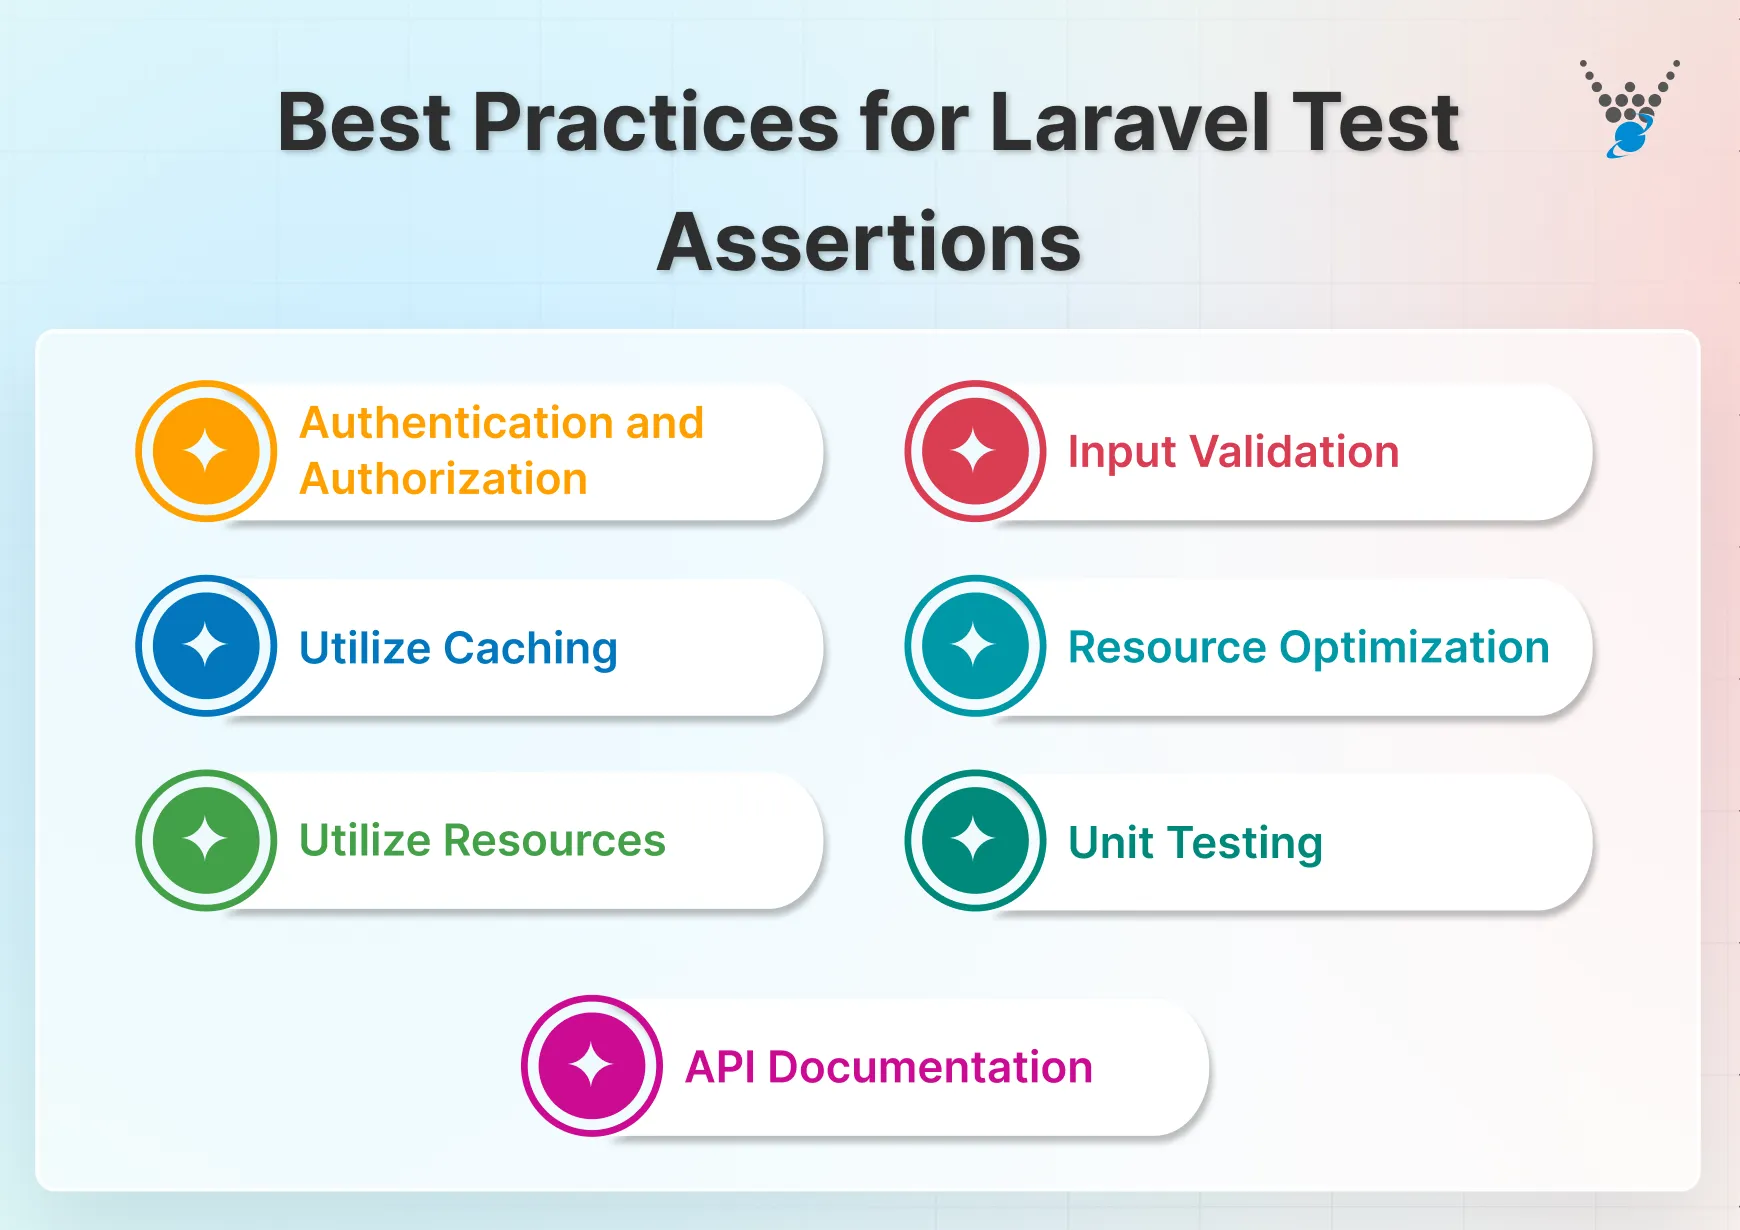
- Authentication and Authorization: Implement robust authentication mechanisms to control user access. Also, authorization rules should be used to restrict specific actions based on user roles or permissions.
- Input Validation: Always validate incoming data using Laravel’s built-in validation features or custom rules. This helps prevent malicious attacks like SQL injection or cross-site scripting (XSS).
- Utilize Caching: Use Laravel’s caching mechanisms to save the frequently accessed data in the cache. This reduces database load and improves response times for your API.
- Resource Optimization: Optimize your API responses by including only relevant data and using efficient data formats like JSON.
- Utilize Resources: Use Laravel’s API resources for model serialization. It will provide a consistent and maintainable way to structure your API responses.
- Unit Testing: Write complete unit tests for your controllers, models, and other core functionalities. This will ensure code quality and find any issues in operations during development.
- API Documentation: Document your API with clear instructions, examples, and error codes. Use tools like Swagger to generate interactive API documentation that developers can easily integrate.
Conclusion
A well-designed API is the backbone of seamless data exchange between applications, fostering a more interconnected web ecosystem. With Laravel, you can build secure, scalable, and efficient APIs that can grow alongside your project.
While testing your API is equally simple with tools like PHPUnit and Postman, the aim is to ensure your endpoints work as expected.
For a basic API, you can rely on the above process, but if you need a complex API, you might consider hire expert Laravel developers.
FAQs About How to Create and Test an API in Laravel
What is the purpose of testing an API in Laravel?
The purpose of testing an API in Laravel is to ensure that it works as expected and provides accurate responses to requests. Testing also helps to identify and fix any potential errors or bugs before deploying the API to a live environment.
Can I use Laravel API to integrate with other applications?
Yes, you can integrate Laravel API with other applications. Laravel provides a robust and flexible API structure for integrating with various third-party applications and services.
How can I secure my Laravel API endpoints?
Use HTTPS to encrypt data in transit, implement authentication and authorization, and use middleware. If you want more security, you can also add security layers like rate limiting and IP whitelisting.